
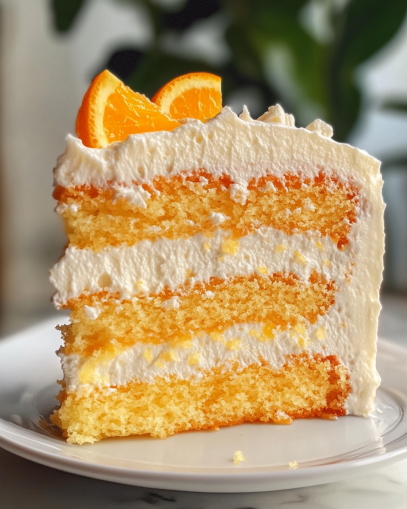
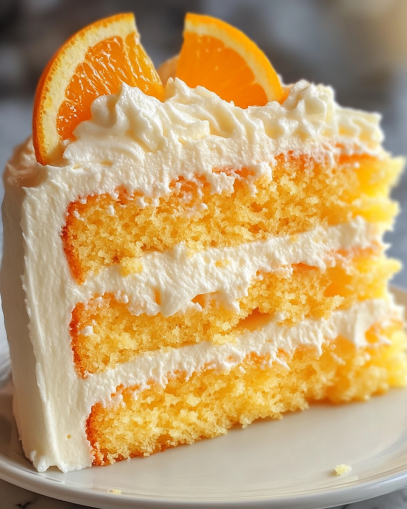
Introduction to Orange Creamsicle Cake
Orange Creamsicle Cake—just the name itself sounds like a refreshing summer treat, doesn’t it? Imagine sinking your fork into a moist, fluffy cake that bursts with the sweet, tangy flavor of oranges, topped with a smooth, creamy frosting that perfectly balances the citrus notes. It’s the kind of cake that instantly transports you to warm, sunny days with every bite.
Whether you’re looking for a new cake to wow your guests or craving a nostalgic dessert that takes you back to those orange creamsicle popsicles, this cake checks all the boxes. The combination of fresh orange juice, zest, and the creamy frosting is an irresistible blend that’s perfect for any occasion, from birthdays to casual get-togethers.
In this article, we’ll walk you through everything you need to know to create the perfect Orange Creamsicle Cake. From selecting the right ingredients to mastering the art of frosting, we’ve got it all covered. So, let’s get started with this zesty, delicious cake that’ll make your taste buds dance!
1. Key Ingredients for Orange Creamsicle Cake
A Orange Creamsicle Cake is all about combining the fresh, tangy goodness of oranges with a light, fluffy cake base. To make this cake truly stand out, it’s essential to use quality ingredients that bring out the best in flavor and texture. Let’s dive into the key components:
Dry Ingredients
To build the structure of your cake, you’ll need the basics:
- All-purpose flour – This is the foundation of your cake. It gives the cake its light and fluffy texture.
- Baking powder – This will help the cake rise to perfection, giving you that airy, melt-in-your-mouth consistency.
- Salt – Just a pinch to balance the sweetness and enhance the flavor.
Wet Ingredients
Now, let’s add those mouthwatering, flavorful liquids:
- Butter – The unsalted variety works best here. Butter brings moisture to the cake and helps it stay soft for days.
- Eggs – These bind everything together and add richness to the cake.
- Milk – Regular whole milk gives your cake a moist, tender crumb.
- Orange juice – Freshly squeezed is ideal for the most authentic, tangy orange flavor.
- Orange zest – The zest from the orange adds a lovely burst of citrus that takes the flavor up a notch.
- Vanilla extract – A dash of vanilla rounds out the flavors, enhancing the sweetness of the cake.
Flavor Add-ins
Want to take the flavor even further? Consider these optional ingredients:
- Orange extract – If you love that deep orange flavor, a few drops of extract can bring out the citrusy notes even more.
- Citrus zest – Feel free to experiment with lemon or lime zest for added zing!
2. Step-by-Step Recipe for Orange Creamsicle Cake
Now that we’ve gathered our ingredients, let’s roll up our sleeves and start baking! This section will guide you through each step to make your Orange Creamsicle Cake from scratch. Trust us, the results are worth every minute of preparation.
2.1 Preparing the Cake Batter
First, preheat your oven to 350°F (175°C). You’ll need to grease and flour two 8-inch round cake pans. This will prevent the cake from sticking and help you achieve that perfect, smooth release after baking.
- Cream the Butter and Sugar
Start by creaming 1 cup unsalted butter and 1 ½ cups granulated sugar together. Beat them until the mixture is light and fluffy. This is where your cake begins to take shape, so don’t rush it. The air you incorporate here will give your cake that light, airy texture we all love. - Add the Eggs
Beat in 4 large eggs, one at a time. Make sure to fully incorporate each egg before adding the next. This helps the eggs blend smoothly into the batter, creating a silky texture. - Mix in the Vanilla
Add 1 teaspoon of vanilla extract and mix it in. It’s the subtle, sweet note that balances the citrus flavor in the cake. The vanilla also enhances the overall flavor profile, so don’t skip it! - Combine the Dry Ingredients
In a separate bowl, whisk together 2 ½ cups of all-purpose flour, 2 ½ teaspoons of baking powder, and ½ teaspoon of salt. Gradually add this flour mixture to the wet ingredients, alternating with 1 cup of whole milk. Start and end with the dry ingredients, mixing until just combined. Don’t overmix, as this can result in a dense cake.
2.2 Making the Orange Creamsicle Flavor
Here’s where the magic happens! The essence of Orange Creamsicle Cake lies in the addition of orange juice and zest.
- Add the Fresh Orange Juice
Stir in ½ cup freshly squeezed orange juice to the batter. The juice will not only add flavor but also contribute to the cake’s moisture. Freshly squeezed is best here for that authentic, tangy taste. - Add the Zest
Grate the peel from 1 large orange to yield about 1 tablespoon of orange zest. Add this zest to the batter for an extra burst of citrusy goodness. The zest enhances the flavor, giving the cake a fresh, bright undertone.
2.3 Baking the Cake
Now it’s time to bake your cake! Pour the prepared batter evenly into the two greased cake pans. Place them in the preheated oven on the middle rack.
- Baking Time
Bake for 25-30 minutes, or until a toothpick inserted in the center comes out clean or with just a few moist crumbs. The tops should be golden and spring back when lightly pressed. - Cool the Cakes
Let the cakes cool in the pans for 10 minutes before transferring them to wire racks to cool completely. This step is crucial as it prevents the cake from falling apart when you frost it.
Pro Tip:
If you’re in a rush or want to make the cake ahead of time, you can freeze the layers. Once the cakes are completely cooled, wrap them in plastic wrap and store them in the freezer. When ready to assemble, simply thaw them and proceed with frosting.
At this point, you’ve got your delicious, fluffy cake layers ready to go! But the Orange Creamsicle Cake wouldn’t be complete without that signature, creamy frosting. Let’s move on to the next step: making the perfect orange cream cheese frosting.
3. How to Make the Orange Cream Cheese Frosting
Now that you’ve baked your beautiful Orange Creamsicle Cake, it’s time to take it to the next level with the perfect frosting. The creamy, tangy, and slightly sweet frosting is what makes this cake truly a creamsicle experience. Here’s how to create a frosting that complements the citrusy cake with that perfect balance of smoothness and flavor.
3.1 Creaming the Butter and Cream Cheese
Start by softening your 1/2 cup unsalted butter and 8 oz cream cheese. Let them sit at room temperature for about 30 minutes to ensure they mix easily. Once softened, beat them together using an electric mixer on medium speed until the mixture is smooth and creamy. This will form the base of your frosting, giving it that rich texture.
3.2 Adding Powdered Sugar and Orange Juice
Next, slowly add 4 cups powdered sugar, one cup at a time. Be sure to mix thoroughly after each addition to avoid any lumps. Once the sugar is incorporated, add 1/4 cup of fresh orange juice. The juice helps balance out the sweetness and intensifies the orange flavor. Beat everything together until the frosting is smooth, with a slightly fluffy texture.
3.3 Adjusting the Frosting’s Consistency
At this point, you can adjust the consistency of your frosting depending on how you want it. If the frosting is too thick, add a little heavy cream (a tablespoon at a time) until you reach the desired spreadable consistency. On the other hand, if the frosting is too runny, simply add more powdered sugar to thicken it.
3.4 Adding Zest and Vanilla
For the finishing touch, add 1 tablespoon of orange zest to the frosting. This will boost the orange flavor and create a lovely aroma. Then, mix in 1 teaspoon of vanilla extract. The vanilla balances out the citrus and adds depth to the flavor.
Now, your frosting should be perfectly smooth, tangy, and ready to spread! You’ll find it’s the ideal consistency to spread evenly between your cake layers and cover the entire cake with a creamy, glossy finish.
Pro Tip:
For extra texture, consider piping some frosting on top for decorative swirls, or add some orange zest as a garnish. This will give the cake an extra pop of color and an even more vibrant flavor!
With the frosting ready, it’s time to move on to assembling your cake! Stay tuned for Part 4, where we’ll show you how to layer and decorate your Orange Creamsicle Cake like a pro.
4. Assembling and Decorating the Orange Creamsicle Cake
The fun part is finally here—putting together your masterpiece! Assembling and decorating your Orange Creamsicle Cake allows you to get creative while ensuring each layer is beautifully frosted and easy to serve. Let’s dive into how to make your cake as stunning as it is delicious.
4.1 Layering the Cake
Once your cake layers are completely cooled, it’s time to get them stacked! Carefully place the first cake layer on your serving platter or cake stand. If you’re working with a slightly uneven top, don’t worry—just level it with a serrated knife. This ensures a more stable base for your cake layers.
Next, take your Orange Cream Cheese Frosting and spread a generous layer over the first cake. Be sure to cover it evenly, reaching all the edges. You want each slice to have an equal amount of frosting in every bite.
Place the second cake layer on top, pressing gently to set it in place. Now, apply a crumb coat. A crumb coat is a thin layer of frosting that seals in any crumbs, creating a smooth surface for the final frosting layer. Don’t worry if it’s not perfect—it’s just a base coat. Chill the cake in the fridge for about 20-30 minutes to let the crumb coat set.
4.2 Applying the Final Coat of Frosting
Once the crumb coat has set, it’s time for the final, generous layer of frosting! Spread the remaining Orange Cream Cheese Frosting evenly over the entire cake, smoothing out the sides and top with a spatula. If you want a clean, professional look, you can use a bench scraper to smooth out the sides.
4.3 Decorative Options
Here’s where you can have some fun with the presentation:
- Garnish with Orange Slices or Zest: Adding thinly sliced fresh orange segments or extra orange zest gives your cake a pop of color and enhances the citrus aroma.
- Piping for Elegance: Use a piping bag to add swirls of frosting around the top and bottom edges. You could even create rosettes for a more decorative, elegant finish.
- Candied Orange Peel: For a fancy touch, consider making some candied orange peel and placing it on top. It adds a delightful texture and sweetness that complements the tangy frosting.
4.4 Chill Before Serving
Before serving, chill the cake in the refrigerator for about 30 minutes to help the frosting set and firm up. This step not only makes the frosting easier to slice through but also enhances the flavor as the cake and frosting meld together.
Pro Tip:
If you’re serving this cake for a special occasion, consider adding a few edible flowers like marigolds or pansies for an extra touch of elegance!
Now that your cake is assembled and looking gorgeous, it’s time to dig in! But before we get to the final tips and serving suggestions, let’s wrap up with some important tips on how to make your Orange Creamsicle Cake even better in the next section.
5. Tips for Perfect Orange Creamsicle Cake
If you want to ensure your Orange Creamsicle Cake turns out perfectly every time, there are a few tricks and tips you can follow. These simple tips will help you avoid common mistakes and elevate your cake to the next level. Let’s get into it!
5.1 Use Fresh Orange Juice and Zest
The flavor of this cake hinges on the orange component, so using fresh orange juice and freshly grated orange zest is essential. Bottled orange juice tends to be overly sweet and lacks the vibrant citrusy flavor that fresh oranges provide. Likewise, fresh zest brings a sharp, fragrant burst of flavor that dried zest or extracts can’t match. Trust us—fresh is always best!
5.2 Balance the Sweetness and Tanginess
One of the challenges with making an Orange Creamsicle Cake is achieving the perfect balance between the sweet cake and the tangy frosting. The cake itself can be sweet, but the cream cheese frosting brings a rich, tangy counterbalance that complements the citrus flavors. If you find the frosting too tangy, add a little more powdered sugar to sweeten it. On the other hand, if the cake feels too sweet, try reducing the sugar slightly in the cake batter.
5.3 Keep the Cake Moist
Nobody wants a dry cake, right? To keep your Orange Creamsicle Cake moist, try incorporating buttermilk or sour cream into the batter. These ingredients add moisture without affecting the flavor. If you’re looking for an extra dose of moisture, consider wrapping the cake layers in plastic wrap right after they cool and allowing them to sit for a few hours before frosting. This will keep the cake soft and fluffy.
5.4 Don’t Overmix the Batter
Overmixing the cake batter can result in a dense, tough cake. When you add the flour to the wet ingredients, mix until just combined. The flour should be incorporated, but it’s okay if there are a few lumps. This will help the cake stay light and airy.
Pro Tip:
If you’re making this cake in advance, you can store the frosted cake in the fridge overnight. The flavors will meld together beautifully, and the cake will be even more flavorful the next day!
With these expert tips, you’ll be well on your way to baking the best Orange Creamsicle Cake every time. But, even the best bakers make mistakes now and then! In the next section, we’ll go over the common mistakes you should avoid to ensure flawless results.
6. Common Mistakes to Avoid When Making Orange Creamsicle Cake
Even the most experienced bakers can run into a few hiccups when making a new recipe, and the Orange Creamsicle Cake is no exception! But don’t worry—by understanding some of the most common mistakes and knowing how to avoid them, you’ll ensure that your cake turns out perfectly every time. Let’s take a look at these top cake-baking blunders.
6.1 Not Using Fresh Ingredients
One of the most frequent mistakes people make is opting for bottled orange juice and pre-packaged zest. While they may seem like convenient shortcuts, they just don’t compare to the fresh, natural flavors that fresh oranges offer. Bottled juice lacks the tartness and complexity you’ll get from fresh oranges, and pre-grated zest can have a muted flavor that doesn’t pack the same punch.
Tip to Avoid This Mistake: Always use freshly squeezed orange juice and grate the zest yourself. You’ll notice the difference in both taste and fragrance!
6.2 Overmixing the Batter
It’s easy to get carried away when mixing cake batter, but overmixing can lead to a dense, heavy cake. Overworking the flour develops gluten, which makes the cake tough instead of light and fluffy. This is especially problematic for a cake like the Orange Creamsicle Cake, which relies on a soft texture to balance the tangy cream cheese frosting.
Tip to Avoid This Mistake: Mix your batter just until the ingredients are combined. Stop as soon as there are no streaks of flour remaining to keep the cake tender.
6.3 Skipping the Crumb Coat
It can be tempting to slather the frosting directly on the cake, but skipping the crumb coat can leave your frosting uneven and full of crumbs. The crumb coat acts as a protective layer that seals in any loose crumbs, giving you a smooth, clean surface for the final frosting layer.
Tip to Avoid This Mistake: Take the time to apply a thin crumb coat first. Chill the cake before applying the final layer of frosting for a flawless, smooth finish.
6.4 Overbaking the Cake
It’s easy to get distracted while baking, but leaving your cake in the oven for too long will result in a dry, crumbly texture. The Orange Creamsicle Cake needs just the right amount of time to bake to stay moist and tender.
Tip to Avoid This Mistake: Keep an eye on your cake and check it at the minimum recommended time. If a toothpick comes out clean or with a few crumbs, it’s ready. If it’s still wet, bake for a few more minutes but don’t overdo it.
6.5 Not Letting the Cake Cool Before Frosting
One mistake that’s easy to make is frosting the cake while it’s still warm. This can lead to runny frosting and an uneven application. The frosting may also melt and slide off, leaving you with a messy, less-than-appealing cake.
Tip to Avoid This Mistake: Always allow the cake layers to cool completely before frosting. You can even pop them in the fridge to speed up the cooling process.
Pro Tip:
If you do happen to overbake your cake or it turns out dry, don’t panic! A simple solution is to drizzle the layers with a bit of orange syrup or even orange liqueur before frosting. This will help lock in moisture and add an extra burst of flavor.
By avoiding these common mistakes, you’ll be able to create a show-stopping Orange Creamsicle Cake that’s sure to impress every time. But don’t just stop there! Let’s round off this article with some frequently asked questions that’ll clear up any lingering doubts.
7. Frequently Asked Questions About Orange Creamsicle Cake
After all the baking, frosting, and decorating, it’s always helpful to have answers to any lingering questions that might arise. In this section, we’ve gathered some of the most frequently asked questions about making Orange Creamsicle Cake to ensure that you’re completely confident in your baking adventure. Let’s dive in!
7.1 Can I Make This Cake Ahead of Time?
Absolutely! One of the great things about Orange Creamsicle Cake is that it holds up well when made in advance.
- Cake layers: You can bake and cool the cake layers a day or two ahead of time. Simply wrap them tightly in plastic wrap and store them in the fridge or freezer.
- Frosting: The frosting can also be made a day in advance. Just store it in an airtight container in the fridge and bring it to room temperature before frosting the cake.
When you’re ready to assemble, just stack and frost the layers, and you’ll have a stunning cake with minimal effort.
7.2 Can I Use a Different Frosting?
While the Orange Cream Cheese Frosting is a classic pairing with this cake, you can absolutely experiment with other frostings! Here are a few options:
- Whipped Cream Frosting: For a lighter, fluffier option, you can swap the cream cheese for heavy whipping cream. This gives the cake a less tangy, more airy texture.
- Buttercream Frosting: A simple orange buttercream frosting would work beautifully too, especially if you want a sweeter, smoother finish.
7.3 Can I Make This Cake in a Different Size Pan?
Definitely! If you don’t have 8-inch round cake pans, you can use other sizes, but be mindful of the baking time. Here’s a quick guide:
- 9-inch pans: If using larger pans, your cake layers will be thinner. Check the cake at 20-25 minutes.
- Cupcakes: If you’d prefer cupcakes, this recipe should make around 24 cupcakes. Bake for about 18-20 minutes.
Adjust the baking time based on the size and shape of the pan to ensure a perfectly baked cake.
7.4 How Do I Store Leftover Cake?
If you happen to have leftovers (lucky you!), you’ll want to store them properly:
- At room temperature: You can keep the cake covered at room temperature for about 2-3 days. The frosting will stay fresh, and the cake will remain moist.
- In the fridge: For longer storage, store the cake in an airtight container in the fridge. It will stay good for up to 5 days. Make sure the cake is tightly covered to avoid it drying out.
7.5 Can I Freeze the Cake?
Yes, you can freeze both the cake layers and the frosting separately or together. Here’s how:
- Cake layers: Wrap the cooled layers tightly in plastic wrap, then foil, and freeze for up to 3 months.
- Frosting: Store the frosting in an airtight container or freezer bag and freeze for up to a month. Let it thaw in the fridge overnight and bring it to room temperature before using.
7.6 Can I Add More Orange Flavor to the Cake?
If you’re a big fan of citrus, you can definitely amp up the orange flavor. Try these options:
- Add more orange zest: Use the zest of an additional orange to intensify the citrus flavor in both the cake and the frosting.
- Orange liqueur: You could add a splash of Grand Marnier or Cointreau to the batter or frosting to deepen the orange flavor with a bit of complexity.
Pro Tip:
To make your Orange Creamsicle Cake extra decadent, consider drizzling orange syrup (a simple mix of orange juice and sugar heated until thick) over the cake layers before frosting. This will lock in moisture and add a touch more orange sweetness.
Conclusion
And there you have it! From selecting the perfect ingredients to avoiding common mistakes, and even storing leftovers, you now have all the tools to create a stunning Orange Creamsicle Cake that will impress anyone who takes a bite. Whether you’re serving it at a celebration or enjoying it as a treat for yourself, this cake is sure to be a hit.
Remember, the key to success with this cake lies in using fresh ingredients, taking your time with each step, and not being afraid to get creative with the decorations. So grab those oranges, preheat your oven, and get baking—your Orange Creamsicle Cake awaits!
Happy baking! 🍊🍰