
The Perfect Chocolate Orange Layer Cake with Orange Curd
If you’re looking to impress with a dessert that combines the best of both worlds—rich, decadent chocolate and bright, zesty orange—then the Chocolate Orange Layer Cake with Orange Curd is your go-to treat. This cake is not just a dessert; it’s an experience. Imagine layers of moist, chocolate cake, complemented by a tangy, creamy orange curd that provides the perfect balance of flavors. Whether you’re preparing for a holiday feast, a birthday bash, or just because you’re craving something extraordinary, this cake is sure to steal the show.
In this article, we’ll walk you through everything from understanding what makes this cake special to baking, frosting, and even decorating it like a pro. So, let’s get started, and soon you’ll be baking a cake that’s as delicious as it is beautiful!
1. What is a Chocolate Orange Layer Cake with Orange Curd?
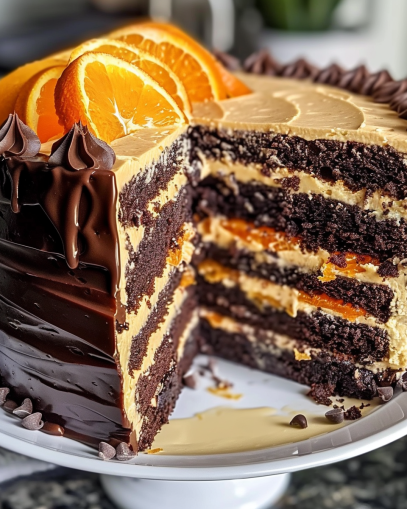
So, what exactly is a Chocolate Orange Layer Cake with Orange Curd? Simply put, it’s the ultimate flavor pairing—a rich, dark chocolate cake layered with a tangy, velvety orange curd filling. The cake layers are typically made from cocoa powder, which gives them that deep, chocolatey richness, while the orange curd adds a burst of fresh citrus flavor that contrasts beautifully with the cake’s sweetness.

Why the Combination Works
The reason chocolate and orange make such a fantastic pair is because of the balance of flavors. The rich bitterness of dark chocolate complements the sweet-tart orange curd, creating a harmonious and indulgent dessert experience. While the chocolate layer gives you that comforting, satisfying richness, the orange curd adds a layer of brightness and freshness, preventing the cake from feeling too heavy or overly sweet.
What sets this cake apart from other chocolate-orange desserts is the inclusion of the orange curd. Curd—a thick, creamy spread made from fresh fruit juice, sugar, eggs, and butter—offers a luxurious texture that you just won’t find in regular frosting or fillings. It’s not overly sweet, allowing the natural flavor of the orange to shine through, while its creamy consistency adds an extra level of indulgence.
The Experience
When you take a bite of this cake, you get everything: the dense, moist texture of the chocolate cake, followed by the smooth, citrusy burst of the orange curd. It’s a flavor combination that will have you going back for seconds—or thirds—every time. Perfect for those who love both decadent desserts and the fresh zing of citrus fruits.
2. Key Ingredients for Chocolate Orange Layer Cake with Orange Curd
To create the perfect Chocolate Orange Layer Cake with Orange Curd, it’s essential to use the right ingredients. The combination of rich chocolate and zesty orange is simple, but every element needs to shine on its own to achieve the right balance of flavors. Let’s break down the ingredients you’ll need for the cake, the orange curd, and the frosting.
Ingredients for the Chocolate Cake:
- All-purpose flour: This is your base, giving structure to the cake.
- Unsweetened cocoa powder: The key to achieving that deep, rich chocolate flavor. Be sure to use high-quality cocoa powder for the best results.
- Granulated sugar: Sweetness is essential to balance the bitterness of the cocoa, but you don’t want to overpower the other flavors.
- Baking soda: This will help the cake rise and give it a nice texture.
- Eggs: The binder for the cake, ensuring it stays moist and holds together.
- Unsalted butter: A must for adding richness and creating that soft, tender crumb.
- Milk: Whole milk will give your cake the best texture and moisture. If you want to make it dairy-free, try using almond or oat milk as a substitute.
- Vanilla extract: A subtle addition to enhance the flavors without overpowering the chocolate and orange.
- Fresh orange zest: The zest gives the cake a light, citrusy fragrance that enhances the overall flavor profile.
Ingredients for the Orange Curd:
- Fresh orange juice: The juice is the star of the curd, bringing in that bright, tart flavor. Freshly squeezed juice is always the best option.
- Orange zest: Adding more zest intensifies the orange flavor, giving the curd that zesty punch.
- Eggs: Eggs act as the thickening agent for the curd, giving it a smooth, velvety texture.
- Sugar: Sweetens the curd and balances the tanginess of the orange.
- Unsalted butter: Adds a creamy richness to the curd, making it smooth and spreadable.
- Cornstarch: This will help thicken the curd and ensure it’s the perfect consistency to layer between your cake.
Frosting and Garnishing:
- Butter: For making the chocolate frosting, choose unsalted butter to control the saltiness.
- Powdered sugar: To achieve a smooth and sweet frosting.
- Heavy cream: If you prefer a creamy, slightly softer frosting, adding a little heavy cream will do the trick.
- Fresh orange slices or zest: For garnish, adding these not only looks beautiful but also reinforces the orange flavor.
These ingredients work together to create a layered cake that’s as moist as it is flavorful. Now that we’ve got the right components ready, let’s dive into the step-by-step process of making this mouthwatering dessert!
3. How to Make the Chocolate Orange Layer Cake
Ready to bake? Here’s how to make your Chocolate Orange Layer Cake with Orange Curd from scratch! Follow these step-by-step instructions for a cake that’s both rich in flavor and light in texture. Trust me—this cake will be the star of any occasion.
Step 1: Preheat the Oven and Prepare the Pans
First things first, preheat your oven to 350°F (175°C). Make sure your oven is fully heated before placing the cake in. This will help your cake rise evenly.
Next, prepare your cake pans. Grease two 8-inch round cake pans with butter, then lightly dust them with flour. For easy removal, you can also line the bottom with parchment paper.
Step 2: Mix the Dry Ingredients
In a medium bowl, sift together the all-purpose flour, unsweetened cocoa powder, baking soda, and a pinch of salt. Sifting is essential here to avoid any lumps in your cake and ensure everything is evenly distributed. Set this bowl aside.
Step 3: Cream the Butter and Sugar
In a large mixing bowl, beat the unsalted butter and granulated sugar together using an electric mixer. Start on a low speed and gradually increase to medium. Creaming the butter and sugar until it’s light and fluffy is a crucial step—it incorporates air, making the cake soft and tender.
Step 4: Add the Eggs and Vanilla
Next, add the eggs, one at a time, beating well after each addition. This ensures that the eggs are fully incorporated, giving the cake structure. Once the eggs are in, add the vanilla extract and mix until everything is smooth and well-combined.
Step 5: Alternate Adding Dry Ingredients and Milk
Now it’s time to incorporate the dry ingredients and the milk into the wet ingredients. Start by adding a third of the dry mixture into the wet ingredients, then mix until combined. Follow this with half of the milk, then repeat the process—alternating dry ingredients and milk—until everything is well-mixed. This alternating process helps keep the batter from getting too thick or lumpy.
Step 6: Add Orange Zest
For that citrusy zing, fold in the orange zest. This step infuses the batter with a fresh, zesty fragrance that perfectly complements the chocolate.
Step 7: Bake the Cake Layers
Divide the batter evenly between the prepared cake pans and smooth the tops with a spatula. Place them in the oven and bake for 30-35 minutes or until a toothpick inserted into the center comes out clean. Baking times may vary, so keep an eye on them around the 25-minute mark.
Once done, allow the cakes to cool in the pans for 10 minutes before transferring them to a wire rack to cool completely. Do not skip this step, as cooling the cakes too quickly or too soon can cause them to crack or become too crumbly.
Step 8: Check for Even Layers
Before assembling, make sure your cake layers are level. If necessary, use a serrated knife to trim the tops to ensure they sit flat. This is especially important for stacking the cake and spreading the orange curd evenly.
4. Making the Orange Curd
The star of the show when it comes to Chocolate Orange Layer Cake is, of course, the orange curd. It’s rich, velvety, and tangy, creating a perfect contrast to the rich, chocolatey layers. Making orange curd from scratch is easier than it sounds and so much more flavorful than store-bought. Here’s how you can make the orange curd that will take your cake to the next level.
Step 1: Prepare the Oranges
First, grab 2-3 fresh oranges. You’ll need the juice and zest, so start by zesting the oranges with a fine grater. Be careful to zest only the orange part of the peel, as the white pith underneath can be bitter. You should have about 2 tablespoons of orange zest.
Next, juice the oranges. You’ll need around 1 cup (240ml) of fresh orange juice—freshly squeezed is best for that bright, tangy flavor. Strain the juice to remove any pulp or seeds, leaving you with smooth, vibrant juice.
Step 2: Heat the Orange Juice and Zest
In a medium saucepan, combine the orange juice, orange zest, and sugar. Stir over medium heat until the sugar is dissolved completely. You’ll begin to smell that wonderful citrus fragrance filling the kitchen—this is a good sign!
Step 3: Add the Eggs and Thicken the Curd
While the orange mixture is heating, beat the eggs in a separate bowl. You want the eggs well-beaten but not frothy. Once the orange juice and zest mixture has warmed up (but not boiling), slowly whisk in the eggs while continuously stirring to prevent them from scrambling.
Continue cooking the mixture over low heat, stirring constantly, until it thickens enough to coat the back of a spoon. This can take around 5-7 minutes. It’s important to keep the heat low here to avoid curdling the eggs. If you’re unsure whether it’s thickened enough, dip a spoon into the curd and run your finger through it. If it leaves a clear trail, you’re good to go.
Step 4: Strain the Curd for Smoothness
Once the curd has thickened, remove it from the heat and strain it through a fine-mesh sieve into a clean bowl. This step will remove any bits of cooked egg, ensuring your curd is smooth and silky.
Step 5: Add Butter and Chill
Stir in the unsalted butter, about 4 tablespoons. The butter will make the curd richer and creamier. Once the butter has melted and the curd is silky, cover it with plastic wrap, pressing the wrap directly onto the surface of the curd to prevent a skin from forming. Let it cool to room temperature, then refrigerate for at least 1-2 hours before using.
Now you have a rich, velvety orange curd that’s ready to be layered between your chocolate cake. The combination of the smooth, tangy curd with the deep, moist chocolate cake is going to be incredible!
5. Assembling the Cake
You’ve done the hard part: baking the moist chocolate cake layers and making that silky, tangy orange curd. Now comes the fun—assembling this decadent masterpiece! The key to a successful cake assembly is patience and a little attention to detail. Don’t worry, we’ve got you covered.
Step 1: Level the Cake Layers
First, make sure your cake layers are completely cooled. If the tops are uneven or domed, use a serrated knife to level them out. You want to have flat layers so the orange curd stays evenly spread between each one. Don’t worry if this step feels a little tedious—it’s worth it for a neat, perfectly stacked cake!
Step 2: Place the First Layer on a Cake Stand
Once your layers are level, place the first layer of cake on a cake stand or a serving platter. Make sure the cake is centered so that it’s easy to assemble and frost later.
Step 3: Spread the Orange Curd
Next, grab that beautiful orange curd you made earlier. Using a spatula, spread a generous layer of orange curd over the first cake layer. You don’t want it too thick—just enough to coat the surface. Spread it evenly, leaving a little space along the edges to prevent it from spilling out when you add the next layer.
Step 4: Add the Second Cake Layer
Carefully place the second layer of cake on top of the first, pressing down gently to ensure they stick together. Take your time here—align the layers so they’re perfectly stacked. You want them to be centered and straight!
Step 5: Frost the Cake
Now, it’s time to frost the whole cake. If you’ve made a chocolate frosting (or ganache), spread a thin crumb coat all over the cake to seal in any loose crumbs. Chill the cake for about 15-20 minutes to set the crumb coat.
Once the crumb coat is set, spread a generous layer of frosting over the entire cake. You can smooth it out with an offset spatula or leave it textured for a rustic look. Make sure the edges are nice and neat, and don’t forget to add some frosting between the layers as well for that extra richness.
Step 6: Garnish the Cake
Finally, garnish your cake with some fresh orange slices, zest, or even a little drizzle of chocolate ganache for extra flair. These touches not only add flavor but make the cake look absolutely stunning.
6. How to Store and Serve the Chocolate Orange Layer Cake
Now that your Chocolate Orange Layer Cake with Orange Curd is beautifully assembled and ready to shine, the next thing to consider is how to store it and when to serve it. Whether you’re preparing for a big event or want to enjoy a slice over a few days, proper storage and serving techniques can make all the difference in keeping the cake fresh and delightful.
How to Store the Cake
The good news is that this cake keeps well when stored properly. However, the orange curd requires some attention to ensure it doesn’t become too runny or spoil.
- Store in the Refrigerator
Since the orange curd is made with eggs and butter, it’s best to store the entire cake in the refrigerator to keep it fresh. This will help maintain the curd’s creamy consistency and keep the cake layers moist.Cover the cake with plastic wrap or place it in an airtight container to protect it from absorbing any other odors in the fridge. If you have leftover frosting, store it separately in a sealed container to keep it fresh for later use. - Don’t Frost Too Early
If you’re preparing the cake a day ahead, it’s best to assemble the cake and refrigerate it without the frosting at first. Apply the chocolate frosting right before serving, as refrigeration can sometimes alter the texture of the frosting. - How Long Will It Last?
When stored properly in the refrigerator, your Chocolate Orange Layer Cake should stay fresh for up to 4-5 days. The orange curd will continue to set in the fridge, making it even more delicious after a day or two!
How to Serve the Cake
When it’s time to serve, take the cake out of the refrigerator about 20-30 minutes before serving. This allows the flavors to bloom and the cake to come to room temperature. Cold cake can sometimes feel too firm, and serving it at a slightly warmer temperature ensures it’s soft and flavorful.
- Slice it Neatly: Use a sharp, serrated knife to slice the cake. The layers should be dense but moist, and a clean knife ensures you get nice, even slices.
- Pairing Suggestions: Consider serving this cake with a dollop of whipped cream or a scoop of vanilla ice cream on the side. The orange curd also complements a glass of champagne or a rich coffee, making it perfect for a dessert after a festive meal.
Can You Freeze the Cake?
Yes! If you want to make the cake ahead of time, you can freeze the layers (without frosting) for up to 3 months. Wrap the cake layers tightly in plastic wrap and then in foil to prevent freezer burn. Thaw them overnight in the refrigerator before assembling.
7. FAQs About Chocolate Orange Layer Cake with Orange Curd
You’ve made it to the final section! By now, you’re probably eager to dive into your Chocolate Orange Layer Cake with Orange Curd, but we know that some questions can still linger. In this section, we’ll address the most frequently asked questions about this delicious dessert to ensure everything goes smoothly and you get the best possible results.
1. Can I Make the Orange Curd Ahead of Time?
Absolutely! In fact, making the orange curd ahead of time is a great idea. You can prepare the curd up to 3 days in advance. Just let it cool completely, cover it with plastic wrap, and store it in the fridge. When you’re ready to assemble your cake, simply give it a stir to make sure it’s smooth before spreading it on your cake layers.
2. Can I Use a Different Type of Orange for the Curd?
While we recommend using navel oranges for their sweet and juicy flavor, you can experiment with other types of oranges, such as blood oranges or Cara Cara oranges. Each type of orange will bring a slightly different flavor profile, but the curd will still be just as delicious!
3. Can I Use a Store-Bought Cake Mix for the Cake Layers?
Yes, if you’re short on time, you can substitute the homemade chocolate cake recipe with a store-bought chocolate cake mix. However, we highly recommend trying the homemade version at least once, as the fresh ingredients and orange zest elevate the cake’s flavor significantly. It’s totally worth the effort!
4. Can I Make This Cake Gluten-Free?
Definitely! You can easily make this cake gluten-free by substituting the all-purpose flour with a gluten-free flour blend. Just make sure the blend you choose includes xanthan gum, as this will help give the cake structure and prevent it from crumbling.
5. How Can I Make the Cake More Chocolatey?
If you want to increase the chocolate flavor in the cake, you can:
- Use dark cocoa powder (like Dutch-process) for an even richer taste.
- Add melted dark chocolate to the batter (around 4 oz) for a more decadent texture and deeper chocolate flavor.
6. Can I Freeze the Cake?
Yes, you can freeze the Chocolate Orange Layer Cake! To freeze the cake, wrap the layers tightly in plastic wrap and aluminum foil, then place them in an airtight container or freezer bag. This will keep them fresh for up to 3 months. When you’re ready to assemble, thaw the layers overnight in the fridge before frosting and serving.
7. What Can I Use Instead of Orange Curd?
If you’re not a fan of orange curd or simply want to switch things up, you can replace it with a chocolate-orange ganache or a whipped chocolate mousse. Both options still bring that delightful chocolate-orange flavor, though the texture and sweetness may vary.
8. Can I Make the Frosting Dairy-Free?
Yes, if you want a dairy-free frosting, you can substitute the butter in the frosting with vegan butter or coconut oil. Use coconut cream instead of heavy cream for a rich, dairy-free option. The frosting will still be smooth and creamy, but it will have a subtle coconut flavor that pairs nicely with the chocolate-orange combo!
And there you have it! With all the tips, tricks, and FAQs answered, you’re now ready to make your Chocolate Orange Layer Cake with Orange Curd. Whether you’re baking it for a special occasion or just treating yourself to something extraordinary, this cake is sure to be a crowd-pleaser. We hope this guide has given you the confidence and knowledge to create a cake that’s as stunning as it is delicious.
Remember, baking is all about having fun and experimenting with flavors. So don’t be afraid to tweak the recipe and make it your own! Enjoy your baking journey—and most importantly, enjoy the cake!