
History and Origin of Cheesecake Bars
Cheesecake has been a beloved dessert for centuries, with its roots tracing back to ancient Greece. The first cheesecakes were simple mixtures of honey, cheese, and flour baked to perfection. Over time, the recipe evolved, incorporating cream cheese for the creamy texture we adore today.
The modern cheesecake bar is an American invention, born from the need for convenience. Unlike traditional cheesecakes, which require precise baking techniques and long cooling times, bars are compact and easy to serve. They quickly became a popular choice for potlucks, parties, and family gatherings.
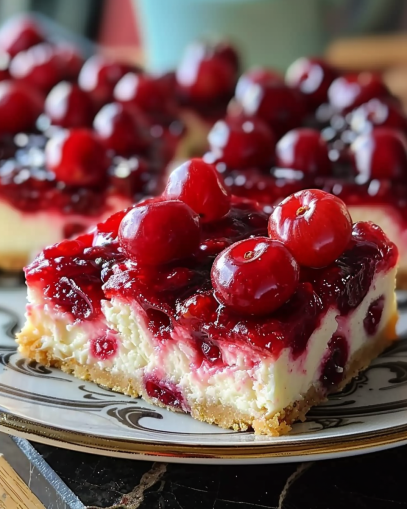
Adding cherries to the mix wasn’t just about flavor—it was a stroke of culinary genius. The tartness of cherries complements the rich, creamy filling, creating a harmonious balance of flavors. Whether made with fresh cherries or a luscious compote, this topping elevates the dessert from simple to spectacular.
Today, cherry cheesecake bars have become a staple in bakeries and kitchens worldwide. They’re cherished for their versatility, portability, and irresistible taste. With variations ranging from no-bake to gluten-free, they cater to every preference, making them a timeless dessert for all occasions.
Ingredients for the Perfect Cherry Cheesecake Bars
To craft the ultimate cherry cheesecake bars, you’ll need a harmonious blend of ingredients that bring together the creamy, sweet, and tart flavors. Each component plays a vital role in achieving that perfect balance. Let’s break down what you’ll need:
1. The Crust: A Crunchy Base
The foundation of any cheesecake bar is its crust, typically made with crushed cookies or crackers. Here’s what you’ll need:
- Graham crackers (1 ½ cups, finely crushed) – A classic choice for a buttery, crumbly base.
- Unsalted butter (½ cup, melted) – Binds the crumbs and adds richness.
- Granulated sugar (2 tablespoons) – Just a touch for added sweetness.
Optional: Swap graham crackers for digestive biscuits or chocolate cookies for a unique twist.
2. The Cheesecake Filling: Creamy Perfection
The filling is where the magic happens. It’s all about achieving that smooth, velvety texture. You’ll need:
- Cream cheese (16 oz, softened) – The star ingredient for a rich and creamy filling.
- Granulated sugar (¾ cup) – Sweetens the mixture without overpowering.
- Eggs (2 large) – Adds structure and ensures a silky consistency.
- Vanilla extract (1 teaspoon) – Enhances the overall flavor.
- Sour cream (¼ cup) – A secret ingredient for tanginess and creaminess.
3. The Cherry Topping: Sweet and Tart
This vibrant topping is the highlight of the dessert.
- Cherry pie filling (1 can, 21 oz) – Convenient and flavorful.
- Or: Use fresh cherries cooked down with sugar and lemon juice for a homemade touch.
Step-by-Step Instructions for Making Cherry Cheesecake Bars
Step 1: Prepping the Pan and Ingredients
Start by setting yourself up for success:
- Preheat your oven to 325°F (163°C).
- Line a 9×13-inch baking pan with parchment paper, leaving an overhang on the sides for easy removal.
- Gather all your ingredients and ensure your cream cheese is softened to room temperature for a smooth filling.
Step 2: Making the Crust
The crust provides the perfect foundation for your cheesecake bars.
- In a mixing bowl, combine the graham cracker crumbs, melted butter, and sugar. Stir until the mixture resembles wet sand.
- Press the mixture firmly and evenly into the bottom of the prepared pan.
- Bake the crust for 10 minutes, then set it aside to cool slightly while you prepare the filling.
Step 3: Preparing the Cheesecake Filling
Here’s where the creamy magic happens:
- In a large bowl, beat the cream cheese and sugar until smooth and fluffy. Use a hand mixer or stand mixer for best results.
- Add the eggs one at a time, mixing after each addition until fully incorporated.
- Mix in the vanilla extract and sour cream until the filling is velvety smooth.
Step 4: Assembling the Bars
- Pour the cheesecake filling over the pre-baked crust and spread it evenly with a spatula.
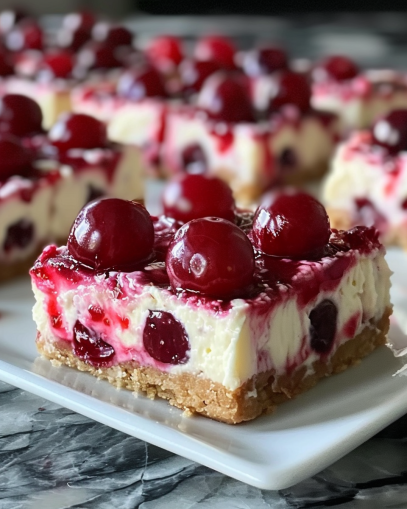
- Dollop spoonfuls of cherry pie filling across the top. Use a toothpick or skewer to swirl it into the filling for a marbled effect, or spread it in an even layer for a uniform look.
Step 5: Baking and Cooling
- Bake the assembled bars for 30–35 minutes, or until the edges are set and the center jiggles slightly when shaken.
- Turn off the oven and let the bars cool inside with the door slightly ajar for 15 minutes to prevent cracks.
- Remove the pan and let it cool completely at room temperature before refrigerating for at least 4 hours (or overnight).
Tips and Tricks for Perfect Cherry Cheesecake Bars
When it comes to cherry cheesecake bars, the difference between good and unforgettable lies in the details. Here are some pro tips to ensure your dessert turns out perfectly every time:
1. Use Quality Ingredients
- Cream cheese: Always use full-fat cream cheese for the creamiest texture. Avoid low-fat versions as they can make the filling watery.
- Cherries: Opt for high-quality cherry pie filling or make your own from fresh cherries for a richer, homemade taste.
- Graham crackers: Use fresh crumbs for the crust to avoid a stale flavor.
2. Don’t Overmix the Filling
- Overmixing introduces too much air into the batter, which can cause cracks during baking. Mix just until all ingredients are combined and smooth.
3. Room Temperature Ingredients Are Key
- Cold cream cheese or eggs can lead to a lumpy filling. Let your ingredients come to room temperature before starting.
4. Swirling Perfection
- For an elegant marbled look, gently swirl the cherry filling into the cheesecake with a toothpick. Avoid overdoing it to keep the design intact.
5. Baking and Cooling Tips
- Water bath alternative: Place a pan of water on the oven’s bottom rack to create steam and prevent cracks.
- Let the bars cool gradually in the oven to minimize sudden temperature changes.
6. Cutting Like a Pro
- Chill the bars thoroughly before slicing. Use a sharp knife dipped in hot water, wiping it clean between cuts for sharp, neat edges.
7. Storage Suggestions
- Store the bars in an airtight container in the refrigerator for up to 5 days. For longer storage, freeze individual bars and thaw when ready to enjoy.
Creative Variations of Cherry Cheesecake Bars If you’re ready to shake things up, there are plenty of ways to add a twist to traditional cherry cheesecake bars. These variations not only bring new flavors but also make the dessert even more exciting for any occasion.
1. Chocolate Cherry Cheesecake Bars
- Add a layer of melted dark chocolate to the crust or drizzle chocolate ganache over the top for a decadent treat.
- Sprinkle mini chocolate chips into the cheesecake filling for extra texture.
2. Lemon Cherry Cheesecake Bars
- Mix lemon zest and a splash of lemon juice into the cheesecake batter for a tangy contrast to the sweet cherries.
- Add a thin layer of lemon curd on top before swirling in the cherry filling.
3. Almond Cherry Cheesecake Bars
- Substitute almond extract for vanilla in the filling for a nutty flavor that complements cherries beautifully.
- Top the bars with slivered almonds for a delightful crunch.
4. No-Bake Cherry Cheesecake Bars
- Skip the oven! Use a no-bake cheesecake filling made with whipped cream and gelatin for a light and airy texture.
- Chill the bars overnight for the perfect set.
5. Gluten-Free Cherry Cheesecake Bars
- Swap traditional graham crackers for gluten-free versions or use ground almonds as the crust base.
- Ensure all other ingredients, like cherry pie filling, are certified gluten-free.
6. Festive Cherry Cheesecake Bars
- Create themed bars for holidays by swirling in red and green food coloring for Christmas or adding patriotic sprinkles for the Fourth of July.
Serving and Presentation Tips for Cherry Cheesecake Bars
1. Cutting Perfect Squares
- To achieve clean edges, chill the bars thoroughly before slicing.
- Use a sharp knife dipped in hot water and wiped dry between each cut.
- Cut slowly and with precision to maintain the layers’ integrity.
2. Garnish Like a Pro
- Add a dollop of whipped cream on each bar for an elegant finish.
- Sprinkle a touch of powdered sugar or cocoa powder for subtle decoration.
- Garnish with a fresh cherry, mint leaf, or a drizzle of chocolate for that “wow” factor.
3. Plate It Beautifully
- Use white plates to make the vibrant cherry topping pop.
- For an extra touch, drizzle a zigzag of cherry sauce or chocolate on the plate before placing the bar.
- Pair each bar with a scoop of vanilla ice cream or a side of fresh berries for a complementary treat.
4. Serve in Style
- Arrange bars on a tiered dessert stand for a party or buffet.
- Use parchment paper liners for individual servings, especially for casual gatherings or picnics.
Storing and Freezing Cherry Cheesecake Bars
Ensuring your cherry cheesecake bars stay fresh and tasty requires proper storage techniques. Whether you’re making them ahead for a party or saving leftovers, here’s how to store them like a pro.
1. Short-Term Storage: Refrigeration
- Since cheesecake bars contain dairy, always store them in the fridge.
- Place them in an airtight container or cover tightly with plastic wrap to prevent them from drying out or absorbing other fridge odors.
- Keep them in the coldest part of the refrigerator, and they’ll stay fresh for up to 4-5 days.
2. Long-Term Storage: Freezing
- To freeze, first chill the bars in the fridge until firm.
- Cut them into individual servings and wrap each bar tightly in plastic wrap, then add a layer of aluminum foil for extra protection.
- Place wrapped bars in a freezer-safe bag or container to prevent freezer burn.
- Frozen cherry cheesecake bars can last up to 2 months.
3. Thawing Tips
- When ready to enjoy, transfer frozen bars to the fridge and let them thaw overnight.
- Avoid microwaving as it may ruin the texture and make the layers soggy.
4. Pro Tip
- Label the storage container with the date to keep track of freshness.
- Consider freezing without the cherry topping and adding it fresh when serving for the best results.
Why Cherry Cheesecake Bars Are a Must-Try Dessert
From the joy of crafting the layers to savoring the creamy, fruity flavors, these bars are the perfect balance of indulgence and simplicity. Plus, with storage and freezing options, you can always have a delectable dessert ready for any occasion.
So, roll up your sleeves, gather those ingredients, and dive into the delightful world of cherry cheesecake bars. Trust us, once you make them, they’ll become a go-to favorite in your dessert repertoire!