
Sneak Peek of the Recipe
Raspberry cheesecake with pistachio crumb is a match made in dessert heaven! This article will guide you through crafting a luscious, creamy cheesecake with a tangy raspberry topping and a nutty pistachio crust. Along the way, you’ll pick up helpful tips, substitutions, and variations that’ll make this dessert your new go-to showstopper. So, roll up your sleeves, and let’s dive into this sweet adventure!
Introduction
There’s nothing quite like the perfect cheesecake to steal the show at any gathering, don’t you think? Raspberry cheesecake with pistachio crumb is a dessert that checks all the boxes—delicate, creamy, and bursting with flavor. This recipe combines the tartness of fresh raspberries, the richness of cream cheese, and the crunch of pistachios into one unforgettable bite.
Not only is this treat a feast for the taste buds, but it’s also visually stunning, with its bright raspberry topping and golden-green crumb crust. Whether you’re a seasoned baker or a beginner, this guide has got your back. From the ingredient list to the final garnish, you’ll learn how to create a dessert that wows.
Stay tuned as we unpack every step of this irresistible cheesecake, share insider tips for achieving that creamy texture, and explore creative twists to suit your preferences. Ready to impress? Let’s get started!
Ingredients
A great cheesecake starts with the perfect blend of ingredients. Let’s break it down into three essential components: the pistachio crust, the creamy cheesecake filling, and the tangy raspberry topping. Using fresh, high-quality ingredients is the key to a dessert that’s bursting with flavor.
For the Pistachio Crust
The crust forms the foundation of your cheesecake, and this pistachio-based layer adds a delightful nuttiness that complements the creamy filling. Here’s what you’ll need:
- 1 cup finely ground pistachios (unsalted works best for balance)
- 1/2 cup graham cracker crumbs (for structure)
- 2 tablespoons granulated sugar (to enhance sweetness)
- 1/4 cup unsalted butter, melted (to bind it all together)
- A pinch of salt (to bring out the flavors)
For the Cheesecake Filling The filling is the heart of your cheesecake. Its creamy, velvety texture is what everyone loves! Gather these:
- 16 ounces cream cheese (softened for easy mixing)
- 3/4 cup granulated sugar (for sweetness)
- 1/2 cup sour cream (for a hint of tanginess)
- 1 teaspoon vanilla extract (pure, for the best flavor)
- 2 large eggs (at room temperature)
- 2 tablespoons pistachio paste or finely ground pistachios (optional, but highly recommended)
For the Raspberry Topping
The star of the show—your raspberry topping—should be bright, tangy, and slightly sweet. Here’s your list:
- 2 cups fresh or frozen raspberries (vivid and flavorful)
- 1/4 cup granulated sugar (adjust to taste)
- 1 tablespoon lemon juice (to balance the sweetness)
- 1 teaspoon cornstarch (only if needed for thickening)
Preparing the Pistachio Crust
The pistachio crust serves as a sturdy, flavorful base that complements the cheesecake’s creamy filling. This step is all about creating a crunchy layer with just the right balance of nutty and sweet flavors. Here’s how to do it:
Step 1: Process the Dry Ingredients
Start by placing the ground pistachios and graham cracker crumbs into a food processor. Pulse a few times until the texture is fine and evenly combined. Add the sugar and salt, and give it another quick pulse. The result should look like vibrant green breadcrumbs—don’t you love that color?
Step 2: Add the Butter
Drizzle in the melted butter while pulsing. The mixture should start clumping together slightly when pressed between your fingers. If it feels too dry, add a teaspoon of melted butter at a time until it’s just right.
Step 3: Press into the Pan
Line the bottom of a 9-inch springform pan with parchment paper. Pour the crust mixture into the pan and press it firmly using the bottom of a glass or your fingers. Spread it evenly, ensuring it reaches the edges. Chill the crust in the fridge for 15–20 minutes while you prepare the filling.
💡 Pro Tip: Want extra crunch? Bake the crust at 350°F (175°C) for 8–10 minutes before cooling and adding the filling.
Making the Cheesecake Filling
The cheesecake filling is the star of this dessert—smooth, creamy, and oh-so-decadent. Follow these steps to achieve that velvety texture and delightful flavor.
Step 1: Cream the Ingredients
In a large mixing bowl, beat the softened cream cheese with an electric mixer on medium speed until it’s smooth and free of lumps. This step is crucial, so don’t rush—creamy cheesecake starts here.
Add the sugar gradually, continuing to beat until the mixture is light and fluffy. Toss in the vanilla extract and sour cream, blending just until combined. The tanginess of the sour cream is what sets this filling apart, giving it depth and balance.
Step 2: Incorporate the Eggs
Crack the eggs one at a time, beating on low speed after each addition. Be careful not to overmix, as too much air can cause cracks during baking. The goal is a silky, lump-free batter that glides off your spatula.
Step 3: Optional Pistachio Flavor
If you’re adding pistachio paste or finely ground pistachios, gently fold them into the batter at this stage. This subtle touch enhances the nutty notes of the crust.
Step 4: Pour Over the Crust
Retrieve your chilled crust from the fridge and carefully pour the cheesecake filling over it. Use a spatula to smooth the top for an even layer.
Step 5: Prepare for Baking
Before baking, give the pan a gentle tap on the counter to release any trapped air bubbles. Then, wrap the outside of the springform pan in aluminum foil to prepare for a water bath—this ensures even baking and prevents cracks.
💡 Pro Tip: Let all ingredients come to room temperature before mixing to avoid a grainy texture.
Baking and Cooling the Cheesecake
Baking a perfect cheesecake requires a little patience and precision. Follow these steps for a creamy, crack-free result that’ll wow everyone at the table.
Step 1: Set Up a Water Bath
Preheat your oven to 325°F (165°C). To ensure even baking and prevent the top from cracking, place your cheesecake in a water bath. Wrap the outside of the springform pan tightly with aluminum foil, ensuring no water can seep in. Then, place the pan inside a larger roasting dish and fill the dish with hot water until it reaches halfway up the sides of the cheesecake pan.
Step 2: Bake the Cheesecake
Carefully transfer the setup to the oven. Bake the cheesecake for 55–65 minutes, or until the edges are set but the center still has a slight jiggle when gently shaken. Resist the urge to overbake—it will continue to set as it cools.
Step 3: Cool Gradually
Once baked, turn off the oven and crack the door slightly. Let the cheesecake cool inside the oven for about an hour. This slow cooling process helps prevent cracks caused by sudden temperature changes.
Step 4: Chill in the Fridge
After removing the cheesecake from the oven, allow it to cool completely at room temperature. Then, transfer it to the fridge and chill for at least 4 hours, but ideally overnight. This chilling time allows the flavors to meld and the texture to firm up beautifully.
💡 Pro Tip: If cracks do appear, don’t sweat it—the raspberry topping will cover them up, and nobody will notice!
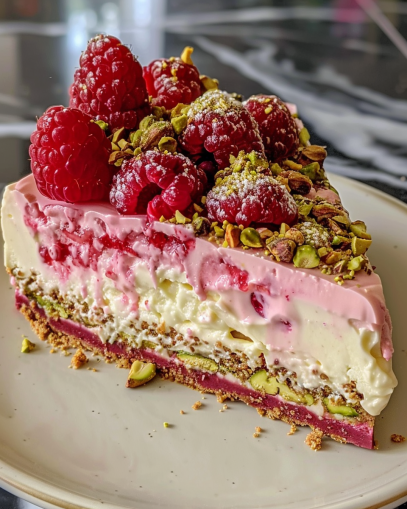
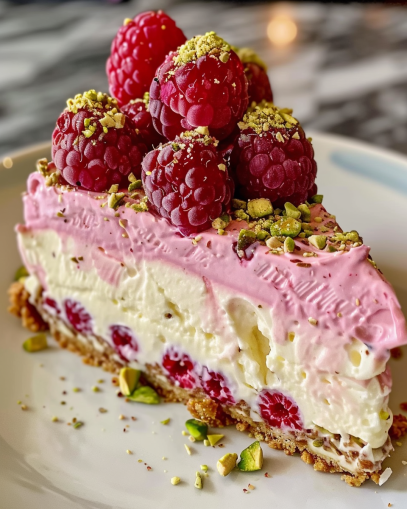
Preparing the Raspberry Topping The raspberry topping adds a burst of tangy sweetness that perfectly complements the creamy cheesecake and nutty crust. This glossy, jewel-toned layer will make your dessert pop, both in flavor and presentation.
Step 1: Cook the Raspberries
In a medium saucepan, combine 2 cups of fresh or frozen raspberries, 1/4 cup sugar, and 1 tablespoon lemon juice. Heat the mixture over medium heat, stirring occasionally, until the raspberries release their juices and soften—about 5–7 minutes.
Step 2: Thicken the Sauce
If you prefer a thicker topping, dissolve 1 teaspoon cornstarch in 1 tablespoon of water, then stir it into the simmering raspberry mixture. Cook for an additional 1–2 minutes until the topping thickens slightly. Remove from heat and allow it to cool to room temperature.
Step 3: Strain (Optional)
For a smoother topping, press the mixture through a fine-mesh sieve to remove the seeds. This step is optional but gives the topping a velvety finish.
Step 4: Spread Over the Cheesecake
Once the cheesecake is fully chilled, pour the cooled raspberry topping over the top. Spread it evenly using an offset spatula, letting it cascade slightly over the edges for an elegant look.
💡 Pro Tip: For added flair, garnish the topping with a few fresh raspberries and a sprinkle of crushed pistachios just before serving.
Next, we’ll wrap up with serving tips, storage advice, and some creative variations for your raspberry cheesecake with pistachio crumb! ! Your raspberry cheesecake with pistachio crumb is now ready to steal the show. Let’s dive into some pro tips for serving, storing leftovers, and experimenting with creative variations.
Serving Tips
- Temperature Matters: Serve the cheesecake chilled, straight from the fridge. Use a sharp, warm knife (dip it in hot water and wipe dry) for clean, precise slices.
- Garnish for Extra Flair: Add a few fresh raspberries, a sprinkle of crushed pistachios, or a light dusting of powdered sugar to elevate its visual appeal.
- Pair It Right: This dessert pairs beautifully with a hot cup of coffee or a sparkling rosé to balance the rich, tangy flavors.
Storing the Cheesecake
- In the Fridge: Cover the cheesecake tightly with plastic wrap or place it in an airtight container. It will stay fresh for up to 5 days.
- In the Freezer: Wrap individual slices in plastic wrap, then foil, and store in a freezer-safe bag. Cheesecake freezes well for up to 2 months. To enjoy, thaw in the fridge overnight.
Creative Variations
- Chocolate Twist: Swap the pistachio crust for a chocolate cookie crust, and drizzle melted dark chocolate over the raspberry topping.
- Citrus Fusion: Add zest from an orange or lemon to the cheesecake filling for a refreshing twist.
- Mixed Berry Medley: Replace raspberries with a mix of berries like blueberries, blackberries, and strawberries for a colorful topping.
- No-Bake Option: Skip the oven by using a gelatin-stabilized filling. It’s faster and just as delicious!
💡 Pro Tip: Don’t be afraid to experiment. Cheesecake is a versatile canvas, so let your creativity shine!
With these tips, your raspberry cheesecake with pistachio crumb will not only delight but also leave your guests craving more. Ready to impress? It’s time to serve and savor!