
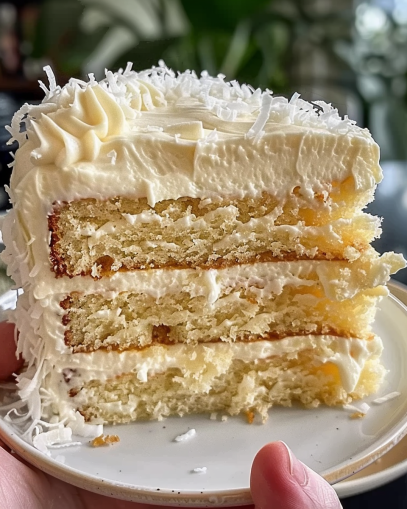
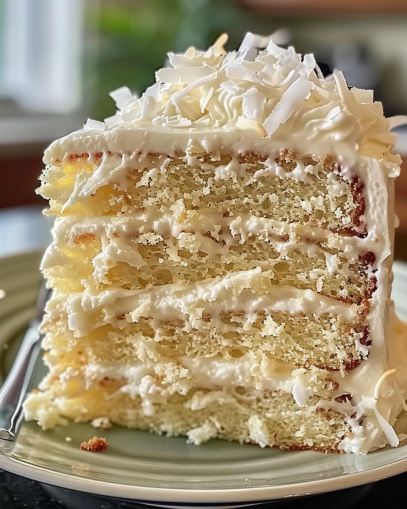
White Velvet Cake with Coconut Buttercream: A Heavenly Dessert Experience
Get ready to dive into the world of White Velvet Cake with Coconut Buttercream, a combination that promises an irresistible balance of sweetness and texture. If you’ve ever wondered how to make a cake that’s both soft and moist, with the tropical touch of coconut, then this recipe is your perfect match. The cake’s velvety texture paired with the creamy coconut buttercream frosting will leave your taste buds dancing. In this article, we’ll take you through every step—from the history of white velvet cake to the best techniques for frosting it like a pro. Let’s get started!
1. Understanding White Velvet Cake
Definition and Characteristics
The White Velvet Cake is a true showstopper, known for its incredibly soft and delicate crumb. Unlike traditional cakes, which tend to be denser, this cake is airy and light, thanks to the combination of egg whites and cake flour. The texture is the star of the show, and its subtle sweetness pairs perfectly with the rich, flavorful coconut buttercream frosting.
But why “velvet”? It’s all about that smooth texture that melts in your mouth, creating an experience that’s almost ethereal. Whether it’s a birthday, a wedding, or just a treat to impress your friends, this cake is guaranteed to steal the spotlight.
History and Origins
Though the name “velvet cake” may seem fancy, it actually dates back to the 19th century. Originating in the United States, the velvet cakes were initially created to be incredibly moist. The White Velvet Cake, as we know it today, evolved from its red counterpart, the Red Velvet Cake, which first gained popularity in the early 1900s.
The White Velvet Cake was developed as a lighter version, for those who preferred a subtle flavor with a soft, refined texture. Thanks to its versatility, the cake has remained a favorite in bakeries worldwide, and it’s especially popular when paired with rich and creamy frostings like coconut or cream cheese.
If you’re curious about the science behind achieving such a tender crumb, the secret lies in the balance between the acid in buttermilk and the alkalinity of baking soda, which causes the batter to rise while remaining wonderfully soft.
Ready to start baking? Let’s get into the key ingredients in the next section!
2. Key Ingredients
To achieve the perfect White Velvet Cake with Coconut Buttercream, it’s crucial to understand the role of each ingredient. Let’s break down the essential components that will help create the soft, fluffy texture and the coconut flavor that ties everything together.
Cake Ingredients
- Cake Flour
The use of cake flour instead of regular all-purpose flour is key to achieving that melt-in-your-mouth softness. Cake flour has a lower protein content, which results in a lighter and more delicate crumb. If you’re wondering why your cakes haven’t turned out as soft in the past, it’s probably because you’ve used the wrong flour. So, make sure to choose cake flour for this recipe to get that ideal texture. - Egg Whites
Using only egg whites helps keep the cake light and airy. The proteins in egg whites provide structure but don’t weigh down the cake like whole eggs would. They also help to create a nice rise in the batter, giving the cake that signature velvety feel. Make sure to beat your egg whites until they form soft peaks for the best results! - Buttermilk
The buttermilk in this recipe adds moisture and acidity, which reacts with the baking soda to create bubbles that help the cake rise. Buttermilk also enhances the flavor, giving the cake a slight tang that complements the sweetness of the coconut buttercream. If you don’t have buttermilk on hand, you can easily make a substitute by adding a tablespoon of lemon juice or vinegar to a cup of milk. - Vanilla Extract
Vanilla extract is a must-have in any cake recipe. Not only does it enhance the overall flavor, but it also adds a fragrant aroma that complements the richness of the coconut frosting.
Coconut Buttercream Ingredients
- Unsalted Butter
The base of your coconut buttercream is unsalted butter, which provides the smooth and creamy texture you need for frosting. Room temperature butter works best for easy mixing, ensuring your frosting is light and airy. - Powdered Sugar
To sweeten and thicken the frosting, powdered sugar is the perfect choice. It dissolves easily into the butter, making the frosting smooth and spreadable. - Coconut Milk
The addition of coconut milk adds both flavor and creaminess to the buttercream. Coconut milk brings that tropical essence, and its fat content makes the frosting rich and velvety. - Shredded Coconut
Shredded coconut is the final touch that gives your buttercream texture and a visual pop. You can choose between sweetened or unsweetened coconut, depending on your preference for sweetness. Toasting the coconut before adding it to the frosting brings out a deeper flavor, adding complexity to the overall taste.
With these ingredients ready, you’ll be able to create a cake that’s not only visually stunning but also bursting with flavor! In the next section, we’ll cover the equipment you’ll need to make your cake creation come to life. Stay tuned!
Before we start mixing and baking, it’s important to ensure you have all the essential equipment ready. Using the right tools can make the process easier, and will ensure your White Velvet Cake with Coconut Buttercream turns out perfect every time. Here’s what you’ll need:
Cake Pans
For this recipe, you’ll need two 8-inch round cake pans. These pans allow the cake to rise evenly and give you a good-sized layer for frosting. If you don’t have 8-inch pans, you can use other sizes, but keep in mind that baking time may vary.
Mixing Bowls
You’ll need a few large mixing bowls—one for the dry ingredients, one for the wet ingredients, and another for the egg whites. This ensures that everything is incorporated properly without over-mixing. A glass or metal mixing bowl works best to maintain a steady temperature.
Electric Mixer
To get that perfect, light and airy batter, an electric stand mixer or hand mixer is essential. If you don’t have an electric mixer, you can whisk the batter by hand, but using a mixer will save you time and energy. For the frosting, a hand mixer works just fine to achieve the smooth consistency.
Measuring Cups and Spoons
Accurate measurements are key to any recipe. Make sure to use proper measuring cups and spoons for both dry and wet ingredients. Don’t eyeball the measurements, especially for the cake flour and powdered sugar, as it can affect the texture of your cake.
Spatula
A silicone spatula is perfect for scraping the sides of your mixing bowls and for spreading the frosting evenly over the cake layers. It helps create smooth, clean edges on your finished cake.
With these tools, you’ll be all set to create your beautiful and delicious White Velvet Cake with Coconut Buttercream. Next, we’ll get into the preparation process and how to mix everything just right. Let’s get baking!
4. Step-by-Step Instructions
Now that you have all your ingredients and equipment ready, let’s dive into the fun part—baking! Follow these step-by-step instructions to create a White Velvet Cake with Coconut Buttercream that will have everyone coming back for seconds.
Step 1: Preheat the Oven
Start by preheating your oven to 350°F (175°C). This will give the oven enough time to heat up, ensuring your cake bakes evenly. While the oven is heating, you can prepare your cake pans.
Step 2: Prepare the Cake Pans
Grease your two 8-inch round cake pans with butter or cooking spray. You can also line the bottoms with parchment paper to ensure the cakes come out easily once baked. Lightly dust the pans with flour to prevent the cake from sticking.
Step 3: Mix the Dry Ingredients
In a large bowl, whisk together the cake flour, baking powder, and salt. Sifting the cake flour beforehand will help to prevent any lumps. Set this dry mixture aside.
Step 4: Mix the Wet Ingredients
In another large bowl, beat together the unsalted butter and granulated sugar until the mixture becomes light and fluffy. This should take about 3-5 minutes with an electric mixer. Once it’s smooth, add the egg whites, one at a time, beating well after each addition. Stir in the vanilla extract for that delicious aroma.
Step 5: Combine Wet and Dry Ingredients
Now, it’s time to combine the wet and dry ingredients. Start by adding the dry mixture to the wet mixture in three parts, alternating with the buttermilk. Begin with a third of the dry ingredients, then add half of the buttermilk, and repeat until everything is incorporated. Mix until just combined—be careful not to over-mix, as this can make the cake dense.
Step 6: Beat the Egg Whites
In a separate bowl, beat the egg whites until soft peaks form. This means the egg whites should hold their shape when lifted with a spoon but still have a slight curl at the tip. Gently fold the beaten egg whites into the batter, being careful not to deflate them. This step will give your cake its signature light, fluffy texture.
Step 7: Bake the Cake
Pour the batter evenly into your prepared cake pans. Bake in the preheated oven for 25-30 minutes, or until a toothpick inserted into the center of the cake comes out clean. If you’re using different-sized pans, the baking time may vary, so keep an eye on them.
Step 8: Cool the Cake Layers
Once baked, remove the cake pans from the oven and allow the cakes to cool in the pans for about 10 minutes. Then, turn the cakes out onto a wire rack to cool completely. This will prevent them from becoming soggy or too fragile when you’re ready to frost them.
5. Making the Coconut Buttercream Frosting
The Coconut Buttercream is what truly makes this cake stand out, adding a luscious, tropical twist that complements the lightness of the White Velvet Cake. Follow these easy steps to whip up a frosting that’s both creamy and packed with coconut flavor.
Step 1: Cream the Butter
Start by placing your unsalted butter in a large mixing bowl. Using an electric mixer, beat the butter on medium speed until it becomes light and fluffy. This should take about 3-5 minutes. The key here is to ensure the butter is at room temperature, as it will make it much easier to cream and create a smooth frosting.
Step 2: Add the Powdered Sugar
Gradually add in the powdered sugar, about a cup at a time, mixing on low speed to avoid a sugar cloud. Once all the sugar is incorporated, increase the speed to medium-high and beat for an additional 2 minutes until the frosting becomes light and fluffy.
Step 3: Add Coconut Milk
Add coconut milk a little at a time, starting with about a tablespoon. The amount of coconut milk you use can vary depending on the consistency of the frosting you prefer. Add just enough to achieve a smooth, spreadable texture—usually about 3-4 tablespoons. Mix until fully incorporated.
Step 4: Incorporate the Shredded Coconut
Next, stir in shredded coconut to give the frosting both texture and flavor. Toasting the shredded coconut before adding it to the frosting can enhance the flavor, so if you have time, lightly toast the coconut in a dry pan over medium heat until golden brown. Once toasted, allow it to cool before adding to your buttercream for that extra depth of flavor.
Step 5: Whip Until Fluffy
Once everything is mixed in, increase the speed on your mixer to high and beat for another 2-3 minutes. This will help the frosting become extra fluffy and airy. Taste the frosting and adjust sweetness or coconut flavor as needed by adding more sugar or coconut milk.
Step 6: Prepare for Frosting
Once your frosting is fluffy and smooth, it’s ready to be used! If you’re not frosting the cake immediately, you can store the buttercream in an airtight container in the fridge for up to 3 days. Just remember to let it come to room temperature before using, and give it a quick whip to get it back to its creamy consistency.
6. Assembling and Decorating the Cake
Now that both your White Velvet Cake and Coconut Buttercream Frosting are ready, it’s time to assemble and decorate your cake! This is where you can get creative and make the cake visually stunning while keeping that delicious, tropical flavor intact.
Step 1: Level the Cake Layers
Once your cake layers have cooled completely, it’s important to level them to ensure they stack neatly. Use a serrated knife or a cake leveler to trim the tops of each cake layer so they’re flat. This step ensures your cake layers sit evenly on top of each other and that the frosting has a stable base.
Step 2: Apply a Thin Layer of Frosting (Crumb Coat)
Before you go all in with frosting, apply a thin layer of Coconut Buttercream all over the cake. This is called the crumb coat, and its purpose is to lock in any crumbs so they don’t mix with the final layer of frosting. Spread a thin, even layer of frosting over the entire cake using a spatula. Once it’s coated, place the cake in the refrigerator for about 20-30 minutes to let the crumb coat set. This step helps create a smooth base for your final frosting layer.
Step 3: Frost the Cake
After the crumb coat has set, it’s time to apply the final layer of frosting. Using your spatula or an offset spatula, take a generous amount of Coconut Buttercream and spread it evenly over the top and sides of the cake. Work from the center outwards and then down the sides. Be sure to cover the entire cake with a smooth layer of frosting.
Step 4: Smooth the Frosting
To achieve that perfectly smooth finish, use a bench scraper or a straight spatula. Run it gently around the sides of the cake while rotating it on a turntable. This will smooth out the frosting, giving your cake a polished, professional look. If you prefer a more textured or rustic look, feel free to leave the frosting a little rough.
Step 5: Decorate with Toasted Coconut
For added texture and a pop of flavor, toasted shredded coconut is a fantastic garnish. Sprinkle a generous amount of toasted coconut over the top and around the sides of the cake. This not only enhances the coconut flavor but also adds a beautiful, crunchy contrast to the soft frosting.
If you want to add more decorations, you could also pipe small swirls of frosting along the edges or top, or even place some fresh fruit like raspberries or coconut flakes for an extra visual touch.
Step 6: Let the Cake Set
Once your cake is fully frosted and decorated, place it in the refrigerator for about 30 minutes to allow the frosting to firm up a bit. This also helps the cake layers meld together, ensuring that your first slice is as beautiful as it is delicious.
7. FAQs (Frequently Asked Questions)
As you prepare to make your White Velvet Cake with Coconut Buttercream, you might have some questions along the way. Here are some of the most frequently asked questions about this recipe, along with answers that will help ensure your cake turns out perfectly.
1. Can I make this cake ahead of time?
Absolutely! You can bake the cake layers in advance and store them in an airtight container for up to 3 days at room temperature, or freeze them for up to 3 months. Just make sure to wrap them tightly in plastic wrap and foil before freezing. When you’re ready to assemble, let them thaw at room temperature, and then proceed with the frosting.
2. How can I make this cake more coconut-flavored?
If you want a more pronounced coconut flavor, try adding coconut extract to both the cake batter and the frosting. You can also increase the amount of shredded coconut in the frosting or add a little coconut cream to the cake batter for extra richness.
3. Can I use a different type of frosting?
Yes, if you’re not a fan of Coconut Buttercream, you can replace it with a classic buttercream frosting or cream cheese frosting. However, keep in mind that the coconut flavor will be less pronounced, so you may need to add extra coconut essence or flavoring.
4. How do I store leftover cake?
Store any leftover cake in an airtight container in the refrigerator for up to 4-5 days. The coconut buttercream can sometimes harden in the fridge, so allow the cake to sit at room temperature for a few minutes before serving.
5. Can I make this cake gluten-free?
Yes, you can substitute the cake flour with a gluten-free flour blend. Make sure to choose a high-quality blend that works well for cakes to achieve the best texture. Keep in mind that gluten-free cakes can sometimes have a denser texture, so you might need to adjust the liquid amounts slightly.
With these tips and answers, you’re ready to bake the perfect White Velvet Cake with Coconut Buttercream. Enjoy every bite of this tropical treat, and don’t forget to share it with your friends and family!