
Introduction to Strawberry Earthquake Cake
If you’re a fan of desserts that are both indulgent and eye-catching, then the Strawberry Earthquake Cake is going to become your new favorite treat! This irresistible cake is a delightful twist on the classic Earthquake Cake, which is known for its gooey, creamy, and melt-in-your-mouth texture. Imagine a cake filled with layers of fresh strawberries, a decadent cream cheese filling, and topped with a slightly crisp crust. This cake doesn’t just taste good – it looks stunning, too!
In this article, we’ll walk you through everything you need to know about making the perfect Strawberry Earthquake Cake. From its origins and key ingredients to step-by-step instructions and creative variations, we’ve got you covered. Ready to learn how to create this show-stopping dessert? Let’s dive into the first part!
What is Strawberry Earthquake Cake?
So, what exactly is a Strawberry Earthquake Cake? To understand this mouthwatering treat, let’s first talk about the classic Earthquake Cake. Originally, an Earthquake Cake was a gooey, rich dessert that included a mixture of cream cheese and chocolate, resulting in a cake that appeared to “crack” or “quake” during baking, creating layers of flavor and texture.
The Strawberry Earthquake Cake follows this same concept, but with a fruity twist. Instead of the traditional chocolate, fresh strawberries (or sometimes strawberry preserves) take center stage, providing a burst of sweetness and color. At its core, the Strawberry Earthquake Cake still features that signature cream cheese filling that melts into the cake, creating a delightful contrast between the fluffy cake and creamy, tangy filling.
What makes it so special? The combination of sweet strawberries, rich cream cheese, and the light, airy texture of the cake mix creates a dessert that’s both simple and elegant. It’s perfect for a summer gathering or a celebratory occasion when you want to impress your guests with minimal effort. The gooey, cracked top adds a whimsical touch that’s bound to get people talking.
Key Ingredients for Strawberry Earthquake Cake
Now that we have a general idea of what the Strawberry Earthquake Cake is, let’s break down the key ingredients that make it a true showstopper. Each ingredient plays a crucial role in creating the perfect balance of sweetness, richness, and texture.
1. Fresh Strawberries
The star of this cake is, of course, the fresh strawberries. These juicy red fruits not only add vibrant color but also a sweet-tart flavor that perfectly complements the richness of the cream cheese filling. You can use either fresh strawberries or strawberry preserves, depending on your preference. Fresh strawberries will give you a burst of natural sweetness and freshness, while preserves add a deeper, concentrated strawberry flavor.
2. Cake Mix
While the Strawberry Earthquake Cake does have some homemade charm, it’s made easier with a simple cake mix. Most recipes call for a white cake mix or sometimes a vanilla cake mix. This serves as the base for the cake, providing the fluffy texture that contrasts wonderfully with the creamy filling. You can always opt for a gluten-free cake mix if you’re catering to dietary needs.
Using a cake mix is also a great way to save time without sacrificing taste. However, for those who love to bake from scratch, we’ll discuss how you can make your own cake batter later.
3. Cream Cheese
The cream cheese is the heart and soul of this cake. It’s what creates that signature earthquake effect—a rich, gooey filling that slightly melts and sinks into the cake as it bakes. The tanginess of the cream cheese balances out the sweetness of the strawberries and the cake mix, creating a complex flavor profile. It’s crucial to use full-fat cream cheese for the creamiest, richest texture, though low-fat cream cheese can also be used if you’re looking for a lighter alternative.
4. Butter
Butter not only adds richness but also helps to create a slightly crisp crust around the cake, which contrasts nicely with the soft interior. Melted butter is often poured over the batter before baking to give the cake its golden finish. It’s a crucial ingredient for flavor, so don’t skimp on it!
5. Powdered Sugar
Powdered sugar is used to sweeten the cream cheese filling, providing just the right amount of sweetness without making it too sugary. It also gives the filling a smooth, velvety texture that contributes to the cake’s melt-in-your-mouth quality.
6. Vanilla Extract
A touch of vanilla extract brings all the flavors together. It enhances the sweetness of the strawberries and the creaminess of the filling, adding a subtle depth to the overall taste of the cake. Make sure to use pure vanilla extract for the best flavor.
With these basic ingredients, you’re well on your way to creating a Strawberry Earthquake Cake that will surely be the highlight of any gathering. But of course, just having the ingredients isn’t enough. In the next section, we’ll go through the step-by-step process of how to assemble and bake your cake!
Stay tuned for the next part, where we’ll dive into the Strawberry Earthquake Cake preparation process.
How to Make Strawberry Earthquake Cake: Step-by-Step Guide
Now that we know the ingredients, let’s roll up our sleeves and dive into the process of making this delicious Strawberry Earthquake Cake. Don’t worry—it’s easier than it sounds, and the results are well worth the effort! This step-by-step guide will walk you through each phase, from prepping the pan to enjoying the first bite of this irresistible dessert.
Step 1: Preheat the Oven and Prepare Your Pan
Before you get started, it’s important to preheat your oven to 350°F (175°C). This ensures that the cake bakes evenly and achieves that perfect golden-brown texture.
While the oven is heating, grease a 9×13-inch baking dish with butter or cooking spray. You can also line it with parchment paper for an easier release after baking. This helps prevent the cake from sticking to the sides, allowing for a clean and smooth removal once it’s ready.
Step 2: Mix the Cake Batter
Start by preparing your cake mix according to the package instructions. This typically involves combining the cake mix with water, vegetable oil, and eggs. You’ll want to mix everything until smooth and well-combined, avoiding overmixing, which could result in a denser cake.
For an extra kick of flavor, you can add 1 teaspoon of vanilla extract to the batter. This enhances the cake’s flavor and adds a lovely aromatic note to the overall taste.
Step 3: Prepare the Strawberry Layer
Now comes the fun part: the strawberries! If you’re using fresh strawberries, chop them into small pieces. You’ll want a good amount to spread evenly throughout the cake for that burst of fruity goodness in every bite.
Once chopped, toss the strawberries in a bit of sugar (about 2 tablespoons), and let them sit for 5-10 minutes. This will help release some of the juice, which will soak into the cake and create even more flavor. If you’re using strawberry preserves, simply spread a thin layer over the batter in the next steps.
Step 4: Layer the Cake
Take your cake batter and pour it evenly into the prepared baking dish. Use a spatula to spread it into an even layer. Then, gently spoon your sweetened strawberries (or strawberry preserves) over the top of the cake batter, spreading them out evenly.
This is where the magic begins—when the cake bakes, the strawberries will sink down, creating a “lava” effect under the surface of the cake.
Step 5: Make the Cream Cheese Filling
In a separate bowl, beat together the cream cheese, powdered sugar, and vanilla extract until smooth. The cream cheese filling should be thick and spreadable. Take your cream cheese mixture and carefully spoon it over the batter, gently spreading it out with a spatula.
Don’t worry about making it perfect—this filling will spread and sink into the cake as it bakes, creating the signature “earthquake” cracks and gooey, creamy center.
Step 6: Add the Butter and Bake
The final step before baking is to drizzle the melted butter over the top of the cake and filling. This helps create a golden, slightly crispy topping as the cake bakes.
Now, place the baking dish in the preheated oven and bake for about 40-45 minutes, or until the cake is golden brown and a toothpick inserted into the center comes out clean (with just a few moist crumbs attached).
You may notice the cake will start to form cracks as it bakes, and that’s exactly what you want—this is the earthquake effect in action!
Step 7: Cool and Serve
Once the cake is done baking, remove it from the oven and let it cool for about 15-20 minutes. This allows the cream cheese filling to set a bit, making it easier to slice.
For the best experience, serve your Strawberry Earthquake Cake slightly warm, with a dollop of whipped cream or a scoop of vanilla ice cream on the side.
Storage and Customization Tips for Your Strawberry Earthquake Cake
Now that you’ve mastered the art of making the perfect Strawberry Earthquake Cake, let’s talk about how to store it and how to make it your own with some easy customizations. Whether you’re preparing this cake in advance for a special occasion or just looking to tweak it to your personal tastes, we’ve got you covered!
How to Store Strawberry Earthquake Cake
To keep your cake fresh and delicious, proper storage is key. Here’s how to do it:
- Room Temperature Storage
If you plan to eat your Strawberry Earthquake Cake within a day or two, simply cover it with plastic wrap or aluminum foil and store it at room temperature. The cake will stay fresh for about 2-3 days this way. Just make sure it’s kept away from direct sunlight or heat sources, which could dry it out. - Refrigeration
If you need to store the cake for longer than a couple of days, refrigeration is your best bet. Since the cake contains cream cheese, it’s important to refrigerate it to prevent spoilage. Cover the cake tightly with plastic wrap or store it in an airtight container to prevent it from absorbing any unwanted smells or flavors from the fridge.
The cake can last up to 5-7 days in the fridge. Just make sure to let it come to room temperature before serving, as this will enhance the texture and flavor.
- Freezing
For longer storage, you can freeze your Strawberry Earthquake Cake. Simply cover the cake tightly with plastic wrap and then wrap it in aluminum foil to protect it from freezer burn. When you’re ready to enjoy it, just let it thaw in the fridge overnight, and you’ll have a dessert that tastes almost as fresh as the day you made it.
Customizing Your Strawberry Earthquake Cake
One of the best things about Strawberry Earthquake Cake is how easy it is to customize. If you want to add your own twist, here are a few ideas:
- Add Nuts for Crunch
If you love a bit of crunch in your desserts, try adding chopped walnuts, pecans, or almonds to the batter. The nuts will add texture and a nutty flavor that pairs wonderfully with the strawberry and cream cheese. - Swap the Strawberries for Other Berries
While strawberries are the star of the show here, you can easily swap them out for other berries like blueberries, raspberries, or even blackberries. The vibrant color and tartness of these fruits will provide a delicious contrast to the creamy cake. - Add Chocolate
For a chocolatey twist, sprinkle some chocolate chips over the cake before baking. The rich flavor of the chocolate complements the sweetness of the cake, making it even more indulgent. - Go Vegan
If you’re looking for a vegan-friendly option, substitute the cream cheese with a vegan cream cheese alternative, and use a dairy-free cake mix and butter. You can also substitute the eggs with a flaxseed mixture or another egg replacement. - Experiment with Flavors
Want to add even more flavor? Try adding a teaspoon of cinnamon or nutmeg to the cake batter, or mix in a splash of almond extract for a unique twist. These spices will give your cake a little extra warmth and depth of flavor.
With all these options, you can easily personalize your Strawberry Earthquake Cake to suit your taste preferences or dietary needs. Plus, these modifications allow you to get creative with what’s available in your kitchen or what’s in season. The possibilities are endless, making this dessert not only scrumptious but versatile too!
In the next section, we’ll answer some frequently asked questions about Strawberry Earthquake Cake, so keep reading to clear up any doubts you may have!
Frequently Asked Questions (FAQ) About Strawberry Earthquake Cake
Now that we’ve covered how to make, store, and customize your Strawberry Earthquake Cake, let’s dive into some of the most frequently asked questions about this delicious dessert. Whether you’re a first-timer or a seasoned baker, these answers should clear up any uncertainties you might have!
1. Can I make Strawberry Earthquake Cake ahead of time?
Absolutely! One of the great things about Strawberry Earthquake Cake is that it can be made ahead of time. In fact, making it a day before you plan to serve it is a great idea because it allows the flavors to meld together even more. Just be sure to store it in the fridge to keep the cream cheese filling fresh. If you’re making it further in advance, you can also freeze the cake (as mentioned earlier) and thaw it out when you’re ready to serve.
2. Can I use frozen strawberries instead of fresh ones?
Yes, you can absolutely use frozen strawberries if fresh ones aren’t available. However, it’s important to thaw and drain the strawberries before using them in the recipe. Frozen strawberries have more moisture than fresh ones, so draining the excess liquid helps prevent the cake from becoming soggy. Once drained, you can chop them up and use them just like fresh berries.
3. How do I know when my Strawberry Earthquake Cake is fully baked?
To check if your Strawberry Earthquake Cake is done, perform the classic “toothpick test.” Insert a toothpick or cake tester into the center of the cake. If it comes out clean or with only a few moist crumbs attached, the cake is ready. If there’s batter on the toothpick, it needs more time in the oven. Baking times can vary depending on your oven, so keep an eye on the cake as it gets close to the suggested bake time.
4. Can I use a different type of cake mix?
Yes! While a vanilla cake mix works wonderfully for the basic recipe, you can experiment with other flavors like yellow cake mix, chocolate cake mix, or even strawberry cake mix for a unique twist. The flavor of the cake mix will slightly alter the overall taste, so choose one that you think will pair well with the creamy strawberry and cream cheese filling.
5. How can I make my Strawberry Earthquake Cake more decadent?
If you want to take your cake to the next level, consider adding a drizzle of chocolate syrup or whipped cream on top. You could even garnish it with extra chocolate chips, sliced strawberries, or a sprinkle of powdered sugar for an extra touch of elegance. If you’re feeling adventurous, a few crushed graham crackers on top will add some crunch and a nice contrast to the creamy filling.
6. Why is it called an “Earthquake Cake”?
The name “Earthquake Cake” comes from the cracking effect that happens during baking. As the cake bakes, the cream cheese filling and cake batter swirl together, creating a beautifully cracked and “earthquake-like” appearance. This unique texture and look are part of the fun, making it a visually appealing dessert as well as a delicious one!
7. Can I make this cake gluten-free?
Yes! You can easily make this recipe gluten-free by using a gluten-free cake mix. Many brands now offer high-quality gluten-free options that will work well in this recipe. Just be sure to check the rest of your ingredients for hidden gluten (such as in cream cheese or baking powder), and you’re all set!
8. How should I serve Strawberry Earthquake Cake?
Serve your Strawberry Earthquake Cake at room temperature for the best texture. If it has been stored in the fridge, let it sit out for about 15-20 minutes before serving. This allows the flavors to come to life and the creamy filling to soften up just a bit. It’s delicious on its own, but if you want to add some extra indulgence, serve it with a scoop of vanilla ice cream or a drizzle of whipped cream.
Creative Ways to Serve and Present Strawberry Earthquake Cake
Now that you’ve mastered the art of baking a Strawberry Earthquake Cake, let’s move on to the fun part – how to serve and present it in a way that makes it look as impressive as it tastes! Whether you’re hosting a dinner party, bringing it to a potluck, or enjoying a casual dessert with your family, these presentation ideas will elevate the entire experience.
1. Serve in Individual Portions
For a more sophisticated presentation, consider serving individual portions of the Strawberry Earthquake Cake. You can use small glass jars, dessert cups, or even mason jars to create a layered, visually appealing look. Simply cut the cake into small squares and layer them with some of the cream cheese filling, strawberries, and chocolate drizzle. Not only does this make the cake easier to serve, but it also adds a personal touch that’s perfect for special occasions.
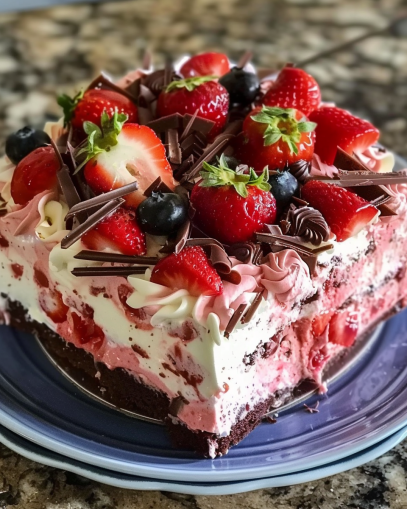
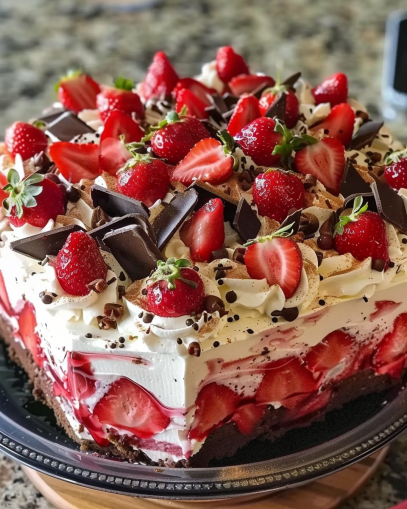
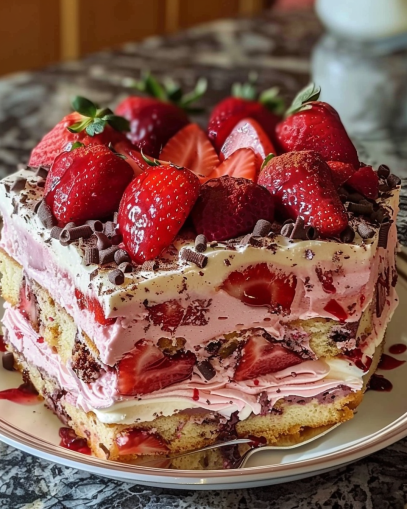
2. Garnish with Fresh Berries
A simple yet effective way to elevate your Strawberry Earthquake Cake is by garnishing it with fresh strawberries. You can slice them thin and fan them out on top of the cake or add a whole berry on each slice. This adds a fresh and vibrant touch that makes the cake pop visually while enhancing its fruity flavor. Plus, it’s a great way to showcase the fresh strawberries that are incorporated into the cake itself.
3. Add a Drizzle of Chocolate Syrup or Ganache
If you’re aiming for a more indulgent experience, consider drizzling some chocolate syrup or a rich chocolate ganache over the top of your cake. This pairs wonderfully with the creamy cheesecake filling and adds a decadent layer of flavor. You could also melt some white chocolate for a contrasting drizzle to make the dessert even more eye-catching. The glossy chocolate will not only taste amazing but also create a beautiful contrast against the soft pink hues of the strawberries.
4. Pair with Ice Cream or Whipped Cream
When it comes to serving, you can never go wrong with a scoop of vanilla ice cream or a dollop of whipped cream. The cool, creamy texture complements the rich, moist Strawberry Earthquake Cake perfectly. For a more upscale touch, opt for homemade whipped cream, flavored with a hint of vanilla or even some citrus zest to add a fresh twist. If you’re feeling extra fancy, top the whipped cream with a few toasted almond slices or chocolate shavings.
5. Use a Cake Stand or Pedestal for Elegant Display
Nothing says elegance like a beautiful cake stand or dessert pedestal. For a special event, place your Strawberry Earthquake Cake on a decorative cake stand to make it the centerpiece of the table. You can even add a few fresh mint leaves or edible flowers around the base for a pop of color. A cake stand raises the dessert to eye level, making it look more inviting and professional. This is especially great for birthday parties, holidays, or any occasion where you want to impress your guests.
6. Serve with a Side of Fruit Compote
Another creative way to serve this cake is by pairing it with a fruit compote. A tangy strawberry compote made from fresh or frozen strawberries can enhance the fruitiness of the cake. You can also make a mixed berry compote with raspberries, blackberries, or blueberries. The sweet-tart compote drizzled on top or served on the side complements the richness of the cake and adds a splash of color to your plate.
7. Offer Different Toppings for Customization
If you’re serving a crowd and want to offer different variations, set up a toppings station! Let your guests customize their Strawberry Earthquake Cake by providing a variety of toppings. Offer options like crushed graham crackers, chopped nuts, mini chocolate chips, or even a drizzle of caramel sauce. This not only makes the dessert more interactive but also caters to different tastes, ensuring everyone can enjoy their own perfect slice.
8. Serve as a Layered Cake for Special Occasions
If you’re making a larger version for a celebration, consider serving the Strawberry Earthquake Cake as a layered cake. Stack multiple layers of cake and filling, frosting each layer with the cream cheese filling and adding a few strawberries between the layers. This approach creates a dramatic, multi-layered effect that will wow your guests when they slice into it. It’s perfect for birthdays, weddings, or any event where you want to show off your baking skills!
Final Thoughts on Serving Strawberry Earthquake Cake
Whether you’re presenting it casually or pulling out all the stops for a special event, Strawberry Earthquake Cake is guaranteed to be a showstopper. Its moist, rich texture and creamy filling already make it a dessert to remember, but with these creative serving ideas, you can take it to the next level. The possibilities are endless, so don’t be afraid to get a little creative and customize your presentation to fit the occasion.
In the next section, we’ll wrap up the article with some final thoughts and additional tips to ensure your Strawberry Earthquake Cake is always a hit!