
1. What Are S’mores Bars?
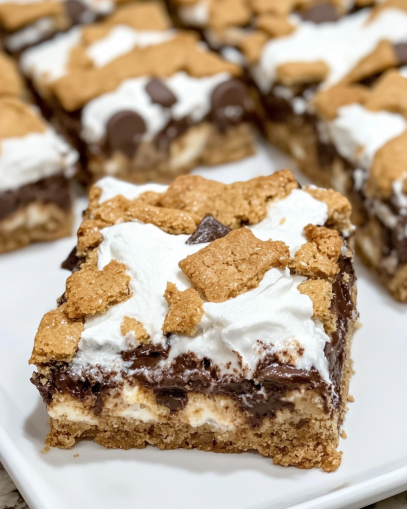
S’mores have long been a beloved treat, especially around campfires. But s’mores bars made with graham cracker cookie take everything you love about the classic treat and make it bakeable. Think of them as a portable, no-fuss version of the traditional s’more, but in bar form. The beauty of these bars is in the layers.
The base is made from a buttery graham cracker crust, which gives you that signature crunch we all adore in a s’more. Then, you add a layer of smooth, melted chocolate—whether you go for rich dark chocolate, creamy milk chocolate, or chocolate chips. To top it all off, you add a layer of gooey marshmallows, which melt beautifully to create that comforting, sticky texture we crave.
In comparison to the traditional s’more, which can be a bit tricky to assemble and eat, these bars are a convenient alternative. They’re perfect for picnics, parties, or even a cozy movie night at home. Plus, they keep the magic of a classic s’more intact with no open flame required. Ready to make your own batch? Let’s get into the key ingredients you’ll need to whip up these delicious bars!
2. Key Ingredients for S’mores Bars Made with Graham Cracker Cookie
The beauty of s’mores bars made with graham cracker cookie lies in their simplicity. To achieve that perfectly balanced flavor and texture, you only need a few key ingredients. Let’s break them down one by one and see why each one is essential for creating the most delicious batch of s’mores bars you’ve ever tasted.
2.1 Graham Cracker Cookies
Graham crackers are the backbone of this recipe. They provide that sweet, slightly crunchy texture we all associate with s’mores. You’ll either use store-bought graham crackers or opt for graham cracker crumbs for convenience. If you prefer to make your own graham cracker cookies from scratch, go for it! However, store-bought graham crackers will work just as well for a faster and easier preparation. Once you crush the graham crackers into crumbs, they form a golden, buttery base that holds everything together. The slightly sweet and crisp flavor gives the bars that authentic s’mores taste.
2.2 Chocolate Layer
Chocolate is a must-have in any s’mores treat, and these bars are no exception. The key is picking the right chocolate for your taste. Milk chocolate is the classic choice, bringing sweetness that pairs perfectly with the crunchy graham cracker base. Dark chocolate offers a richer, more intense flavor for those who prefer a slightly less sweet option. Chocolate chips are also a convenient and popular option for those who want to save time and avoid melting chocolate on the stove. Whatever chocolate you choose, be sure it’s of good quality—this layer is what elevates the entire bar!
2.3 Marshmallows
No s’more is complete without those gooey marshmallows! The marshmallow layer in these bars is what gives them that sticky, sweet, and comforting texture. You can use regular marshmallows or opt for mini marshmallows to help them melt more evenly across the surface. Another fun option is using marshmallow fluff, especially if you prefer a smoother, more spreadable marshmallow filling. Just be sure to toast the marshmallows until they’re golden brown and soft in the center to mimic that campfire effect. The marshmallow layer, when done right, is the perfect balance between chewy and gooey.
These three ingredients—graham crackers, chocolate, and marshmallows—come together to form the ultimate s’mores bars that everyone will love. But don’t forget, there are a few additional steps and tricks to perfecting the recipe, and we’ll dive into those in the next section!
3. Step-by-Step Guide to Making S’mores Bars
Now that you know what makes up the foundation of your s’mores bars made with graham cracker cookie, it’s time to dive into the fun part—baking them! Don’t worry, this recipe is simple, and we’ll walk you through every step to ensure you end up with gooey, crunchy, and absolutely delicious bars. Here’s how to make the perfect s’mores bars.
3.1 Prepping the Graham Cracker Base
First things first: you need that graham cracker base to form the foundation of your bars. Here’s how to do it:
- Crush the graham crackers: If you’re using whole graham crackers, crush them in a food processor or place them in a sealed plastic bag and smash them with a rolling pin. Aim for fine crumbs but don’t stress about being too perfect.
- Mix with butter: In a bowl, combine the graham cracker crumbs with melted unsalted butter. The butter is key for binding everything together and giving it that buttery, crisp texture.
- Press into the pan: Once your mixture is ready, transfer it into a greased 9×9-inch baking pan. Press it down firmly with the back of a spoon or your hands to make sure it’s evenly distributed. The firmer you press, the more solid your base will be after baking.
Bake the base at 350°F (175°C) for 8-10 minutes until it’s slightly golden. Once done, remove from the oven and let it cool for a few minutes.
3.2 Melting the Chocolate and Preparing the Marshmallows
While the graham cracker base is cooling, you can work on the chocolate and marshmallow layers.
- Melt the chocolate: If you’re using a chocolate bar, chop it into small pieces for even melting. You can melt the chocolate in a heatproof bowl over simmering water (double boiler method) or in the microwave in short 30-second bursts. Stir frequently until it’s fully melted and smooth. If you’re using chocolate chips, just toss them into the microwave for 30 seconds at a time, stirring in between until completely melted.
- Prepare the marshmallows: Cut the marshmallows into halves or thirds if you’re using large marshmallows. This will help them melt more evenly and create a better layer. Mini marshmallows can be used without chopping.
3.3 Assembling the Layers
Now that your base is ready and your chocolate and marshmallows are prepped, it’s time to build the layers:
- Spread the melted chocolate: Take your melted chocolate and pour it over the graham cracker crust. Use a spatula to spread it into an even layer, covering the entire surface. You want the chocolate to settle nicely into the crust but without disturbing it too much.
- Add the marshmallows: Once the chocolate layer is spread, sprinkle the marshmallows evenly over the top. Make sure the marshmallows are spread out enough to give you that perfect gooey, marshmallow-y texture with each bite. If you like a toasted marshmallow effect, pile them a little higher in the center.
3.4 Baking Instructions and Tips
- Bake the bars: Pop the pan into the oven at 350°F (175°C) for about 10-12 minutes. Keep an eye on them during the last few minutes of baking. You want the marshmallows to turn a lovely golden brown, and the chocolate to be fully melted. If you want a toasted top, consider broiling the bars for the last minute or so (but watch them closely to prevent burning).
- Let them cool: Once the marshmallows are golden and the chocolate is melted, take the bars out of the oven and let them cool for about 30 minutes. This allows the chocolate to set slightly, making the bars easier to cut. You can also refrigerate them for about 15 minutes if you prefer a firmer texture.
- Cut and serve: Use a sharp knife to slice your bars into squares. These s’mores bars can be a bit sticky, so spraying your knife with cooking spray between cuts can help make the process smoother.
4. Tips for Perfect S’mores Bars
Now that you’ve made your s’mores bars, it’s time to take them to the next level! Here are some tips and tricks to ensure that your s’mores bars made with graham cracker cookie turn out perfect every time.
4.1 Achieving the Perfect Texture
The key to great s’mores bars lies in the texture. You want a crunchy graham cracker base, a smooth chocolate layer, and a chewy, gooey marshmallow topping. Here’s how to get each part just right:
- Graham cracker base: Don’t over-bake the crust. A few minutes in the oven is all it takes to give it that perfect golden color. If you bake it too long, it can become too hard.
- Chocolate layer: Make sure the chocolate is melted properly to avoid any lumps or graininess. Stir frequently to get it completely smooth before spreading it over the crust.
- Marshmallow topping: Toast the marshmallows just until golden brown. Too little, and they won’t melt enough; too much, and they’ll burn.
4.2 Avoiding Common Mistakes
We’ve all had mishaps in the kitchen. Here’s how to avoid some common issues:
- Soggy crust: If the graham cracker base gets soggy, you may have added too much butter. Aim for just enough to hold the crumbs together.
- Burnt marshmallows: Watch the marshmallows closely in the oven. If you’re broiling, it’s just a few seconds—don’t let them over-toast.
4.3 Variations
One of the best things about these s’mores bars is how versatile they are. Feel free to experiment with different types of chocolate—dark chocolate for a richer taste, or white chocolate for a sweeter twist. You can also add in some fun mix-ins like peanut butter, caramel sauce, or even chopped nuts for added texture.
5. How to Store and Serve S’mores Bars
Once you’ve baked and cut your s’mores bars made with graham cracker cookie, the next step is making sure they stay fresh and delicious. Whether you have leftovers or want to prepare them ahead of time, here’s everything you need to know about storing and serving these gooey treats.
5.1 Storing Leftovers
After your s’mores bars have cooled and been sliced, you can store them to keep them fresh:
- Room Temperature: If you’re planning to eat them within a couple of days, simply store the bars in an airtight container at room temperature. They’ll stay fresh for about 3-4 days. This is perfect if you’re serving them at a party or snacking throughout the week.
- Refrigeration: For longer shelf life, you can store the bars in the fridge. They’ll last about 5-7 days if stored properly in an airtight container. The cool temperature can also help set the marshmallows a bit more, making them less sticky when handling.
- Freezing: Yes, you can freeze these bars for up to 3 months. To freeze, wrap them tightly in plastic wrap and place them in a freezer-safe bag or container. To thaw, simply let them sit at room temperature for about 30 minutes, and they’ll be as good as fresh!
5.2 Serving Suggestions
While these bars are delicious on their own, here are a few ways to serve them for maximum enjoyment:
- Warm: Heat them up for a few seconds in the microwave for that freshly-baked feel. The chocolate will melt slightly, and the marshmallow will get extra gooey!
- Toppings: Drizzle with extra chocolate syrup or caramel sauce for a sweet twist.
- Pairing: Serve with a glass of cold milk, hot chocolate, or even a cup of coffee for a decadent dessert.
6. S’mores Bars for Every Occasion
S’mores bars made with graham cracker cookie are the perfect dessert for any event or gathering. Whether it’s a family BBQ, a cozy get-together, or a festive celebration, these bars will be a hit! Here are a few ideas on how to enjoy them for different occasions.
6.1 Perfect for Family Gatherings
When it comes to family gatherings, s’mores bars are a win. They’re easy to make in large batches, and everyone—kids and adults alike—will love them. If you’re hosting a casual cookout or picnic, you can pre-make the bars and serve them as a simple dessert that doesn’t require any extra effort. They’re also portable, so you can take them with you to a family gathering, whether it’s at a friend’s house or a weekend picnic in the park. The bars are delicious at room temperature or warmed up for a few seconds in the microwave. Easy to transport, easy to serve, and hard to resist!
6.2 S’mores Bars for Holidays and Special Events
These versatile treats are also ideal for holidays and special events. Here are a few ideas:
- Summer BBQs: Perfect for outdoor gatherings, s’mores bars bring a little bit of summer campfire nostalgia without the mess of roasting marshmallows.
- Halloween Parties: Decorate your bars with orange and black sprinkles or candy eyes for a spooky twist.
- Christmas: Add a bit of peppermint extract to the chocolate layer for a seasonal spin that pairs beautifully with the marshmallows.
7. FAQs About S’mores Bars Made with Graham Cracker Cookie
We’ve covered everything from the ingredients to the tips for perfect bars, but there are always a few burning questions people have when it comes to baking. Don’t worry, we’ve got you covered! Below, we’ve answered some of the most frequently asked questions about s’mores bars made with graham cracker cookie.
7.1 Can I Use Gluten-Free Graham Crackers?
Yes! If you need a gluten-free option, you can absolutely use gluten-free graham crackers. Many brands now offer gluten-free graham crackers that taste just as good as the regular ones. Simply swap them out for the traditional graham crackers in the recipe. The rest of the ingredients will still work perfectly, so you won’t sacrifice any flavor or texture!
7.2 How Do I Make S’mores Bars Vegan?
Making these bars vegan is surprisingly simple! You can substitute:
- Vegan butter or coconut oil for regular butter.
- Dairy-free chocolate (look for chocolate with no milk or whey) for the chocolate layer.
- Vegan marshmallows (brands like Dandies offer delicious options) in place of regular marshmallows.
This way, everyone—regardless of dietary preferences—can enjoy a bite of this indulgent treat!
7.3 How Can I Make S’mores Bars Without an Oven?
If you don’t have an oven or you’re looking for a no-bake version, you can try making no-bake s’mores bars. Here’s how:
- For the base: Use a no-bake crust made from crushed graham crackers, melted butter, and a bit of sugar. Press it into the pan and refrigerate it until firm.
- For the marshmallows: Use marshmallow fluff or cold marshmallows, and melt them together with the chocolate in a microwave or over a stovetop.
Let the bars set in the fridge for an hour or so, and you’ll have a delicious, no-bake version of s’mores bars!
7.4 Can I Add Nuts or Other Mix-ins?
Absolutely! Feel free to get creative. You can add chopped nuts like walnuts, pecans, or even hazelnuts for a bit of crunch. Other fun add-ins include peanut butter chips, caramel, or even some toffee bits for extra sweetness. If you’re feeling adventurous, you could try drizzling caramel or fudge over the bars before serving!