
Introduction
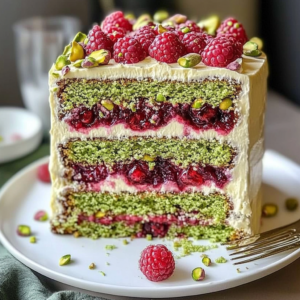
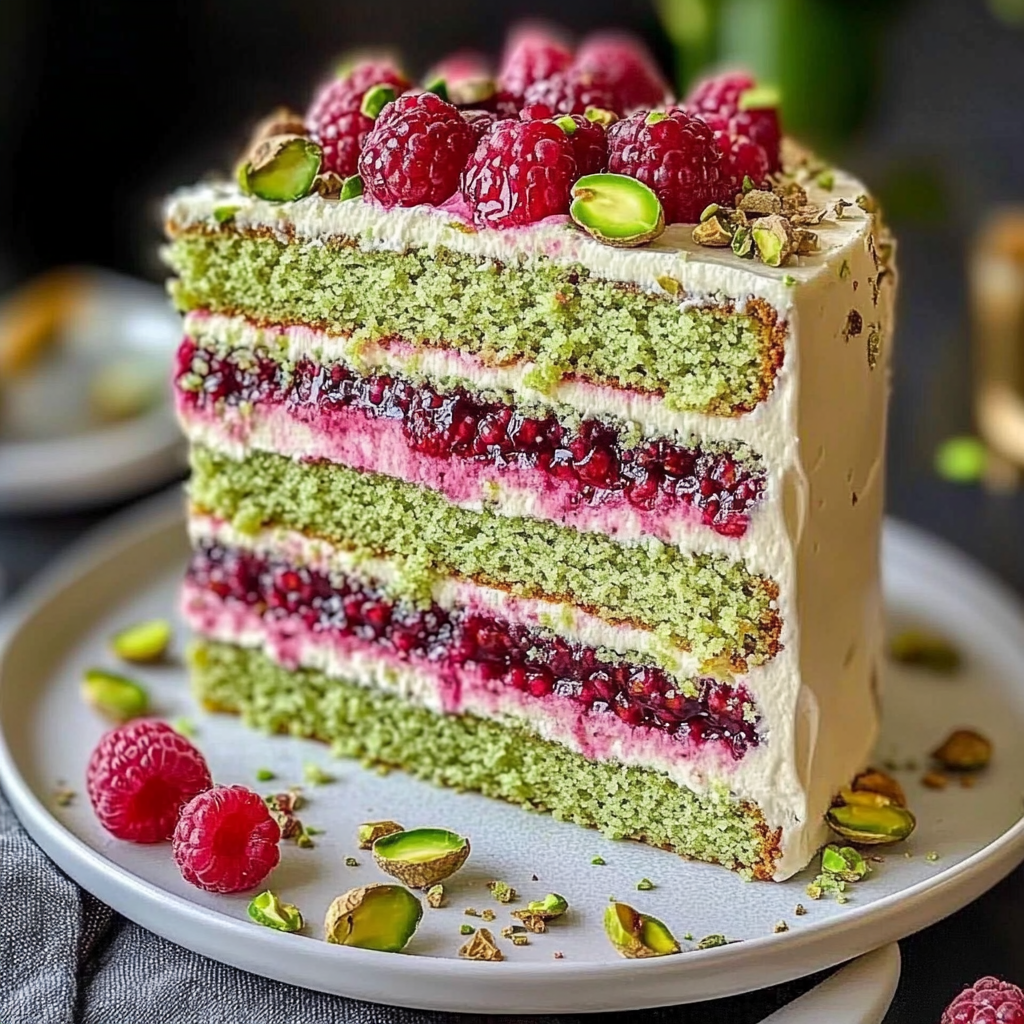
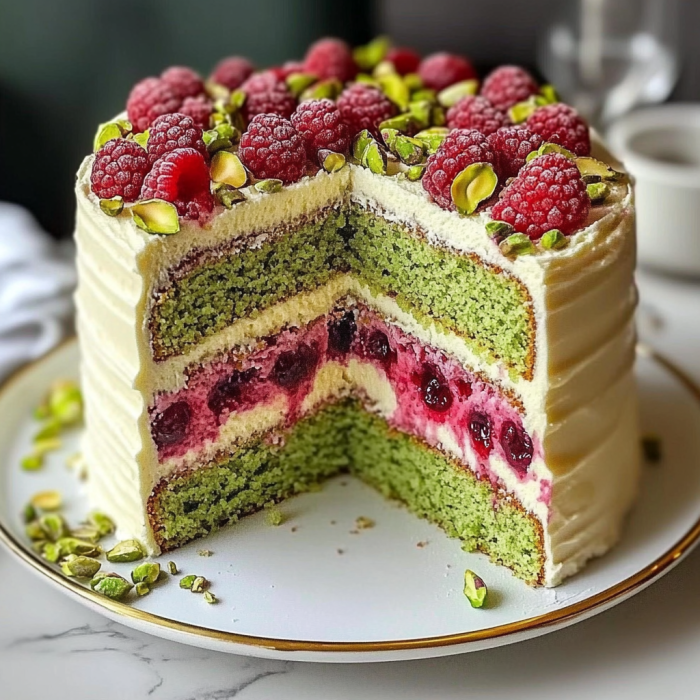
Are you craving a dessert that’s both elegant and bursting with flavor? Enter the Pistachio Raspberry Dream Cake – a showstopper that combines the richness of pistachio with the vibrant, tangy punch of raspberry. With layers of fluffy pistachio cake, a luscious raspberry gelée, smooth vanilla frosting, and a glossy mirror glaze, this cake is an unforgettable treat for any occasion. Whether you’re celebrating a special event or just treating yourself, this cake will undoubtedly wow your guests. Let’s dive into the process of creating this delicious masterpiece!
 Part 1: Introduction to the Pistachio Raspberry Dream Cake
H1: Introduction to the Pistachio Raspberry Dream Cake
The Pistachio Raspberry Dream Cake is no ordinary dessert. It’s a glorious fusion of flavors, with the nutty, earthy taste of pistachios paired with the bright, tangy sweetness of raspberries. This cake is not only delicious but also a visual delight, thanks to its stunning layers and vibrant colors. It’s perfect for anyone who enjoys sophisticated flavors and enjoys impressing guests with their baking skills.
Imagine sinking your fork into a soft, moist pistachio cake that complements the burst of fresh raspberry gelée and the creaminess of the vanilla frosting. Topped off with a beautiful mirror glaze that shines like a jewel, it’s the kind of cake that’ll steal the show at any gathering.
Whether you’re a seasoned baker or just starting your cake-making journey, this recipe is for you. With clear steps and simple ingredients, you’ll be able to create a dream cake that looks and tastes like it came from a high-end bakery. Let’s explore everything you’ll need to make this beauty, from the right ingredients to the tools required to bring it all together.
Part 2: Ingredients and Equipment
H2: Key Ingredients for Pistachio Raspberry Dream Cake
Creating the Pistachio Raspberry Dream Cake starts with gathering the right ingredients. Here’s a breakdown of what you’ll need to craft this heavenly dessert:
Pistachio Cake Ingredients:
- Ground pistachios: The star of the cake. They give the cake its nutty flavor and rich texture. You can either grind your pistachios at home or purchase pre-ground pistachio flour.
- Butter: Adds moisture and richness to the cake.
- Sugar: Granulated sugar is used to sweeten the cake batter.
- Eggs: They provide structure and stability to the cake.
- Flour: All-purpose flour is typically used for the cake’s base.
- Baking powder: Helps the cake rise and achieve the perfect fluffiness.
- Milk: Adds moisture and softens the texture of the cake.
Raspberry Gelée Ingredients:
- Fresh raspberries: The perfect balance of tartness and sweetness to create a vibrant, flavorful gelée.
- Sugar: Helps balance the tartness of the raspberries and creates a syrupy texture.
- Gelatin: Used to thicken the raspberry mixture into a firm, gel-like consistency.
Frosting & Glaze Ingredients:
- Cream cheese: Used as the base for the frosting, giving it a smooth and tangy flavor.
- Vanilla extract: Adds depth to the frosting.
- Powdered sugar: Sweetens the frosting while helping achieve the right consistency.
- White chocolate: For the mirror glaze, giving it a beautiful shine.
- Condensed milk: Helps create the creamy, glossy finish of the mirror glaze.
H2: Essential Equipment
Before you start baking, make sure you have the following tools:
- Baking pans: You’ll need round cake pans for baking the pistachio cake layers.
- Mixer: A stand or hand mixer will make beating the ingredients much easier and quicker.
- Strainer: Essential for straining the raspberry puree to ensure smooth gelée.
- Thermometer: For checking the temperature of the mirror glaze, ensuring it’s perfect when poured over the cake.
Having the right ingredients and equipment will make your cake-making experience much smoother, so gather everything before you begin!
H2: Step-by-Step Instructions
H3: Making the Pistachio Cake
Start by preheating your oven to 350°F (175°C) and greasing and lining your cake pans. You’ll need two 8-inch round pans for this recipe. Once the pans are ready, proceed with making the pistachio cake batter.
- Mix dry ingredients: In a medium bowl, whisk together the flour, baking powder, and a pinch of salt. In a separate bowl, finely grind your pistachios until they reach a fine powder consistency. Mix the ground pistachios into the flour mixture, ensuring it’s well combined.
- Cream butter and sugar: Using a hand mixer or stand mixer, beat together the butter and sugar until light and fluffy. This usually takes about 3-4 minutes.
- Add eggs and wet ingredients: Add the eggs one at a time, mixing well after each addition. Then, pour in the milk and blend until the batter is smooth.
- Combine dry and wet ingredients: Gradually add the dry pistachio-flour mixture into the wet ingredients, folding it in gently. Be sure not to overmix, or the cake might turn out dense.
- Bake: Divide the batter evenly between the prepared cake pans and smooth the top with a spatula. Bake for 25-30 minutes or until a toothpick inserted in the center comes out clean. Once done, remove the cakes from the oven and allow them to cool completely.
H3: Preparing the Raspberry Gelée
Now, let’s move on to the raspberry gelée. This layer adds a beautiful burst of flavor and color to your cake.
- Prepare the raspberry puree: In a blender or food processor, combine the fresh raspberries and blend until smooth. Then, strain the puree through a fine sieve to remove the seeds, leaving only the vibrant raspberry juice.
- Cook the gelée: In a saucepan, combine the raspberry puree with sugar and gelatin. Heat the mixture over low heat, stirring until the gelatin has dissolved and the sugar is fully dissolved. Allow the mixture to cool slightly, then pour it over the top of one of the cooled pistachio cake layers. Refrigerate the cake for at least 2 hours or until the raspberry gelée has set.
H3: Making the Vanilla Frosting
While the raspberry gelée sets, it’s time to prepare the frosting. This frosting complements the cake beautifully with its creamy and slightly tangy flavor.
- Beat cream cheese and butter: In a large mixing bowl, beat together cream cheese and butter until smooth and fluffy. This should take about 3 minutes.
- Add powdered sugar and vanilla: Gradually add in the powdered sugar and vanilla extract, beating until fully combined and smooth. The frosting should be thick and creamy.
H3: Creating the Mirror Glaze
The mirror glaze is what gives this cake its polished, glossy finish. Let’s go over how to make this stunning addition.
- Prepare the glaze ingredients: In a saucepan, combine white chocolate and condensed milk. Heat over low heat until the chocolate is fully melted and combined with the condensed milk.
- Cool and color the glaze: Remove from the heat and allow it to cool to about 95°F (35°C) before adding a few drops of green food coloring. Stir gently to achieve the desired hue.
- Glaze the cake: Once the cake with the raspberry gelée is assembled, pour the mirror glaze over the top of the cake, allowing it to drip down the sides. Let it set for about 10-15 minutes.
H3: Assembling the Cake
- Layer the cake: Start by placing the first pistachio cake layer on a cake stand or serving platter. Spread a thick layer of the vanilla frosting over the cake.
- Add the raspberry gelée: Carefully place the layer of raspberry gelée on top of the frosting. Gently press the second pistachio cake layer on top, making sure the gelée is nestled between the layers.
- Finish with frosting and glaze: Frost the top and sides of the cake with the remaining vanilla frosting, smoothing it out evenly. Finally, pour the mirror glaze over the top, allowing it to drip down the sides.
- Garnish (optional): For a finishing touch, sprinkle chopped pistachios and fresh raspberries on top of the cake for a pop of color and added texture.
 Part 4: Decoration and Presentation Tips
H2: Enhancing the Visual Appeal of Your Cake
Now that your Pistachio Raspberry Dream Cake is assembled, let’s turn it into a showstopper. The key to an impressive cake lies not only in the flavors but also in its presentation. Here are a few tips to help elevate your cake’s appearance.
H3: The Finishing Touch: Garnishing
- Chopped pistachios: After glazing the cake with the mirror finish, sprinkle chopped pistachios around the top edge for a contrasting texture. The vibrant green color of pistachios adds a lovely contrast against the pale frosting and raspberry gelée.
- Fresh raspberries: Nothing says “elegant” like fresh fruit. A scattering of fresh raspberries on top of the cake will enhance the raspberry flavor while adding a pop of color. You can also arrange them in a beautiful pattern for an added visual effect.
- Edible flowers: For an extra touch of elegance, consider adding edible flowers like violets or pansies. These flowers will give your cake a sophisticated look, perfect for weddings or fancy parties.
H3: Creating a Layered Look
To make your Pistachio Raspberry Dream Cake even more impressive, you can serve it in a multi-layered display.
- Naked cake style: If you’re going for a rustic or minimalistic look, a “naked cake” style could work beautifully. This means leaving the sides of the cake exposed so that the layers and fillings are visible. This style works particularly well for showcasing the gorgeous raspberry gelée and pistachio layers.
- Tiered cake design: For a grander presentation, consider making two or three cakes and stacking them into a tiered structure. This allows you to show off more layers, creating a dramatic effect at your event.
H3: Cake Stand and Plates
Your Pistachio Raspberry Dream Cake will look stunning on an elegant cake stand. A simple, white pedestal stand helps elevate the cake and draws attention to its details. If you’re serving at a more casual event, a wooden cake stand can give a rustic charm that pairs well with the natural textures of the pistachios and raspberries.
When serving, use high-quality plates that complement the cake’s color scheme. If your cake has a lot of color (such as vibrant raspberries), choose a neutral-colored plate like white, beige, or soft pastels to let the cake take the spotlight.
Part 5: Storing and Transporting Your Pistachio Raspberry Dream Cake
H2: Keeping Your Cake Fresh
Proper storage is key to ensuring your Pistachio Raspberry Dream Cake stays fresh and delicious for as long as possible. Let’s break down the best practices for storing this cake so that it retains its texture and flavor.
H3: Storing the Cake in the Refrigerator
Since your Pistachio Raspberry Dream Cake contains fresh cream cheese frosting and a delicate raspberry gelée, it’s essential to store it in the refrigerator to prevent spoilage. Follow these simple steps:
- Cover the cake: If you’re not serving the cake immediately, cover it with plastic wrap or place it in a cake box to prevent it from absorbing other odors in the fridge. This will also keep it from drying out.
- Refrigerate immediately: As soon as the cake is assembled and frosted, place it in the fridge. The cake should stay fresh for up to 3-4 days when properly covered. Make sure it’s kept in a spot where it won’t get crushed or knocked around.
H3: Freezing for Long-Term Storage
If you need to store the cake for a longer period, freezing is a great option. Freezing can preserve the pistachio cake and frosting without compromising too much on texture or flavor.
- Freeze before frosting: The best way to freeze this cake is to freeze the cake layers before applying the frosting or glaze. After baking the pistachio cake, let it cool completely, then wrap each layer tightly in plastic wrap. Place them in a freezer-safe bag or container. Frozen cake layers will last for up to 3 months.
- Thawing and assembling: When you’re ready to enjoy the cake, remove the layers from the freezer and let them thaw at room temperature for about 2 hours. Once thawed, proceed with adding the raspberry gelée, frosting, and mirror glaze as you would with a fresh cake.
H3: Transporting Your Cake
Whether you’re bringing your Pistachio Raspberry Dream Cake to a party, wedding, or family gathering, transporting a multi-layered cake can be tricky. Here are a few tips to keep it intact:
- Use a sturdy cake box: A well-fitting cake box is your best friend when transporting a cake. It will help keep the cake safe from the elements and prevent it from toppling over. If you don’t have a cake box, a large, deep cardboard box can also work if lined with non-stick parchment paper.
- Secure the cake layers: If you’re transporting a tiered cake, make sure the layers are securely stacked and that each layer is held together with cake dowels or skewers. This will ensure that the cake doesn’t shift during transportation.
- Keep the cake cool: If you’re traveling a long distance, bring along a cooler or insulated bag to keep the cake cool, especially if it contains frosting that could melt at higher temperatures. A cool environment will help maintain the integrity of the mirror glaze and frosting.
Part 6: Troubleshooting & Tips for the Perfect Cake (Approx. 400 words)
H2: Troubleshooting and Tips
Baking the Pistachio Raspberry Dream Cake can be an enjoyable and rewarding experience, but like any complex recipe, it might present a few challenges. Below are some tips and tricks to help ensure your cake turns out perfectly every time.
H3: 1. My Cake Is Sinking in the Middle – What Went Wrong?
A sunken center is a common problem when baking cakes. One likely culprit is overmixing the batter, which can incorporate too much air and cause it to collapse during baking. To avoid this, be sure to mix your ingredients just until they are combined. Also, check your oven temperature with a thermometer to make sure it’s accurate, as a low oven temperature can also lead to sinking.
H3: 2. How Do I Keep the Pistachios from Being Too Dry?
Pistachios can occasionally dry out, which may affect the flavor and texture of the cake. To keep them fresh and flavorful, toast the pistachios lightly before adding them to the batter. This not only enhances their taste but also ensures they remain moist throughout the baking process. Avoid overtoasting, as this can lead to bitterness.
H3: 3. What Can I Do If My Raspberry Gelée Isn’t Setting?
If your raspberry gelée is too runny or isn’t setting properly, the problem may lie in the gelatin. Make sure to follow the instructions carefully when dissolving the gelatin, and avoid adding too much liquid. If the gelée doesn’t firm up in the fridge, you can add more gelatin and gently reheat the mixture to dissolve it before letting it set again.
H3: 4. How Can I Add More Flavor to the Frosting?
If you want a more pronounced flavor in the cream cheese frosting, consider adding a touch of vanilla extract or a small amount of finely grated lemon zest to complement the pistachio and raspberry flavors. You can also experiment with adding a few teaspoons of rose water for an aromatic twist.
H3: 5. How Do I Ensure a Moist Cake?
For a moist, tender cake, be careful not to overmix your batter. Also, avoid opening the oven door too early as this can cause the cake to collapse. If you’re baking the cake ahead of time, wrapping the cooled layers in plastic wrap and storing them in an airtight container will lock in moisture and ensure your cake stays fresh.
These troubleshooting tips should help resolve any issues you encounter while baking your Pistachio Raspberry Dream Cake. With just a little attention to detail, you can achieve a cake that’s not only flavorful but also perfectly textured and visually stunning.
Part 7: FAQs about the Pistachio Raspberry Dream Cake
H2: Frequently Asked Questions (FAQs)
Baking the Pistachio Raspberry Dream Cake can raise several questions along the way. To ensure your cake turns out just right, here are answers to some common inquiries.
H3: 1. Can I make this cake ahead of time?
Yes! In fact, making your cake ahead of time is a great idea if you’re preparing for a special event. You can bake the pistachio cake layers and store them in an airtight container at room temperature for up to 2 days. Alternatively, freeze the cake layers (wrapped tightly in plastic wrap) for up to 3 months. Once the cake is assembled with the frosting and raspberry gelée, refrigerate it until you’re ready to serve.
H3: 2. How do I make the raspberry gelée more flavorful?
If you want a more intense raspberry flavor in your gelée, consider using fresh raspberries instead of frozen. You can also add a small splash of raspberry liqueur to the mixture for an added depth of flavor. If you prefer a sweeter taste, you can adjust the amount of sugar according to your preference.
H3: 3. Can I substitute pistachios with other nuts?
Absolutely! While pistachios bring a unique flavor to the cake, you can experiment with other nuts such as almonds, walnuts, or even hazelnuts. Just keep in mind that these substitutions will slightly alter the flavor profile of the cake, but they will still provide the desired texture and richness.
H3: 4. How can I prevent my cake from sinking in the center?
A sunken center often occurs if the oven temperature is too low or the cake batter was overmixed. To avoid this, make sure your oven is preheated to the correct temperature and bake the cake for the specified time. You can also check for doneness by inserting a toothpick in the center – it should come out clean when the cake is ready.
H3: 5. How do I store leftovers?
To store your Pistachio Raspberry Dream Cake leftovers, cover the cake with plastic wrap or store it in an airtight container. Keep it in the refrigerator for up to 3-4 days. If you’d like to store it for a longer period, freeze individual slices for up to 1-2 months. Just thaw them in the fridge overnight before serving.
 Conclusion
The Pistachio Raspberry Dream Cake is an indulgent dessert that beautifully balances the earthy richness of pistachios with the refreshing tartness of raspberries. It’s a versatile cake, offering plenty of opportunities for customization—whether you want to experiment with different nuts, fruits, or flavor profiles.
By following the guidelines in this article, you’ll not only perfect the cake’s texture and flavor but also learn creative ways to decorate and present it. Additionally, the troubleshooting tips in the FAQs section ensure a smoother baking experience, so you can confidently create a stunning cake every time.
As you explore various ways to enhance the Pistachio Raspberry Dream Cake, remember that the possibilities are endless. With the right techniques and a little creativity, you can elevate this dessert into something truly unforgettable. Happy baking, and enjoy creating this beautiful treat!