
A Sweet Symphony of Flavors – The Peanut Butter Oreo Cake
Are you ready for an indulgent, irresistible dessert that combines peanut butter, Oreos, and the soft, rich texture of cake? Let me introduce you to the Peanut Butter Oreo Cake, the dessert that’ll leave everyone reaching for seconds (or thirds). It’s the ultimate treat that brings together the creamy richness of peanut butter, the crunch of Oreos, and the soft, fluffy texture of cake in one heavenly bite. Whether you’re celebrating a birthday, hosting a party, or simply craving something sweet, this cake will steal the show.
In this article, we’ll break down the making of this cake, share some variations, provide handy tips, and even discuss how to avoid common baking mistakes. And let’s not forget – you’ll learn how to make it so irresistible that no one can say no. So, let’s get started with Part 1 of this tasty journey!
What is a Peanut Butter Oreo Cake?
When it comes to desserts, combining peanut butter and Oreos seems like the perfect idea, doesn’t it? Both are classic ingredients in the world of sweets, and together, they create a flavor explosion that’s hard to beat. So, what exactly is a Peanut Butter Oreo Cake?
The Essence of Peanut Butter Oreo Cake
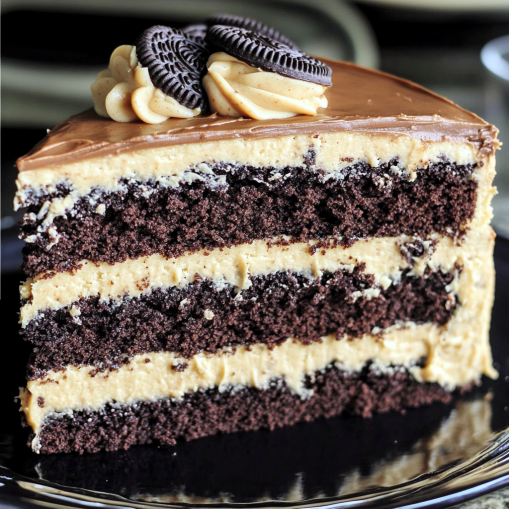
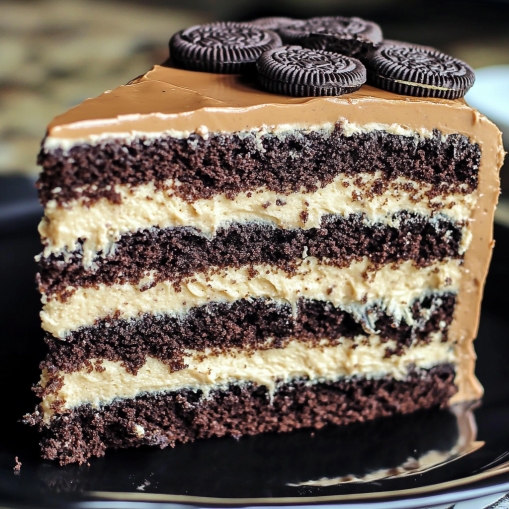
At its core, a Peanut Butter Oreo Cake is a multi-layered dessert that incorporates the two star ingredients: peanut butter and Oreos. Picture this: a soft, moist cake, often made with a chocolate base, paired with a rich and creamy peanut butter frosting, and loaded with crunchy Oreo pieces throughout. It’s sweet, salty, and creamy, all in one bite.
The cake usually consists of a few layers, but there are many ways to make it. You can bake it with a traditional cake mix, or you might choose a no-bake version if you’re short on time (we’ll get into this in Part 3!). The frosting typically has peanut butter, butter, sugar, and sometimes even cream cheese for a little tanginess that balances the sweetness.
But the magic happens when you bring in the Oreos. Whether they’re crushed into the frosting or used as layers between the cake, they add that perfect bit of crunch and flavor. It’s like combining two desserts – cake and a cookie – into one, and who doesn’t love that?
Ingredients Breakdown
The best Peanut Butter Oreo Cake relies on a simple set of ingredients. Here’s a quick list to get you started:
- Cake Layer: Flour, sugar, cocoa powder (for a chocolate cake), eggs, milk, butter, and vanilla extract.
- Peanut Butter Frosting: Peanut butter, powdered sugar, cream cheese or butter, and vanilla extract.
- Oreos: These are the heart of the cake. You’ll need regular Oreos or any variation you prefer (Golden Oreos work wonderfully, too).
- Extras: Some recipes might add chopped chocolate, caramel drizzle, or a sprinkling of sea salt for an elevated flavor.
Of course, feel free to play with these ingredients based on your preferences or dietary needs. Whether you’re looking for a gluten-free, vegan, or lower-sugar version, the Peanut Butter Oreo Cake is adaptable!
The Origins of Peanut Butter and Oreos in Dessert
Peanut butter and Oreos are two powerhouse ingredients in the world of baking, but how did they come to dominate the dessert scene? Let’s take a quick peek at their history.
Peanut butter has been around for centuries, but it gained popularity as a go-to ingredient for desserts in the early 20th century. With its rich texture and nutty flavor, it became a favorite among bakers looking to add depth to their creations.
As for Oreos, these iconic cookies have been a beloved treat since they were first introduced by Nabisco in 1912. Over the years, they’ve become a must-have in cakes, pies, and other sweet treats. The combination of the creamy center and crunchy cookie makes them the perfect addition to any dessert, and they’re especially great in cakes like the Peanut Butter Oreo Cake.
Now that you have an idea of what the cake is and why these ingredients work so well together, let’s dive deeper into Part 2, where we’ll teach you how to make this delicious treat from scratch!
Key Takeaways from Part 1:
- The Peanut Butter Oreo Cake is a layered dessert featuring peanut butter frosting, chocolate cake, and crushed Oreos.
- Key ingredients include peanut butter, Oreos, chocolate cake (or a cake mix), and creamy frosting.
- The combination of rich, creamy, and crunchy textures is what makes this cake so irresistible.
And don’t forget—if you’re interested in the science of baking and want tips for getting that perfect, moist cake every time, check out this guide on how to bake perfect cakes.
How to Make a Peanut Butter Oreo Cake from Scratch
Making a Peanut Butter Oreo Cake from scratch is a fun and rewarding experience. It may seem like a lot of work, but once you see the end result, you’ll know it’s worth every second. Plus, there’s something incredibly satisfying about creating a cake with your own two hands.
Let’s break down the process step-by-step so you can create a masterpiece in your kitchen.
Gather Your Ingredients
Before we start baking, let’s make sure you have everything you need. Here’s a checklist of ingredients for both the cake and the frosting:
For the Cake:
- 1 ¾ cups all-purpose flour
- 1 cup granulated sugar
- ½ cup unsweetened cocoa powder (for that chocolatey goodness!)
- 1 teaspoon baking powder
- ½ teaspoon baking soda
- ½ teaspoon salt
- 2 large eggs
- 1 cup buttermilk (or regular milk if you don’t have buttermilk on hand)
- ½ cup vegetable oil
- 1 teaspoon vanilla extract
- 1 cup boiling water (to make the batter nice and smooth)
For the Peanut Butter Frosting:
- 1 cup peanut butter (creamy works best)
- ½ cup unsalted butter, softened
- 2 cups powdered sugar
- 1 teaspoon vanilla extract
- 1 tablespoon heavy cream or milk (adjust for consistency)
- Pinch of salt (to balance out the sweetness)
For the Oreo Filling:
- 12 to 15 Oreos, crushed into crumbs (you can use a food processor or just crush them in a plastic bag with a rolling pin)
Once you’ve gathered everything, we’re ready to get started!
Prepare the Cake Layers
Preheat your oven to 350°F (175°C) and grease two 9-inch round cake pans, then line the bottoms with parchment paper. This ensures that your cake layers come out clean and perfect!
- Mix Dry Ingredients: In a large bowl, whisk together the flour, sugar, cocoa powder, baking powder, baking soda, and salt. This will be the base of your cake.
- Combine Wet Ingredients: In another bowl, beat together the eggs, buttermilk, vegetable oil, and vanilla extract. Once well-mixed, slowly add this wet mixture to your dry ingredients. Stir until combined.
- Add Boiling Water: The key to a super moist cake is adding boiling water to the batter. It will thin the batter out, but that’s exactly what you want. Slowly pour in the boiling water and mix until smooth.
- Bake the Cake Layers: Divide the batter evenly between the prepared pans and bake for about 30-35 minutes, or until a toothpick inserted in the center comes out clean. Let the cakes cool in the pans for 10 minutes, then transfer to wire racks to cool completely.
Make the Peanut Butter Frosting
While the cake is cooling, let’s whip up the peanut butter frosting. This frosting is the star of the cake, with its smooth and creamy texture that perfectly complements the chocolate cake and crunchy Oreos.
- Beat the Peanut Butter and Butter: In a medium bowl, beat together the peanut butter and softened unsalted butter until light and fluffy. This can take about 2 minutes.
- Add Powdered Sugar and Vanilla: Gradually add the powdered sugar, 1 cup at a time, beating well after each addition. Add the vanilla extract and a pinch of salt. If the frosting seems too thick, add a tablespoon of heavy cream or milk to achieve a spreadable consistency.
- Beat Until Smooth: Continue beating for about 2-3 minutes until the frosting is smooth and creamy.
Assemble the Cake
Now comes the fun part—assembling the cake! We’ll make sure the layers are perfectly stacked and decorated with the peanut butter goodness.
- Layer the Cakes: Place one cake layer on a serving platter or cake stand. Spread a generous amount of peanut butter frosting over the top.
- Add the Crushed Oreos: Sprinkle the crushed Oreos evenly on top of the frosting. This adds a delicious crunch that contrasts with the creamy texture of the frosting.
- Add the Second Cake Layer: Place the second cake layer on top of the frosted layer, then frost the entire cake with the remaining peanut butter frosting.
- Decorate the Cake: To finish, garnish the top of the cake with extra crushed Oreos for a fun, decorative touch. You can also drizzle melted chocolate or peanut butter on top for added indulgence.
Key Takeaways from:
- The Peanut Butter Oreo Cake involves two main components: the cake layers and the creamy peanut butter frosting.
- The cake layers are made from a simple combination of dry ingredients, eggs, milk, and cocoa powder, with boiling water to create a moist texture.
- The frosting is made with creamy peanut butter, butter, powdered sugar, and vanilla, creating a velvety finish that pairs perfectly with the cake.
- Don’t forget to layer in crushed Oreos for a delightful crunch that adds both flavor and texture.
Now that you know how to create the cake itself, it’s time to explore more ways to customize this dessert and learn about some helpful tips for making it even better. Stay tuned for Part 3!
And in case you’re looking for additional baking tips, feel free to check out this helpful guide on making the best cakes.
Tips and Tricks for Perfecting Your Peanut Butter Oreo Cake
Now that you know how to make a Peanut Butter Oreo Cake from scratch, let’s talk about some expert tips and tricks to ensure your cake turns out perfectly every time. Whether you’re a seasoned baker or a beginner, these tips will elevate your cake-making game and make sure your cake is a hit at any occasion.
1: Ensure Your Cake Layers Are Moist
The key to a moist cake is to not over-bake it. Here’s how to make sure your Peanut Butter Oreo Cake layers stay soft and tender:
- Check for Doneness Early: Start checking your cake layers about 5 minutes before the recommended bake time. Insert a toothpick into the center of the cake; if it comes out clean, it’s done. If not, give it a few more minutes.
- Don’t Open the Oven Too Early: Resist the urge to check on your cake constantly. Opening the oven door too early can cause the cake to collapse. Wait until the cake has risen fully before checking.
- Use Room Temperature Ingredients: Before you mix your wet and dry ingredients, make sure the eggs, butter, and milk are at room temperature. This helps them incorporate more easily, leading to a smoother batter and better texture in your cake.
2: Perfect Your Peanut Butter Frosting
While making frosting may seem simple, it’s easy to end up with something too thick, too runny, or not smooth enough. To get that perfect frosting:
- Cream the Peanut Butter and Butter Properly: Don’t rush this step. Beat the peanut butter and butter together for at least 2-3 minutes until they’re light and fluffy. This will give your frosting that smooth, airy texture.
- Adjust Consistency: If the frosting feels too thick to spread, add a little milk or heavy cream, one tablespoon at a time, until you reach the desired consistency. You don’t want it to be too runny or too stiff; it should be spreadable but hold its shape.
- Chill the Frosting: If you find the frosting too soft to work with, refrigerate it for 10-15 minutes. This will firm it up and make it easier to spread without it sliding off the cake.
3: Add a Little Extra Crunch
One of the highlights of the Peanut Butter Oreo Cake is the Oreos. Adding them not only to the cake layers but also as a decoration can take this cake to the next level:
- Crushed Oreos in the Frosting: You can crush some Oreos and mix them directly into the peanut butter frosting. This will add even more texture and flavor, making every bite a delightful mix of creaminess and crunch.
- Oreo Garnishes: After frosting the entire cake, press additional Oreo crumbs into the sides or sprinkle them over the top. You could also create a fun Oreo ring around the cake’s outer edge for a striking look.
4: Make It a Layered Cake
If you want to turn your Peanut Butter Oreo Cake into a showstopper, consider making it a layered masterpiece. Here’s how to do it:
- Bake Two or Three Layers: Instead of a two-layer cake, bake three layers. This adds more room for frosting and Oreos in between, making each slice even more decadent. If you go with three layers, divide the frosting and crushed Oreos evenly to ensure every layer gets enough attention.
- Layering the Cake: When stacking the layers, alternate between cake, peanut butter frosting, and crushed Oreos. This way, each slice will have layers of cake, cream, and crunch.
5: Add Some Fun Variations
The beauty of a Peanut Butter Oreo Cake is how adaptable it is! Feel free to get creative with some of these variations:
- Add a Drizzle: Drizzle melted chocolate, caramel, or peanut butter over the top of the cake for extra richness and an eye-catching design.
- Go Beyond the Classic Oreo: Mix it up by using different flavored Oreos, like Mint Oreos or Peanut Butter Oreos, for a unique twist on the classic.
- Make it No-Bake: If you’re short on time, make a no-bake version of this cake. Instead of baking the cake, use a no-bake cheesecake or a graham cracker crust, layering it with peanut butter, Oreos, and a creamy filling. No oven required!
6: Decorating the Cake
Presentation is everything when it comes to desserts, and with a Peanut Butter Oreo Cake, you want it to look as delicious as it tastes. Here are some ideas for decorating your cake:
- Oreo Edging: After frosting, press Oreos into the sides of the cake to create a beautiful, textured edge that looks like it came from a professional bakery.
- Peanut Butter Swirls: If you’ve got some leftover peanut butter frosting, use it to make decorative swirls on top. This adds a neat, sophisticated touch.
- Sprinkles and Extras: Add a few extra sprinkles of cocoa powder, a handful of chopped peanuts, or mini chocolate chips for some added visual appeal and flavor.
Key Takeaways from
- To keep your cake moist, avoid over-baking, check early, and use room temperature ingredients.
- For the peanut butter frosting, make sure to beat it well and adjust its consistency with milk if needed.
- The Oreos are a crucial part of the cake; add them inside the frosting or as decoration to elevate the crunch and flavor.
- Customize your cake by adding drizzles of chocolate, experimenting with different flavored Oreos, or even making it a no-bake dessert.
By now, you should have a great understanding of how to make a Peanut Butter Oreo Cake that’s not just delicious but also impressive. And when you’re ready to explore more variations and tricks, don’t forget to check out this guide on creative cake decorating.
Frequently Asked Questions
Even though the Peanut Butter Oreo Cake is pretty straightforward to make, it’s common for people to have a few questions along the way. Whether you’re a first-time baker or a pro looking for extra tips, this FAQ section will answer all your burning questions about this dessert. So let’s get to it!
1. Can I use crunchy peanut butter for the frosting?
Absolutely! Using crunchy peanut butter instead of smooth adds extra texture and flavor to your Peanut Butter Oreo Cake. It’s a great option if you love that little crunch in your frosting. Just be sure to mix it well to avoid clumps, and adjust the sweetness to your liking.
2. Can I make the Peanut Butter Oreo Cake ahead of time?
Yes, you can! This cake actually holds up really well when made ahead of time. To store, cover the cake tightly with plastic wrap or place it in an airtight container. It’ll stay fresh in the fridge for 2-3 days. If you’re planning to make it further in advance, you can freeze the cake layers and frosting separately. Just thaw them in the fridge overnight before assembling and serving.
3. Can I substitute the Oreos with another cookie?
While Oreos are the star of this cake, you can definitely substitute them with other cookies. For a different twist, try using chocolate chip cookies, chocolate wafer cookies, or even peanut butter cookies. However, be mindful that the flavor profile will change depending on your cookie choice, so make sure it complements the peanut butter filling.
4. Is it possible to make a gluten-free Peanut Butter Oreo Cake?
Yes, you can! If you need a gluten-free version, look for gluten-free Oreos (there are plenty of varieties available) and make sure the cake mix or any flour you use is certified gluten-free. You can easily substitute regular flour with a gluten-free all-purpose flour blend to keep the cake soft and fluffy.
5. How do I make sure the cake doesn’t get too sweet?
Peanut Butter Oreo Cake can be a bit on the sweet side, especially with the frosting and Oreos. To balance out the sweetness, you can reduce the sugar in the cake batter slightly or use a dark chocolate ganache instead of a super sweet topping. Another trick is to add a pinch of salt to the frosting to bring out the flavors and cut through the sweetness.
6. Can I make this cake without baking?
Definitely! If you prefer a no-bake version, you can skip the cake layers and make a no-bake cheesecake layer instead. Use peanut butter, cream cheese, Oreos, and a graham cracker crust to create a quick and easy dessert. It’s a fun, simple alternative, and it still gives you the same delicious peanut butter and Oreo flavors without turning on the oven.
7. What’s the best way to store leftover Peanut Butter Oreo Cake?
If you have any leftovers (which is rare, right?), store them in an airtight container in the fridge. The cake should stay fresh for 2-3 days. If you’d like to store it for longer, you can freeze slices. Just wrap each slice tightly in plastic wrap and then in aluminum foil. When ready to eat, thaw the slice in the fridge overnight and enjoy it as if it were freshly made!
8. Can I add more layers to my Peanut Butter Oreo Cake?
Absolutely! If you love a multi-layer cake, feel free to add more layers. Simply bake additional cake layers and layer them with peanut butter frosting and crushed Oreos. Just be mindful to adjust the frosting recipe if needed to make enough to cover all the layers.
9. What should I serve with Peanut Butter Oreo Cake?
Since this cake is rich and indulgent on its own, you can serve it with something light and refreshing to balance out the flavors. Consider pairing it with a scoop of vanilla ice cream, fresh fruit, or even a cup of coffee to complement the sweetness and richness of the cake.
10. Can I use homemade peanut butter in the frosting?
Yes, you can! If you have homemade peanut butter on hand, feel free to use it in the frosting. Just make sure it’s smooth and creamy enough to blend well with the other ingredients. You may need to adjust the consistency with a bit of milk or cream if it’s too thick.
Here’s why you’ll love making and eating this cake:
- Rich, Indulgent Flavor: The combination of peanut butter and Oreos is a match made in dessert heaven. It’s a flavor duo that’s as comforting as it is indulgent.
- No-Bake and Easy to Prepare: The no-bake method is super easy, making this cake perfect for beginners or anyone short on time. No complicated steps, just pure deliciousness!
- Versatile and Customizable: With options like adding more layers, using different cookies, or even going gluten-free, this cake is adaptable to suit various tastes and dietary needs.
- Impressive Presentation: Not only does this cake taste amazing, but it’s also visually stunning. It’s one of those desserts that looks as good as it tastes, making it perfect for celebrations, parties, or a special family treat.
Pro Tips for the Perfect Peanut Butter Oreo Cake:
- Don’t rush the chilling process: The cake’s texture will improve if it’s allowed to cool completely and chill in the fridge before serving. This step helps the frosting set perfectly, making each slice easier to cut and serve.
- Experiment with toppings: Add extra chocolate chips, peanut butter drizzles, or whipped cream for an extra indulgent touch.
- Make it ahead: This cake gets even better the next day as the flavors meld together. Make it a day in advance, and it’ll be ready for a perfect reveal!
Final Thoughts:
This Peanut Butter Oreo Cake has all the right flavors in all the right places, and it’s the kind of dessert that’s sure to impress. Easy, fun, and utterly delicious – you just can’t go wrong. Whether you’re new to baking or a seasoned pro, this cake will leave you with a satisfied smile and an empty plate. So, grab your ingredients, roll up your sleeves, and dive into the world of creamy, crunchy, chocolatey peanut butter goodness!
That’s a wrap on the Peanut Butter Oreo Cake journey! I hope this article has inspired you to give this cake a try and make it your new go-to dessert. If you’re craving more dessert ideas or need tips on cake baking techniques, feel free to check out this baking guide to take your skills to the next level.
Happy baking!