
Before diving into the detailed steps, tips, and variations, this article will walk you through every aspect of creating a delicious No-Bake Blackberry Split Cake. From assembling the perfect crust to mastering a creamy filling and a vibrant blackberry topping, this guide has you covered. Let’s get started!
Part 1: Introduction

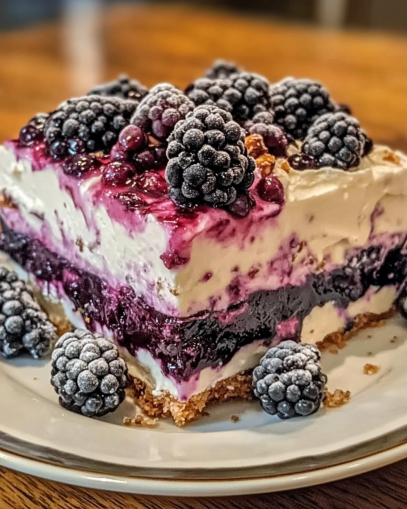
There’s something magical about a dessert that doesn’t require an oven—especially when it’s as decadent and delightful as a No-Bake Blackberry Split Cake. This dessert combines the tangy sweetness of blackberries, the smooth richness of cream cheese, and the buttery crunch of a graham cracker crust to create a perfect harmony of flavors.
Whether you’re hosting a summer gathering, looking for an easy dessert idea, or simply craving something indulgent, this cake is a lifesaver. It’s fuss-free, comes together in no time, and tastes like a slice of heaven. Plus, with no baking required, it’s perfect for keeping your kitchen cool on hot days.
In this article, we’ll walk through every step to make this crowd-pleaser, share tips for perfection, explore creative variations, and answer your top questions about the recipe. So grab your ingredients, and let’s create something extraordinary!
Part 2: Ingredients and Equipment Needed
Creating a No-Bake Blackberry Split Cake is as much about assembling the right ingredients as it is about execution. Here’s a detailed rundown of what you’ll need to ensure your cake turns out perfect every time.
Ingredients
- For the Crust:
- 2 cups graham cracker crumbs (or digestive biscuit crumbs for a twist)
- 1/2 cup unsalted butter, melted
- 2 tablespoons granulated sugar
- For the Creamy Filling:
- 16 ounces cream cheese, softened
- 1 cup powdered sugar (sifted for a smoother texture)
- 1 teaspoon vanilla extract
- 1 cup heavy whipping cream, whipped to soft peaks
- For the Blackberry Layer:
- 2 cups fresh blackberries (or frozen, thawed and drained)
- 1/2 cup granulated sugar
- 2 tablespoons cornstarch
- 1 tablespoon lemon juice
- 1/4 cup water
- For Garnish:
- Whipped cream, fresh blackberries, and mint leaves (optional but highly recommended for a stunning presentation)
Equipment
- 9×9-inch square pan (or a springform pan for easy removal)
- Mixing bowls of various sizes
- Hand or stand mixer
- Silicone spatula
- Small saucepan
- Plastic wrap or aluminum foil (for chilling the cake)
Key Ingredient Notes
The secret to a standout No-Bake Blackberry Split Cake lies in using ripe, juicy blackberries and high-quality cream cheese. Opt for unsalted butter for the crust, as it allows you to control the sweetness.
Pro Tip:
If you’re short on time, pre-made graham cracker crusts can work, but crafting your own adds a homemade touch that elevates the flavor.
Now that we’ve got everything ready, let’s dive into making the crust in the next section!
Part 3: Preparing the Graham Cracker Crust
A firm yet crumbly graham cracker crust is the base for any exceptional no-bake dessert, and it’s no different for this No-Bake Blackberry Split Cake. Follow these steps for the perfect foundation.
Step 1: Combine Ingredients
- Measure your crumbs: In a medium-sized mixing bowl, combine 2 cups graham cracker crumbs with 2 tablespoons granulated sugar. The sugar adds just the right touch of sweetness.
- Add melted butter: Pour 1/2 cup melted unsalted butter over the mixture. Use a silicone spatula to mix until the crumbs are evenly coated and resemble damp sand.
Step 2: Press into the Pan
- Prepare the pan: Line your 9×9-inch square pan with parchment paper or lightly grease it to ensure easy removal.
- Form the crust: Transfer the crumb mixture into the prepared pan. Use the bottom of a measuring cup or a flat spoon to press it down firmly and evenly. A compact crust ensures stability for the layers above.
Step 3: Chill the Crust
Pop the crust into the refrigerator for at least 30 minutes or until firm. If you’re in a hurry, a quick 10-minute chill in the freezer will also do the trick.
Pro Tip:
For a unique flavor twist, substitute a portion of the graham crackers with crushed pecans or vanilla wafer cookies.
This crust not only holds up beautifully but also provides a delightful crunch that complements the creamy layers of the cake. Ready for the next step? Let’s whip up that luxurious cream cheese filling in Part 4!
Part 4: Whipping Up the Cream Cheese Filling
The heart of this No-Bake Blackberry Split Cake is its velvety, tangy cream cheese filling. It’s what gives the cake its luxurious, melt-in-your-mouth quality. Follow these steps for a perfectly smooth and flavorful filling.
Step 1: Gather the Ingredients
- Cream Cheese: Use 16 ounces (2 packages) of full-fat cream cheese. Ensure it’s softened to room temperature for easier blending.
- Powdered Sugar: Add 1 cup powdered sugar for a smooth and sweet texture.
- Vanilla Extract: Mix in 1 teaspoon vanilla extract for a warm, aromatic undertone.
- Heavy Whipping Cream: You’ll need 1 cup of cold heavy whipping cream, which adds fluffiness to the mixture.
Step 2: Beat the Base
- Start with cream cheese: In a large mixing bowl, beat the softened cream cheese with an electric mixer on medium speed until smooth and lump-free.
- Incorporate the sugar and vanilla: Gradually add the powdered sugar and vanilla extract, blending until fully incorporated and creamy.
Step 3: Add Fluffiness
- Whip the cream separately: In another bowl, whip the heavy whipping cream until it forms stiff peaks. Be careful not to overwhip—it should be light and airy.
- Fold it in: Gently fold the whipped cream into the cream cheese mixture. Use a spatula to fold in small batches, ensuring you don’t deflate the mixture.
Step 4: Layer It Over the Crust
- Retrieve the chilled crust from the refrigerator.
- Spoon the cream cheese filling over the crust, spreading it evenly with an offset spatula or the back of a spoon. Smooth out the top for a clean, professional look.
Part 5: Adding the Blackberry Bliss Layer
Now that the cream cheese layer is perfectly in place, it’s time to turn up the flavor dial with a juicy, fresh blackberry topping. This layer not only adds sweetness and tartness but also gives the cake its striking color contrast.
Step 1: Ingredients You’ll Need
- Fresh Blackberries: You’ll need 1 ½ cups of fresh blackberries. If unavailable, frozen ones work well—just thaw and drain them first.
- Sugar: Add ⅓ cup granulated sugar to balance the tartness.
- Lemon Juice: Use 1 tablespoon fresh lemon juice to enhance the berries’ natural flavor.
- Cornstarch: To thicken the mixture, you’ll need 1 tablespoon of cornstarch mixed with 2 tablespoons water.
Step 2: Prepare the Blackberry Sauce
- Cook the blackberries: In a medium saucepan over medium heat, combine the blackberries, sugar, and lemon juice. Stir occasionally until the berries start to release their juices, about 5-7 minutes.
- Thicken the sauce: Add the cornstarch-water mixture and stir continuously until the sauce thickens, forming a glossy, jam-like texture. Remove from heat and let it cool completely.
Step 3: Layer the Blackberry Goodness
- Once cooled, spread the blackberry sauce evenly over the cream cheese layer.
- If desired, reserve a few whole blackberries for garnish. These add an elegant finishing touch when placed strategically across the top.
Step 4: Pro Tips for Perfection
- For a burst of flavor, sprinkle a dash of cinnamon or nutmeg into the blackberry mixture while cooking.
- If you prefer a smoother texture, strain the sauce through a fine-mesh sieve to remove seeds before spreading it onto the cake.
Why This Layer Shines
The blackberry layer offers a beautiful balance of sweetness and tartness, complementing the cream cheese filling’s rich, tangy notes. Plus, the vibrant purple hue elevates the cake’s visual appeal, making it an absolute showstopper!
Coming up next: Learn how to top it all off with the final layer and garnish that will make your No-Bake Blackberry Split Cake truly irresistible.
Part 6: Whipped Topping Elegance
The final step in crafting your No-Bake Blackberry Split Cake is creating a luscious whipped topping that brings it all together. This light, creamy layer not only balances the cake’s flavors but also provides a perfect canvas for decorating.
Step 1: Gather Your Ingredients
- Whipping Cream: Use 1 ½ cups of heavy whipping cream for a fluffy texture.
- Powdered Sugar: Add 2-3 tablespoons for a subtle sweetness.
- Vanilla Extract: Just 1 teaspoon enhances the flavor.
Step 2: Whip It Up
- Chill Your Tools: Before starting, chill your mixing bowl and whisk attachment for 10-15 minutes in the freezer. Cold tools are key to achieving the fluffiest whipped cream.
- Combine Ingredients: Pour the whipping cream into the bowl, then add powdered sugar and vanilla extract.
- Whip to Peaks: Using a hand or stand mixer, whip the cream on medium-high speed until soft peaks form. This process takes about 3-5 minutes. Be careful not to overwhip, or you’ll end up with butter instead of cream!
Step 3: Spread and Smooth
- Gently spoon the whipped topping over the blackberry layer, spreading it evenly with a spatula.
- For a fancier look, use a piping bag to create swirls or decorative dollops.
Step 4: Garnish with Style
Add a final touch by sprinkling crushed graham crackers, blackberry halves, or even a drizzle of melted chocolate over the top. These little extras make your cake both stunning and irresistible.
Why the Whipped Topping Works
This light, airy layer offsets the richness of the cream cheese and the tangy blackberry sauce, ensuring every bite is perfectly balanced. Plus, its versatility lets you play with decorations to match any occasion.
Next up: Dive into serving tips, storage guidelines, and creative variations to elevate your dessert game even further!
Part 7: Serving Tips, Storage, and Creative Variations
Congratulations! Your No-Bake Blackberry Split Cake is now ready to dazzle. Let’s explore the best ways to serve, store, and customize this dessert to make it a showstopper every time.
Serving Tips for Perfection
- Chill Before Serving: Allow the cake to set in the refrigerator for at least 4-6 hours, or ideally overnight. This helps all the layers firm up for easy slicing.
- Cut with Precision: Use a sharp knife, dipped in warm water and wiped clean between slices, for neat and tidy servings.
- Pair It Up: Serve each slice with a dollop of extra whipped cream or a drizzle of blackberry sauce to enhance the presentation.
Storage Guidelines
- Refrigerator: Cover the cake with plastic wrap or place it in an airtight container to keep it fresh. It can last up to 4 days.
- Freezing: To store longer, freeze individual slices wrapped in plastic wrap and placed in a freezer-safe bag. When ready to enjoy, thaw in the refrigerator overnight.
Creative Variations
- Swap the Fruits: Don’t feel limited to blackberries! Try strawberries, raspberries, or even a mixed berry medley for a new twist.
- Chocolate Lovers’ Delight: Add a layer of melted chocolate between the cream cheese and blackberry layers for an extra decadent touch.
- Nutty Crunch: Sprinkle crushed almonds, pecans, or walnuts on top of the whipped cream for added texture and flavor.
- Citrus Zest: Incorporate a teaspoon of lemon or orange zest into the cream cheese layer to complement the tangy blackberry flavor.
Why You’ll Love It Every Time
Whether it’s a family gathering or a potluck, this versatile dessert adapts to any occasion. Its no-bake simplicity ensures you spend less time in the kitchen and more time enjoying the company of loved ones. Plus, the endless customizations make it a recipe you’ll turn to time and time again.
Now that you’ve mastered this delightful dessert, get ready to wow everyone at the table!
Conclusion: A Sweet and Effortless Indulgence
The No-Bake Blackberry Split Cake is more than just a dessert—it’s a celebration of flavors, textures, and simplicity. With its creamy layers, vibrant berries, and effortless preparation, it’s perfect for any occasion, from summer barbecues to festive gatherings. This recipe ensures you can deliver a stunning dish without breaking a sweat, leaving more time for what matters most—creating memories with loved ones.
Now, it’s your turn to bring this dessert to life! Experiment with the variations, share it with friends and family, and savor every bite. Don’t forget to leave a comment below with your thoughts, tips, or creative twists on the recipe. Happy no-baking!