
1. Introduction to Mini Cherry Cheese Danishes
If you’ve ever walked past a bakery and been drawn to the aroma of freshly baked pastries, chances are you’ve caught a whiff of cherry cheese danishes. These delectable treats have been a staple in bakeries around the world for generations, offering a delightful combination of flaky pastry and a rich, creamy filling.
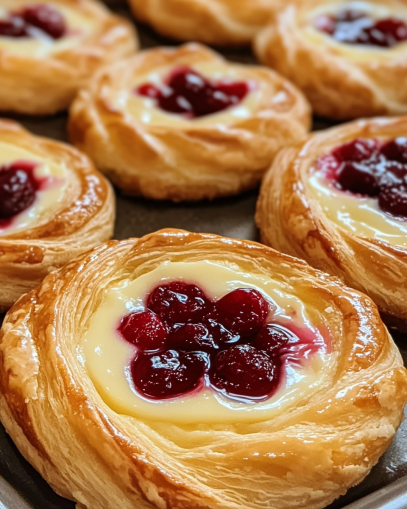
But what makes mini cherry cheese danishes stand out? For starters, they offer the perfect balance of sweet and savory in a conveniently sized bite. With a buttery, golden-brown puff pastry as the base, each mini danish is topped with a velvety cream cheese filling and finished with a dollop of sweet cherry filling for a burst of flavor. Ideal for breakfast or dessert, they’re an indulgent snack that feels like a luxurious treat without requiring a lot of prep time.
Whether you’re hosting a brunch, treating yourself to a homemade dessert, or looking to impress your guests, mini cherry cheese danishes can easily become your go-to recipe. They’re simple to make, but the results are so impressive—each bite leaves you craving more.
And who can resist that combo of flaky pastry and creamy filling? It’s the kind of dessert that evokes feelings of comfort and joy, a sweet treat that brightens your day. Plus, the mini version means you can enjoy them guilt-free—just pop one (or two!) into your mouth, and you’re ready to go.
But before you jump into making these scrumptious pastries, let’s take a look at the history and origins of Danish pastries—because, believe it or not, this little treat has an interesting backstory
2. History and Origin of Danish Pastries
To truly appreciate mini cherry cheese danishes, it helps to understand their origins. You might assume that these pastries come from Denmark, as the name suggests. While it’s true that Danish pastries are famous in Denmark, their history is a bit more complex—and international—than you might think.
Origins of Danish Pastries
The story of Danish pastries begins not in Denmark, but in Vienna, Austria. In the 19th century, the technique for making puff pastry (the flaky layers we all love) was introduced to Denmark by Austrian bakers. These bakers were invited to Denmark during a baker’s strike, and their Viennese baking methods quickly became popular. The Danish took the idea and made it their own by adding local ingredients like butter, fruit preserves, and, of course, cream cheese.
Over time, the pastry evolved to include various fillings, like almond paste, custard, and fruit, making them a popular choice in bakeries across the world. However, it wasn’t until the early 1900s that the Danish pastry began to gain international recognition. American bakeries, especially in New York, started producing their own versions of the pastry, with a twist: they added fruit toppings like cherries, apples, and blueberries, eventually leading to the iconic cherry cheese danish we know today.
Evolution of Mini Cherry Cheese Danishes
Fast forward to today, and mini versions of these classic danishes have taken the world by storm. The mini cherry cheese danish brings all the wonderful flavors of a traditional Danish pastry, but in a bite-sized form that’s perfect for breakfast or brunch gatherings. With their buttery pastry base, smooth cream cheese filling, and tangy cherry topping, these pastries are the ideal balance of sweet and savory, satisfying all kinds of sweet-tooth cravings.
While their origins are European, the mini cherry cheese danish has adapted to various cultures, with people customizing fillings and doughs to suit their personal tastes. In fact, some even go the extra mile and make these treats with homemade cherry jam (check out how you can make your own cherry jam in this The Kitchn guide) for an even fresher, more authentic flavor.
Now that you know the rich history behind these little bites of heaven, let’s explore the ingredients that make mini cherry cheese danishes so irresistible.
3. Ingredients for Mini Cherry Cheese Danishes
Making mini cherry cheese danishes requires just a few key ingredients, many of which you likely have on hand. The beauty of this pastry lies in its simplicity, and using quality ingredients is the secret to achieving that perfect flaky texture and rich flavor. Let’s break down the essentials:
Main Ingredients
- Puff Pastry: This is the star of the show. Puff pastry is known for its delicate, buttery layers that puff up beautifully when baked. You can buy pre-made puff pastry at most grocery stores (for convenience), but feel free to go the homemade route if you’re feeling adventurous. Puff pastry gives your danish its flaky, airy texture that contrasts perfectly with the creamy filling.
- Cream Cheese: For the filling, you’ll need cream cheese. It creates that smooth, rich filling that pairs wonderfully with the cherry topping. Be sure to use full-fat cream cheese for the best texture and flavor.
- Cherries: The cherry topping is what brings that burst of color and sweet-tart flavor. You can use canned cherries, cherry preserves, or even fresh cherries (depending on availability). If you’re looking for a homemade touch, consider making your own cherry jam.
- Sugar and Vanilla Extract: A little sugar sweetens the cream cheese filling, while a splash of vanilla extract adds that warm, comforting flavor. A dash of vanilla can go a long way in making your danish taste even more delicious.
- Egg Wash: To get that golden, glossy finish on the pastry, brush the mini danishes with an egg wash before baking. This helps give them that professional bakery look.
Common Substitutes
- Vegan Options: You can use vegan puff pastry (most are dairy-free) and swap out the cream cheese for a non-dairy alternative like cashew cream or vegan cream cheese.
- Gluten-Free: If you’re looking for a gluten-free version, there are gluten-free puff pastry options available. Be mindful of the filling, as you’ll need to check that it’s also gluten-free.
Now that we’ve covered the ingredients, let’s dive into the step-by-step instructions for making these irresistible pastries from scratch.
4. Step-by-Step Instructions for Making Mini Cherry Cheese Danishes
Ready to bake some mini cherry cheese danishes? Follow this simple step-by-step guide, and you’ll have fresh, flaky pastries in no time! Whether you’re an experienced baker or a first-timer, this process is easy to follow.
Preparing the Dough
- Preheat the Oven: Start by preheating your oven to 375°F (190°C). This ensures your danishes will bake evenly.
- Roll Out the Puff Pastry: If you’re using store-bought puff pastry, roll it out on a lightly floured surface. If it’s frozen, let it thaw for about 30 minutes before working with it. Roll the dough into a rectangular shape, about ¼ inch thick.
- Cut the Pastry into Squares: Using a sharp knife or pizza cutter, slice the puff pastry into squares—about 3-inch by 3-inch. You’ll want each piece to be big enough to hold the filling and still fold up nicely.
Preparing the Filling
- Make the Cream Cheese Mixture: In a mixing bowl, blend the cream cheese with 1/4 cup of sugar and 1 teaspoon of vanilla extract. Beat until smooth and creamy, making sure there are no lumps. This filling should be smooth and thick enough to stay inside the pastry when baked.
- Cherry Topping: If you’re using canned cherries, drain the syrup and slice the cherries into smaller pieces. If you’re using cherry preserves, it’s ready to go. Either way, you’ll want to have your cherry topping set aside and ready to add.
Assembling the Danishes
- Fill the Pastry Squares: Place a dollop of the cream cheese mixture in the center of each pastry square. Be generous but not too much, as you don’t want the filling to spill out during baking.
- Add the Cherries: Spoon a few pieces of cherry filling on top of the cream cheese. You can either use fresh, canned, or homemade cherry jam (check out this King Arthur Baking puff pastry tips for even more baking advice).
- Fold the Edges: Gently fold up the corners of the puff pastry squares towards the center to create a little pocket or fold, leaving the top slightly open for the filling to peek through. This technique ensures that the filling stays inside but gives it a rustic, open-faced appearance.
Baking Instructions
- Brush with Egg Wash: Whisk together 1 egg with 1 tablespoon of water to create an egg wash. Use a pastry brush to lightly coat the edges of the danishes. This will give them a beautiful golden-brown finish.
- Bake: Place the pastries on a lined baking sheet and bake in the preheated oven for 20-25 minutes, or until golden brown and puffed up. Keep an eye on them during the last few minutes to make sure they don’t burn.
- Cool: Once baked, let your mini danishes cool on a wire rack for a few minutes before serving.
Pro Tips for Perfect Mini Danishes
- Chill the Dough: If you’re using store-bought puff pastry, chill it in the fridge for 15 minutes before baking to help it puff up beautifully.
- Don’t Overfill: Be careful not to overfill your danishes with cream cheese or cherries—just enough to fill the center, allowing the pastry to hold its shape.
Now that you’ve mastered the art of assembling your mini cherry cheese danishes, it’s time to serve them up! But before you dig in, let’s go over a few tips for perfecting your danishes.