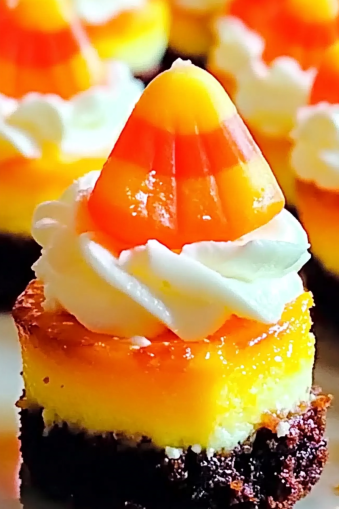
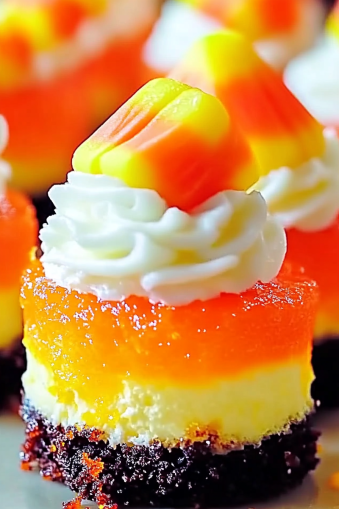
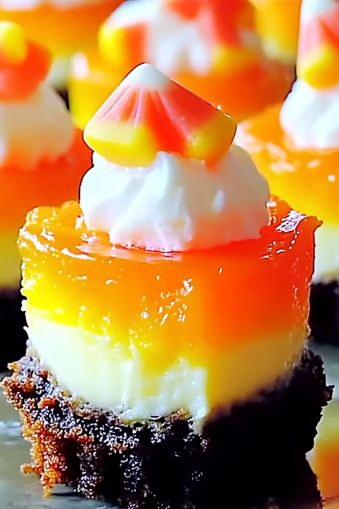
Before we dive into the heart of this article, here’s what you can expect: Mini Candy Corn Cheesecakes are the perfect festive treat for Halloween, combining delicious layers of cheesecake in iconic candy corn colors. We’ll walk you through the essential ingredients, the step-by-step process to create this colorful dessert, plus some decorating tips to add a spooky flair. Additionally, we’ll cover handy storage suggestions, recipe variations, and common FAQs to ensure your mini cheesecakes come out perfectly. Now, let’s get started with part 1: the introduction.
 Part 1: Introduction
Mini Candy Corn Cheesecakes – A Fun Halloween Dessert
Halloween is all about fun, spooky treats, and these Mini Candy Corn Cheesecakes hit the sweet spot—literally! Imagine bite-sized cheesecakes layered with festive Halloween colors that look just like the iconic candy corn. They’re not only visually appealing but also incredibly easy to make, meaning you’ll spend less time in the kitchen and more time enjoying the festivities. Whether you’re hosting a Halloween party or simply looking for a fun dessert to enjoy with family, these cheesecakes are a real crowd-pleaser.
So, why are these mini cheesecakes so popular? For starters, they’re an absolute delight for both kids and adults. Their vibrant layers of yellow, orange, and white mirror the classic candy corn, while the creamy cheesecake filling provides a rich contrast to the crunchy crust. Plus, these mini desserts are easy to customize with spooky decorations, making them the perfect choice for any Halloween-themed event.
In the following sections, we’ll break down exactly how to prepare these mini delights, the ingredients you’ll need, and some creative decorating ideas to make them stand out at your Halloween gathering.
Ingredients You’ll Need for Mini Candy Corn Cheesecakes
Let’s talk about what makes these Mini Candy Corn Cheesecakes come to life—the ingredients! Not only are they simple and easy to find, but they also come together to create a dessert that looks and tastes like a Halloween dream.
For the Crust
To begin, you’ll need a good base. The crust is essential because it holds up the cheesecake layers while adding a delightful crunch. Typically, crushed graham crackers are the go-to, but feel free to swap these out for Oreos if you’re craving something a bit richer. Here’s what you need:
- 1 cup graham cracker crumbs – this is the base. For those looking for a gluten-free option, you can opt for gluten-free graham crackers.
- 2 tablespoons granulated sugar – it sweetens the crust just enough without overpowering the cheesecake flavor.
- ¼ cup unsalted butter, melted – butter binds everything together, and it’s what makes the crust golden and crisp when baked.
For the Cheesecake Filling
Now, onto the creamy part of this dessert—the cheesecake filling. We want a silky smooth, rich base that contrasts beautifully with the crunchy crust. Here’s what you’ll be working with:
- 16 ounces cream cheese, softened – full-fat cream cheese is key for a rich, velvety texture. Be sure to let it soften, so it blends well.
- ½ cup granulated sugar – this gives the perfect amount of sweetness to balance the tanginess of the cream cheese.
- 2 medium eggs – these help set the cheesecake, giving it structure without making it overly dense.
- 1 teaspoon vanilla extract – adds a subtle depth of flavor.
- ½ cup sour cream – sour cream brings a slight tang and helps achieve that ultra-creamy texture.
For the Coloring and Decoration
What makes these cheesecakes stand out? The vibrant Halloween colors! You’ll need:
- Yellow and orange food coloring – these colors give you that classic candy corn look.
- Whipped cream or candy corn for garnish – perfect for giving these mini cheesecakes their final Halloween flair.
Stay tuned for Part 3: Step-by-Step Instructions, where we’ll guide you through assembling and baking these festive treats.
 Part 3: Step-by-Step Instructions
How to Make Mini Candy Corn Cheesecakes
Now that you’ve gathered all your ingredients, it’s time to bring these fun Mini Candy Corn Cheesecakes to life! Don’t worry if you’re not a seasoned baker—this recipe is super beginner-friendly, and we’ll break it down into easy steps. With just a bit of mixing, layering, and chilling, you’ll have the cutest Halloween treats ready to wow your guests.
Step 1: Preparing the Crust
First things first: let’s get that delightfully crunchy base ready. Here’s how:
- Preheat your oven to 325°F (165°C). This ensures the crust bakes evenly.
- Line a 12-cup muffin tin with cupcake liners. This will help with easy removal later on.
- Mix the crust ingredients: In a medium bowl, combine 1 cup graham cracker crumbs, 2 tablespoons granulated sugar, and ¼ cup melted unsalted butter. Stir until the mixture has the texture of wet sand.
- Press the mixture firmly into the bottom of each cupcake liner, creating an even layer. Use the back of a spoon to press it down.
- Bake for 5 minutes to set the crust. Once done, set it aside to cool while you prepare the cheesecake filling.
Tip: If you’re using Oreos for a richer base, don’t forget to remove the filling before crushing the cookies!
Step 2: Making the Cheesecake Filling
While the crust is cooling, it’s time to whip up that creamy cheesecake filling! This step is where the magic begins.
- Beat the cream cheese: In a large mixing bowl, beat 16 ounces of softened cream cheese using an electric mixer until smooth. This step is crucial for avoiding lumps in your filling.
- Add sugar: Gradually mix in ½ cup of granulated sugar. Beat until well combined and smooth.
- Incorporate eggs: Add the 2 eggs, one at a time, beating after each addition. Eggs help give the cheesecake structure without making it too dense.
- Mix in vanilla and sour cream: Finally, blend in 1 teaspoon of vanilla extract and ½ cup sour cream for that perfect creamy texture and rich flavor.
Step 3: Assembling the Cheesecakes
Now comes the fun part—layering your cheesecake batter into the candy corn colors!
- Divide the batter into three bowls: Pour the cheesecake mixture evenly into three separate bowls.
- Add the colors: In one bowl, add a few drops of yellow food coloring and mix until you get a vibrant yellow. In the second bowl, add orange food coloring and mix well. Leave the third bowl plain.
- Layer the colors: Spoon the yellow cheesecake batter into the crust-lined muffin cups, filling each about one-third of the way. Then, carefully spoon the orange batter on top of the yellow, followed by the plain cheesecake batter. This creates the signature candy corn look.
- Smooth the tops: Use a spoon or offset spatula to gently smooth the tops, ensuring even layers.
Step 4: Baking and Chilling the Cheesecakes
- Bake the cheesecakes: Pop the muffin tin into your preheated oven and bake for about 18-20 minutes, or until the centers are just set and no longer jiggle. Don’t overbake, as cheesecakes should have a creamy, soft texture.
- Cool completely: Remove the cheesecakes from the oven and let them cool in the pan for about 30 minutes. Then, transfer them to the fridge and chill for at least 4 hours or, ideally, overnight.
Step 5: Decorating the Cheesecakes
Once your cheesecakes are fully chilled and set, it’s time to add some spooky decorations!
- Frosting: Use whipped cream or orange-colored frosting to top each cheesecake. Pipe it on for a decorative touch.
- Toppings: Add candy corn, spooky sprinkles, or even little fondant ghosts for a Halloween-inspired finish.
By following these easy steps, you’ll end up with adorable, tasty Mini Candy Corn Cheesecakes that are perfect for any Halloween celebration!
Part 4: Decorating Your Mini Candy Corn Cheesecakes
How to Decorate the Mini Candy Corn Cheesecakes
You’ve already got the vibrant layers mimicking candy corn, but adding extra flair can take these cheesecakes from cute to spectacular. The decorating process allows you to unleash your creativity, and with Halloween right around the corner, you can give your cheesecakes that extra spooky edge.
Whipped Cream and Toppings
Let’s start with something simple yet classic—whipped cream. Whether you’re using store-bought or homemade, whipped cream makes an excellent topping to add a light, fluffy contrast to the rich cheesecake.
- Pipe whipped cream on top of each cheesecake using a piping bag with a star or round tip. This gives your cheesecakes a polished, professional look.
- Sprinkles: Add Halloween-themed sprinkles like ghosts, pumpkins, or bats. These are perfect for a festive pop of color and a little crunch.
- Candy Corn Garnish: For a traditional finish, top each cheesecake with a piece of candy corn or even arrange three pieces in a fan shape on top of the whipped cream.
Creating Spooky Halloween Designs
Want to take the Halloween theme to the next level? Add some spooky decorations that will delight your guests and give your desserts that extra festive appeal:
- Fondant Ghosts: Roll out white fondant, cut into circles, and drape them over mini marshmallows to create adorable little ghost toppers.
- Edible Eyes: Add edible candy eyes to your whipped cream or ghost decorations for a playful, slightly spooky vibe.
- Spider Web Drizzle: For an extra eerie effect, melt some dark chocolate or black candy melts and use a toothpick to create spiderweb patterns on top of the cheesecakes.
These decorations will not only make your cheesecakes insta-worthy but will also make them the talk of your Halloween party!
Part 5: Storage and Serving Tips
How to Store Mini Candy Corn Cheesecakes
After all your hard work in preparing and decorating these delightful Mini Candy Corn Cheesecakes, you’ll want to ensure they stay fresh for as long as possible. Storing them correctly is key to maintaining that perfect creamy texture and crunchy crust.
- Refrigeration: These mini cheesecakes should be stored in the refrigerator, as the dairy-based filling requires cool temperatures to stay fresh. After they’ve been fully chilled and set, keep them in an airtight container. This will prevent them from absorbing any odors or drying out. They can last up to 4-5 days in the fridge.
- Freezing for Future Enjoyment: If you want to make these cheesecakes ahead of time, they’re perfect for freezing! Once baked and cooled, skip the decorating step and wrap each mini cheesecake tightly in plastic wrap. Store them in a freezer-safe container for up to 2 months. When you’re ready to enjoy them, thaw overnight in the refrigerator and then decorate them fresh.
Serving Suggestions
When it comes to serving these Mini Candy Corn Cheesecakes, presentation is everything! Here are a few ideas to make sure they look as good as they taste:
- Add a Halloween Touch: Serve your cheesecakes on a festive Halloween platter, or use cupcake liners with Halloween designs to match the theme.
- Whipped Cream Fresh: Add the whipped cream right before serving to keep it fluffy and fresh.
- Pair with a Warm Drink: These cheesecakes are a perfect match for hot cocoa or spiced apple cider, giving your guests a cozy Halloween vibe.
 Part 6: Recipe Variations and Pro Tips
Recipe Variations and Pro Tips
One of the best things about this Mini Candy Corn Cheesecake recipe is how easy it is to customize. Whether you’re catering to dietary preferences or looking for creative twists, there’s plenty of room for experimenting.
Flavor Variations
- Pumpkin Spice Twist: Give your cheesecakes a seasonal fall flavor by adding pumpkin spice to the batter. You can mix 1-2 teaspoons of pumpkin pie spice into the plain cheesecake layer to create a delicious autumn flavor.
- Chocolate Lovers’ Delight: Swap out the graham cracker crust for Oreo crumbs and add a tablespoon of cocoa powder to the filling. This will give your cheesecakes a rich, chocolatey undertone that pairs perfectly with the candy corn theme.
- Citrus Zing: If you’re a fan of fruity flavors, you can add a splash of lemon or orange zest to the batter. This will give your cheesecakes a refreshing tang that balances out the sweetness.
Different Base Options
If you or your guests have dietary restrictions or simply prefer a different base, you can easily change the crust:
- Gluten-Free: Swap out graham crackers or Oreos for gluten-free cookies. Make sure to crush them finely and follow the same process for the crust.
- Gingersnap Crust: For a spicy, warm twist, use crushed gingersnap cookies instead of graham crackers. The ginger pairs beautifully with the creamy cheesecake filling, adding a depth of flavor perfect for fall.
Pro Tips for Perfect Cheesecakes
- Don’t Overmix: When preparing the cheesecake batter, avoid overmixing. Too much air can cause cracks during baking, so mix gently on low speed.
- Chill Thoroughly: Always let your cheesecakes chill for at least 4 hours, preferably overnight. This helps the flavors develop and the texture to firm up beautifully.
- Make It Kid-Friendly: Let kids join the decorating process by allowing them to add their favorite Halloween candies or sprinkles to the top.
Part 7: FAQs
Frequently Asked Questions About Mini Candy Corn Cheesecakes
No matter how simple a recipe may seem, there are always a few questions that pop up. Here are some of the most frequently asked questions about Mini Candy Corn Cheesecakes to help ensure your baking experience goes smoothly.
Q: Can I make these mini cheesecakes ahead of time?
Absolutely! In fact, making them ahead of time is a great idea. Once baked and fully cooled, you can refrigerate these cheesecakes for up to 3-5 days in an airtight container. This makes them the perfect make-ahead dessert for Halloween parties (Ever After in the Woods). If you’re planning even further ahead, you can freeze them for up to 2 months. Just thaw overnight in the fridge before serving, and wait until the day of your event to add any decorations.
Q: Can I use a different type of cookie for the crust?
Definitely! While graham crackers or Oreos are the most common choices, you can experiment with other cookies to customize the flavor. Gingersnaps, vanilla wafers, or even gluten-free options work wonderfully (Ever After in the Woods) (The Soccer Mom Blog). Just be sure to crush the cookies finely and mix with melted butter to get that perfect crust.
Q: Can I make these cheesecakes without food coloring?
Yes, you can! The food coloring is entirely optional and only there to give your cheesecakes the candy corn look. If you prefer a more natural option, simply leave out the coloring. Alternatively, you can use natural food dyes like turmeric for yellow and beet juice for orange (I Heart Recipes).
Q: How long do these mini cheesecakes need to chill?
These cheesecakes need to chill for at least 4 hours, but chilling them overnight is even better. This ensures they set properly and achieve that perfectly creamy texture (Life Love and Sugar).
With these common questions answered, you’re now fully equipped to make these Halloween treats a success!
Why Mini Candy Corn Cheesecakes Are the Perfect Halloween Treat
Mini Candy Corn Cheesecakes aren’t just a feast for the eyes; they’re a treat that brings all the fun and flavor of Halloween to your table. These bite-sized desserts blend the nostalgic look of candy corn with the rich, creamy goodness of cheesecake, making them an instant hit with both kids and adults alike. Whether you’re hosting a spooky-themed party or just indulging in a festive fall treat, these cheesecakes are the perfect addition to any celebration.
Plus, the simplicity of the recipe allows you to whip these up without breaking a sweat, and they’re endlessly customizable—whether you want to change up the base, add new flavors, or go all out with creative decorations. Make them ahead of time, store them for later, and enjoy the magic of Halloween with every bite. Trust me, these treats will become a boo-tiful tradition for your fall festivities!
