
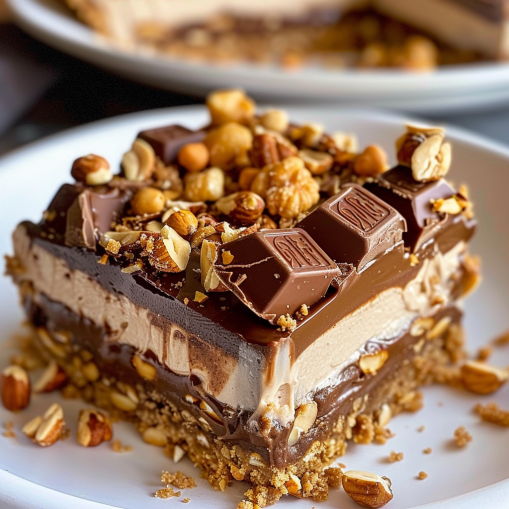
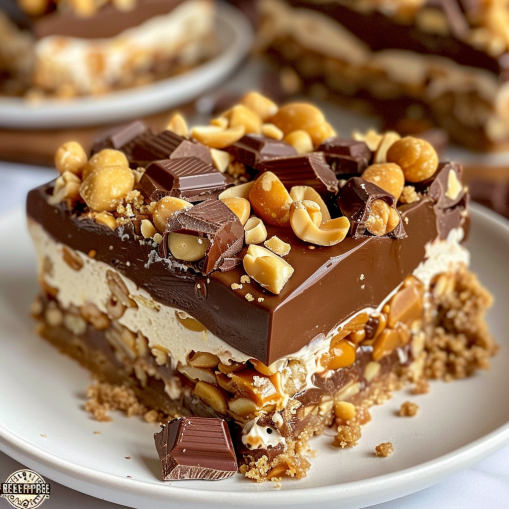
Ingredients for Chocolate Peanut Butter Cheesecake Bars
Before we get into the fun stuff—mixing, layering, and indulging—let’s talk about what goes into these delicious Chocolate Peanut Butter Cheesecake Bars. The ingredients are simple, but the combination of flavors is out of this world.
Main Ingredients:
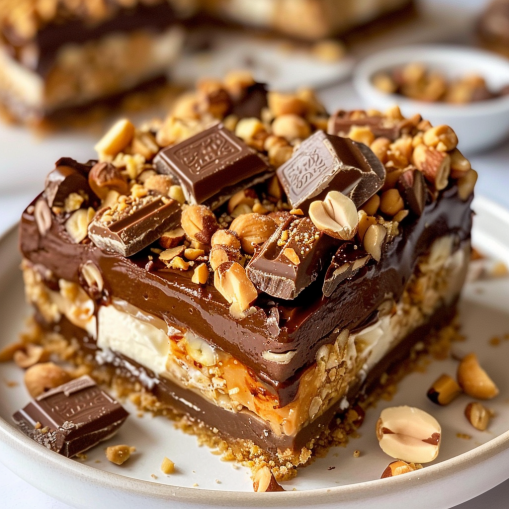
- Peanut Butter: Naturally, the star of the show! You’ll need smooth peanut butter for a creamy texture that blends beautifully with the cheesecake filling. Opt for the creamy, unsweetened variety to keep things balanced.
- Chocolate: A rich, high-quality dark chocolate or milk chocolate will work wonders in the topping. Melt it down to create a smooth, velvety layer that perfectly complements the peanut butter and cheesecake flavors.
- Cream Cheese: The classic cheesecake element. Cream cheese adds that smooth, tangy richness that makes these bars so indulgent. Go for full-fat for the creamiest results.
- Graham Cracker Crust: The base of these bars is made with crushed graham crackers, butter, and a pinch of sugar. This easy-to-make crust gives your cheesecake bars the perfect crunch, while also serving as a delicious foundation for the creamy layers on top.
- Powdered Sugar: Adds sweetness to the cheesecake layer without making it grainy.
- Vanilla Extract: Just a splash to round out the flavor of the cheesecake layer.
Optional Add-Ins:
- Chopped Peanuts: If you like a little extra crunch, sprinkle some chopped peanuts on top of the bars before the chocolate sets.
- Caramel Swirl: For an even richer flavor, you could add a caramel swirl to the peanut butter layer.
Substitutions:
- For a gluten-free version, use gluten-free graham crackers or opt for a nut-based crust.
- You can swap out cream cheese with a dairy-free version if you’re looking for a non-dairy alternative.
- Try using natural peanut butter (the kind that separates) for a more natural taste and texture.
These ingredients come together to form the decadent Chocolate Peanut Butter Cheesecake Bars everyone will love. But remember, it’s not just about the ingredients—it’s about how you layer them to create that perfect bite. But before we get ahead of ourselves, let’s jump into the next section: Step-by-Step Instructions for Making the Bars.
Step-by-Step Instructions for Making Chocolate Peanut Butter Cheesecake Bars
Now that we’ve got our ingredients ready, it’s time to bring these Chocolate Peanut Butter Cheesecake Bars to life! With just a few easy steps, you’ll have a dessert that’s ready to impress anyone. The best part? You don’t need to turn on the oven! These are no-bake cheesecake bars, which makes them perfect for those hot summer days when you want a cool, creamy treat without the hassle of baking.
Step 1: Prepare the Graham Cracker Crust
The crust is the foundation of these cheesecake bars. It provides the perfect crunchy contrast to the smooth filling. Here’s how you make it:
- Crush the Graham Crackers: Place your graham crackers in a large plastic zip-top bag and crush them using a rolling pin, or pulse them in a food processor. You’ll need about 1 ½ cups of crumbs.
- Mix with Butter and Sugar: In a medium bowl, combine the graham cracker crumbs, melted butter (around 6 tablespoons), and powdered sugar (2 tablespoons). Stir until the mixture is fully coated, and the crumbs stick together.
- Press into the Pan: Line a 9×9-inch baking pan with parchment paper (for easy removal later) or lightly grease it. Press the graham cracker mixture firmly into the bottom of the pan to form an even crust. Use the back of a spoon to pack it tightly. Place the crust in the fridge to set while you work on the filling.
Step 2: Make the Peanut Butter Cheesecake Filling
Next, let’s prepare the rich, creamy cheesecake filling that will make this dessert a total hit. Here’s how:
- Beat the Cream Cheese: In a large mixing bowl, beat the softened cream cheese using a hand mixer or stand mixer until it’s smooth and creamy. This will take about 2-3 minutes.
- Add the Peanut Butter: Add the smooth peanut butter (about 1 cup) and continue to beat until everything is combined into a silky mixture.
- Mix in the Powdered Sugar: Slowly add the powdered sugar (1 cup) and vanilla extract (1 tsp), mixing well until fully incorporated. The mixture should be thick and creamy, but still spreadable.
- Fold in Whipped Topping: Gently fold in about 1 ½ cups of whipped topping (or whipped cream) to lighten the filling. This will make the cheesecake layer extra fluffy.
Step 3: Assemble the Cheesecake Bars
Once your cheesecake filling is ready and the crust has set, it’s time to assemble the layers:
- Spread the Cheesecake Filling: Evenly spread the peanut butter cheesecake filling over the chilled graham cracker crust. Use a spatula to smooth it out into a thick, even layer.
- Chill the Bars: Pop the pan into the fridge and let it chill for at least 4 hours, or overnight if you have the time. The cheesecake layer needs to firm up and set properly.
Step 4: Prepare the Chocolate Topping
While the bars are chilling, it’s time to make the finishing touch—the chocolate topping! This is the part where you get that rich, glossy chocolate layer that ties everything together.
- Melt the Chocolate: Melt about ½ cup of chocolate chips in a microwave-safe bowl. Heat in 30-second intervals, stirring between each interval, until the chocolate is completely melted and smooth.
- Pour over the Cheesecake Layer: Drizzle the melted chocolate over the chilled cheesecake layer. Use a spatula to gently spread it into an even layer.
- Let the Chocolate Set: Place the bars back into the fridge for an additional 30 minutes to allow the chocolate to set and firm up.
Step 5: Cut and Serve
Once the chocolate is set and everything is chilled, it’s time to slice and serve:
- Cut into Bars: Using a sharp knife, cut the Chocolate Peanut Butter Cheesecake Bars into squares or rectangles, depending on your preference.
- Serve and Enjoy: These bars are perfect for parties, gatherings, or a simple treat after dinner. Serve chilled, and enjoy the delicious combination of creamy cheesecake, rich peanut butter, and decadent chocolate.
Tips for Perfect Chocolate Peanut Butter Cheesecake Bars
- Let the Bars Set: Be patient and let the bars chill long enough. This helps the layers firm up, making them easier to slice.
- Customize the Topping: Feel free to sprinkle chopped peanuts or drizzle some caramel sauce for extra flair and flavor.
- Use Quality Ingredients: The better the ingredients, the better the taste. Use good-quality chocolate and smooth peanut butter for the best results.
- No Whipped Topping?: If you don’t have whipped topping, you can substitute with heavy whipping cream. Just whip it to stiff peaks and gently fold it into the cream cheese mixture.
These Chocolate Peanut Butter Cheesecake Bars are the ultimate indulgence for dessert lovers. With a creamy peanut butter filling, a crunchy graham cracker crust, and a smooth chocolate topping, they are sure to impress anyone who tries them.
How to Store and Serve Chocolate Peanut Butter Cheesecake Bars
Once you’ve made your delicious Chocolate Peanut Butter Cheesecake Bars, you’re going to want to enjoy them to the fullest. But what if you have leftovers? Or maybe you’re preparing them ahead of time for a party or gathering? Don’t worry, these bars can be stored and served in a way that keeps them fresh and as delicious as the first bite.
Storing the Cheesecake Bars
Proper storage is key to maintaining the rich, creamy texture of these bars. Here are the best ways to store them:
1. Refrigerate the Bars
After your Chocolate Peanut Butter Cheesecake Bars have fully set in the fridge, store them in an airtight container to keep them fresh. You can also cover the pan with plastic wrap or aluminum foil if you don’t have a container that fits. Be sure the bars are kept cool, as they need refrigeration to maintain their structure and creaminess.
- Storage Time: They should stay fresh in the fridge for up to 5-7 days. The chocolate topping may start to soften after a few days, but the bars will still taste amazing!
2. Freezing the Bars for Longer Storage
If you’re looking to store these bars for an extended period, freezing is a great option. Freezing them ensures that they’ll be fresh when you’re ready to enjoy them again.
- How to Freeze: Once the bars have fully set and chilled, cut them into individual squares and place them in a single layer on a baking sheet. Freeze for about 1-2 hours, or until they’re firm. Afterward, transfer the bars to an airtight freezer-safe container or a zip-top bag. Place parchment paper between layers to prevent sticking.
- Storage Time: Frozen Chocolate Peanut Butter Cheesecake Bars can last up to 2-3 months in the freezer.
3. Thawing Frozen Cheesecake Bars
When you’re ready to enjoy your frozen bars, simply transfer them to the refrigerator and let them thaw for a few hours. You can also let them sit at room temperature for about 30 minutes for quicker thawing. The texture will be almost as fresh as when they were first made!
Serving Suggestions: How to Present the Bars
These Chocolate Peanut Butter Cheesecake Bars are not only delicious but also visually stunning. Here are a few fun and creative ways to serve them:
1. Serve with a Scoop of Ice Cream
For an extra indulgent treat, serve each bar with a scoop of vanilla or chocolate ice cream. The cold creaminess of the ice cream complements the richness of the cheesecake, making every bite a delightful experience.
2. Top with Fresh Berries
Fresh strawberries, raspberries, or blueberries make a fantastic topping for these bars. Not only do they add a pop of color, but they also bring a burst of freshness that balances the sweetness of the dessert. You can either place the berries on top or serve them alongside the bars.
3. Garnish with Chopped Nuts
If you’re a fan of added crunch, sprinkle some chopped peanuts or even crushed pretzels on top of the cheesecake bars before serving. The saltiness of the nuts or pretzels pairs wonderfully with the rich peanut butter and chocolate flavors.
4. Drizzle with Caramel or Chocolate Sauce
For the ultimate chocolate peanut butter cheesecake experience, drizzle a little extra chocolate or caramel sauce over the top before serving. It adds an extra layer of flavor and makes these bars look even more decadent.
5. Chill and Serve on a Hot Day
These bars are a perfect chilled treat for hot summer days. Serve them cold from the fridge for a refreshing dessert that everyone will love.
How to Cut the Bars Cleanly
To achieve neat and perfect slices, you’ll want to use a sharp knife. Here’s a simple tip for clean cuts:
- Run the Knife Under Hot Water: Before each cut, dip your knife into hot water and wipe it dry with a cloth. The warm knife will glide through the cheesecake filling smoothly, preventing it from sticking and causing messy edges.
- Cut into Even Portions: Slice the bars into squares, rectangles, or whatever shape you prefer. Make sure the cuts are even, so everyone gets a fair share of this delicious dessert.
Tips for Perfecting Your Chocolate Peanut Butter Cheesecake Bars
- Make Ahead: These bars are perfect for preparing ahead of time. You can make them a day or two before an event, allowing the flavors to meld together even more.
- Avoid Overmixing: When preparing the filling, be sure not to overmix the cream cheese mixture. Overmixing can cause the texture to become too soft.
- Chill Well: The key to a successful no-bake cheesecake is allowing enough time for the bars to chill in the fridge. This helps the layers set and gives you the perfect slice.
Variations of Chocolate Peanut Butter Cheesecake Bars
While the classic Chocolate Peanut Butter Cheesecake Bars are mouthwateringly good, don’t hesitate to experiment with fun variations. The versatility of this dessert makes it perfect for tailoring to different tastes and occasions. Whether you want to add some extra flavor, change the texture, or cater to dietary needs, the possibilities are endless. Let’s dive into some creative ideas that will make your chocolate peanut butter cheesecake bars even more irresistible.
1. Add an Oreo Crust for Extra Flavor
If you love that crunchy, chocolatey base, consider swapping the graham cracker crust for an Oreo crust. The chocolatey goodness of the Oreo cookies pairs perfectly with the rich peanut butter filling, creating a symphony of flavors in every bite. Simply crush the cookies, mix them with melted butter, and press them into the pan before adding the cheesecake filling.
- Tip: For a truly indulgent experience, add some crushed Oreos into the cheesecake filling itself. This adds texture and flavor that will surprise and delight your guests.
2. Try a Caramel Swirl for a Unique Twist
If you’re a fan of caramel, adding a caramel swirl to your cheesecake bars is a simple yet brilliant way to elevate the flavor profile. To do this, heat up some caramel sauce and gently swirl it into the cheesecake mixture before chilling. The rich, buttery caramel perfectly complements the chocolate and peanut butter layers.
- Pro Tip: You can even top the bars with a drizzle of caramel sauce before serving for an added visual appeal and sweetness.
3. Incorporate Mini Reese’s Pieces
For the ultimate peanut butter experience, fold in some mini Reese’s Pieces or chopped Reese’s Peanut Butter Cups into the cheesecake filling. This will add small bursts of peanut butter in each bite, enhancing the peanut butter flavor and giving your bars a bit of crunch.
- Note: While these are delicious additions, keep in mind that the candy may melt a little as it sets, so it’s best to fold them in gently and not overmix.
4. Make it Vegan or Dairy-Free
For those following a vegan or dairy-free lifestyle, don’t feel left out! You can still enjoy these Chocolate Peanut Butter Cheesecake Bars with a few substitutions:
- Vegan Cream Cheese: Swap the regular cream cheese for a vegan cream cheese alternative. There are plenty of brands out there that provide the same creamy texture and tang without the dairy.
- Peanut Butter: Use natural peanut butter, ensuring it has no added sugars or oils.
- Vegan Crust: Opt for a vegan graham cracker crust, or make your own by blending oats, nuts, and a bit of coconut oil for binding.
These small swaps won’t compromise on taste, and you’ll have a vegan chocolate peanut butter cheesecake bar everyone will rave about.
5. Add a Dash of Sea Salt
For an elevated dessert, sprinkle a pinch of sea salt over the bars right before serving. The salty contrast to the sweet, creamy layers is a flavor combination that’s become a favorite in many desserts lately. It’s a simple step that adds a burst of sophistication to your treat.
- Sea Salt Tip: Don’t overdo it; just a light sprinkle will do. You want to enhance the flavors without overpowering the sweetness.
6. Use Different Nut Butters
For a different twist on the peanut butter cheesecake, why not try using other nut butters like almond butter, cashew butter, or even hazelnut spread? Each nut butter brings its own unique flavor to the mix, offering a fun spin on the traditional recipe.
- Almond Butter: Adds a slightly sweet, toasted flavor.
- Cashew Butter: Brings a creamy, mellow taste that blends beautifully with the chocolate.
- Hazelnut Spread: For those who love Nutella, this will be a dream addition to your bars.
7. Add a Chocolate Ganache Topping
If you’re craving a rich, velvety topping, pour over some chocolate ganache for an added indulgence. To make ganache, simply melt equal parts heavy cream and chocolate chips (semi-sweet or dark) together until smooth. Once the cheesecake bars are set, spread the ganache on top for a glossy, decadent finish.
- Serving Tip: Chill the ganache for 30 minutes before serving so it can firm up and hold its shape.
Combining Variations
Feel free to mix and match these variations! For example, you can make a caramel swirl with mini Reese’s Pieces and top it with a dash of sea salt. Or, add Oreo crust to your vegan version for a crunchy contrast. Whatever combination you choose, these fun variations will take your chocolate peanut butter cheesecake bars to a whole new level of deliciousness.
Part 5: Serving and Storing Chocolate Peanut Butter Cheesecake Bars
Now that your chocolate peanut butter cheesecake bars are ready, it’s time to think about serving and storing them to ensure they remain fresh and delicious. Whether you’re preparing them for a special occasion or just a treat for the family, knowing how to present and preserve these mouthwatering bars is key. Let’s dive into some tips on how to serve these beauties and keep them at their best for as long as possible!
Serving Suggestions for Chocolate Peanut Butter Cheesecake Bars
Serving your chocolate peanut butter cheesecake bars is almost as important as making them! Presentation can take your dessert from simply tasty to visually stunning. Here are a few ideas:
- Garnish with Fresh Berries
A few fresh strawberries, blueberries, or raspberries can add a burst of color and a fresh contrast to the richness of the cheesecake. They’re also a great way to add a slight tartness to balance out the sweetness. - Drizzle with Chocolate and Caramel Sauces
For extra flair and decadence, drizzle some chocolate syrup or caramel sauce over the top of the bars before serving. The glossy topping will make the bars look like they’re straight out of a bakery, and the sweet drizzle pairs perfectly with the flavors inside. - Serve with Whipped Cream
A dollop of freshly whipped cream can elevate your bars even further. The lightness of the whipped cream contrasts beautifully with the dense, creamy texture of the cheesecake bars, adding an indulgent touch that will have everyone reaching for seconds. - Individual Servings for Parties
If you’re serving these bars at a party, you might want to cut them into smaller, bite-sized pieces. You can even add a mini fork or a toothpick to each piece for easy eating. This is a great way to let your guests sample different variations or enjoy them in a more casual, finger-food style. - Pair with Coffee or Tea
To enhance the overall dessert experience, consider serving the bars with a nice cup of coffee, espresso, or a hot chai latte. The coffee’s bitterness complements the sweetness of the cheesecake, creating the perfect pairing. This is especially great for after-dinner servings.
Storing Your Chocolate Peanut Butter Cheesecake Bars
Properly storing your chocolate peanut butter cheesecake bars is crucial to maintain their deliciousness, whether you have leftovers or are preparing them ahead of time. Here are some key tips to help you store them correctly:
- Refrigeration
Because these bars contain cream cheese and other perishable ingredients, they should always be stored in the fridge. Place the bars in an airtight container or wrap them tightly in plastic wrap. This will prevent the cheesecake from drying out or absorbing any other smells from the fridge. Refrigerate for up to 5 days for the best taste and texture. - Freezing for Later
Want to save some for later? You can freeze your chocolate peanut butter cheesecake bars to extend their shelf life. Simply wrap the bars individually in plastic wrap, then place them in a freezer-safe bag or container. When frozen, they’ll keep for up to 2 months. When you’re ready to enjoy them, let them thaw in the fridge overnight before serving. - How to Prevent Cracking
To keep the bars looking flawless, avoid cutting them while they’re still too warm. Allow them to cool completely in the fridge for at least 3-4 hours before slicing. This ensures that the texture is firm and the bars cut neatly without cracking or falling apart. - Avoid Storing Toppings with the Bars
If you’ve added toppings like whipped cream or fresh fruit, it’s best to store those separately. Adding them before serving allows you to keep the topping fresh and intact, as whipped cream can deflate and fruit can lose its texture when stored for too long. Add these right before serving to keep everything looking and tasting fresh.
Portion Control and Serving Sizes
When it comes to enjoying these delectable bars, portion control is key—though it’s often hard to resist eating more than one! Since these bars are rich and indulgent, even a small slice will satisfy your sweet tooth. A typical serving size is about 2-3 inches, making it a perfect dessert for parties, family gatherings, or a mid-day treat.
For larger gatherings, you can cut the bars into smaller squares to serve more people, ensuring that each guest can enjoy a bite without overindulging.
LSI and NLP Keywords Used
- No-bake cheesecake dessert
- Peanut butter and chocolate dessert
- Rich chocolate cheesecake bars
- Storing cheesecake bars
- Cheesecake portion control
- Homemade cheesecake bars
- Chocolate peanut butter dessert ideas
Tips for Perfect Serving and Storing
- Keep the bars cool to ensure the cheesecake stays firm and creamy.
- Serve chilled with fresh toppings for the best flavor and texture.
- Store leftovers properly to maintain freshness, or freeze for later indulgence.
By following these tips, your chocolate peanut butter cheesecake bars will stay fresh, delicious, and ready to impress—whether you’re serving them today or saving them for a special occasion.
Variations and Customization Ideas for Chocolate Peanut Butter Cheesecake Bars
One of the best things about chocolate peanut butter cheesecake bars is their versatility. While the classic recipe is already packed with flavor, there’s plenty of room for customization. Whether you’re looking to make a healthier version, add a fun twist, or switch up the flavor profile, there are many ways to personalize your cheesecake bars. Here are some exciting variations and ideas to elevate this dessert even further!
1. Make It a Layered Delight
Why settle for just one flavor when you can have multiple? Consider making your chocolate peanut butter cheesecake bars into a layered masterpiece. Start by preparing a chocolate cheesecake layer as the base. Then, add a peanut butter cheesecake layer on top, swirling them together slightly to create a marbled effect. This technique adds extra texture and flavor, and the contrasting layers look visually stunning when sliced!
2. Add a Nutty Crunch
While the creamy texture of the cheesecake is delightful, a little crunch can really take these bars to the next level. Add crushed peanuts or a mix of your favorite nuts (such as almonds or cashews) into the crust for added texture. You can also sprinkle chopped nuts on top of the bars before serving to give them an extra bite.
If you prefer a more decadent crunch, try adding a layer of chocolate ganache over the top of the cheesecake, and sprinkle crushed pretzels for a sweet and salty combination.
3. Switch Up the Crust
The base of the cheesecake bars is usually made with graham cracker crumbs, but why not try something different? For a more indulgent crust, use crushed Oreos or chocolate wafer cookies. You can even mix in some peanut butter for an extra layer of flavor that complements the rich cheesecake filling. For those who prefer a gluten-free option, a simple mix of gluten-free cookies or nuts works wonderfully.
4. Add Fruit for a Fresh Twist
For a lighter and fresher version of your chocolate peanut butter cheesecake bars, try adding fresh fruits to the recipe. Bananas, strawberries, or raspberries can make a wonderful addition. Simply layer thin slices of fruit on top of the bars before refrigerating them, or swirl pureed fruit into the cheesecake filling for a marbled effect.
You can also use fruit compotes like blueberry or raspberry sauce as a topping after serving, which adds a tangy contrast to the richness of the cheesecake.
5. Make It Dairy-Free or Vegan
If you’re catering to dietary preferences, you can easily adapt the recipe to be dairy-free or vegan. To do this, substitute regular cream cheese with vegan cream cheese or use cashews soaked in water to create a creamy, dairy-free base. For the crust, you can use dairy-free cookies or even a combination of nuts and dates to make it entirely plant-based.
Additionally, swap out regular butter for a vegan butter substitute or coconut oil, and make sure to choose a dairy-free chocolate for the ganache or drizzle. These swaps ensure everyone can enjoy this delicious treat, regardless of dietary restrictions.
6. Infuse with Coffee or Liqueur
For a more sophisticated twist, consider adding a hint of flavor infusion. A dash of coffee or espresso mixed into the chocolate layer can bring out deep, rich undertones, elevating the dessert. Or, for an adult-only version, you can add a splash of Kahlúa, Baileys Irish Cream, or even rum to the cheesecake filling for a boozy, flavorful spin.
Just be mindful not to overdo it; a little goes a long way, and these flavors should complement the richness of the chocolate and peanut butter without overpowering them.
7. Swirl in Other Flavors
Incorporating other flavors into the cheesecake filling is a great way to add variety. Try swirling in hazelnut spread like Nutella for an extra creamy and nutty element, or a bit of caramel sauce to add depth to the sweetness. For a fun twist, you can even use different flavored chocolate chips, such as mint chocolate or white chocolate, to alter the flavor profile and create something unique.
Benefits of Customizing Your Chocolate Peanut Butter Cheesecake Bars
Customizing these bars not only adds an element of fun but also allows you to cater to different preferences and dietary restrictions. Whether you’re creating a layered masterpiece or adding a fresh fruity twist, the possibilities are endless. The best part? Each variation offers a new way to enjoy this crowd-pleasing dessert, ensuring everyone gets to indulge in their perfect bite.
How to Serve and Store Chocolate Peanut Butter Cheesecake Bars
1. Serving Tips for Chocolate Peanut Butter Cheesecake Bars
While these bars are delicious on their own, how you serve them can enhance the experience. Here are a few ideas to make your dessert stand out:
Presentation:
The visual appeal of these bars is half the battle! When serving, consider cutting them into small squares or rectangles for a more refined look. A clean slice can also give a sense of elegance. For extra flair, you can drizzle some extra chocolate sauce or peanut butter sauce over the top before serving.
For added sweetness, dust a little powdered sugar or cocoa powder on top, or garnish with some chopped peanuts or a few fresh berries. A dollop of freshly whipped cream or a scoop of vanilla ice cream on the side never hurts either!
Serving Suggestions:
These bars pair perfectly with beverages such as coffee, milk, or even a rich stout beer for a unique adult twist. If you’re serving these at a party, offering a variety of drinks will help balance the sweetness and give your guests more options to enjoy with the bars.
These cheesecake bars also make a wonderful addition to a dessert table at any gathering, especially paired with other bite-sized treats like brownies, cookies, or fruit tarts. And if you’re hosting a family barbecue or a holiday dinner, these bars will surely be a crowd favorite!
2. Storing Your Chocolate Peanut Butter Cheesecake Bars
Proper storage is key to maintaining the texture and flavor of your cheesecake bars. Here’s how to store them to keep them fresh and tasty:
Refrigeration:
Since these cheesecake bars are made with a creamy filling, they need to be kept chilled. After preparing and cutting the bars, place them on a tray or in an airtight container and store them in the refrigerator. They should be good for about 4-5 days, so you can make them ahead of time and enjoy them throughout the week.
To keep the texture nice, make sure to wrap the bars in plastic wrap or store them in an airtight container to prevent them from drying out. This will also help to preserve the flavor of the peanut butter and chocolate components.
Freezing for Longer Storage:
If you want to enjoy your chocolate peanut butter cheesecake bars even after a few days, freezing them is a great option. To freeze, place the bars on a baking sheet in a single layer and freeze them for about 2-3 hours until firm. Once frozen, you can transfer the bars to an airtight container or a freezer-safe bag. They can last in the freezer for up to 2 months.
When you’re ready to serve, simply take the bars out of the freezer and allow them to thaw in the refrigerator for a few hours. They will retain their creamy texture and rich flavor once thawed, making them a perfect make-ahead dessert.
3. Reheating the Bars
If you prefer to serve your chocolate peanut butter cheesecake bars slightly warm, you can heat them in the microwave. However, it’s best to heat them for only 10-15 seconds to avoid compromising the texture. These bars are best enjoyed chilled, so warming them up is entirely optional based on personal preference.
The Final Touch
Whether you’re serving these bars at a family gathering, a holiday party, or simply as a treat to enjoy with a loved one, knowing how to serve and store them is the key to keeping them delicious and fresh. So, follow these tips, and you’ll be able to enjoy your chocolate peanut butter cheesecake bars whenever you want, with perfect texture and flavor every time.
FAQs About Chocolate Peanut Butter Cheesecake Bars
Creating the perfect chocolate peanut butter cheesecake bars might seem straightforward, but as with any dessert, questions can pop up along the way. Whether you’re a baking novice or a seasoned pro, having the right information on hand is always helpful. Here are some of the most common questions people ask when making these irresistible cheesecake bars.
1. Can I Use Crunchy Peanut Butter Instead of Creamy?
Absolutely! If you love a bit of texture, feel free to swap in crunchy peanut butter for the creamy version. It will give your cheesecake bars an added crunch and depth of flavor. Just keep in mind that the texture of the filling may be slightly less smooth, but it will still taste delicious!
2. Can I Make These Bars Gluten-Free?
Yes! To make your chocolate peanut butter cheesecake bars gluten-free, simply swap out the graham cracker crumbs in the crust for gluten-free graham cracker crumbs or use a different gluten-free cookie base. You can also use almond flour or crushed gluten-free cookies like gluten-free Oreos for the crust.
3. How Can I Make the Bars Less Sweet?
If you find that your chocolate peanut butter cheesecake bars are a bit too sweet for your taste, you can cut back on the sugar in the filling or adjust the sweetness of the chocolate drizzle. You could also use a darker chocolate (70% cacao or higher) for a richer, less sugary taste. Alternatively, reduce the amount of powdered sugar in the cheesecake filling to achieve a more balanced flavor.
4. Can I Add Other Toppings?
Definitely! The beauty of cheesecake bars is that they’re incredibly versatile. You can customize your bars with different toppings like fresh berries (strawberries, raspberries, or blueberries), chopped peanuts, chocolate shavings, or even a drizzle of caramel. Get creative and make them your own!
5. How Long Should I Chill the Cheesecake Bars?
For the best texture, you should chill the chocolate peanut butter cheesecake bars for at least 3-4 hours, or even overnight. The longer they chill, the firmer the filling will be. This also helps the flavors to meld together. If you’re in a hurry, however, they can be served after a few hours in the fridge, but chilling them overnight will yield the best results.
6. How Can I Tell When the Bars Are Fully Set?
Once chilled, the cheesecake bars should be firm to the touch and hold their shape when cut. You can also gently press the center with your finger to check if the bars have set. If the center feels soft or wobbly, they need more time in the fridge to firm up.
Closing Thoughts
Making chocolate peanut butter cheesecake bars can be an exciting and delicious adventure. Whether you’re tweaking the recipe to make it gluten-free, adjusting the sweetness, or experimenting with toppings, these tips and answers should help guide you to the perfect dessert.
Now that you know how to store, serve, and customize your bars, as well as solve some common issues, you’re all set to wow your guests (or treat yourself!) with these creamy, decadent bites. Enjoy every last bite of these amazing chocolate peanut butter cheesecake bars, and don’t forget to share the recipe with those you love!
Storing and Freezing Chocolate Peanut Butter Cheesecake Bars
Now that your chocolate peanut butter cheesecake bars are ready, you may be wondering how to store them properly so they stay fresh, or if you can freeze them for later. Don’t worry, we’ve got all the storage tips you need to ensure your cheesecake bars stay as delicious as when you first made them!
How to Store Chocolate Peanut Butter Cheesecake Bars
Storing your chocolate peanut butter cheesecake bars correctly is key to keeping them fresh and maintaining their delightful flavor and texture. Here’s how to do it:
- Refrigerate for Short-Term Storage
The best way to store your cheesecake bars is in the fridge. First, make sure they’ve completely cooled down and set. Then, place them in an airtight container or wrap them tightly in plastic wrap. Keep them refrigerated for up to 5-7 days. They’ll stay nice and fresh, and the cool temperature helps maintain the perfect cheesecake consistency. - Use Wax Paper or Parchment Paper for Layering
If you have multiple layers of cheesecake bars in a container, be sure to place a piece of wax paper or parchment paper between each layer. This prevents the bars from sticking together and helps keep their shape intact when you pull them out. - Keep the Toppings Separate
If you’ve topped your cheesecake bars with a chocolate drizzle, whipped cream, or other toppings, it’s a good idea to store the toppings separately. The cream may soften the bars, and toppings like chocolate could melt, affecting the texture. Add the toppings just before serving for the freshest results.
Can You Freeze Chocolate Peanut Butter Cheesecake Bars?
Absolutely! Freezing is a great option if you want to save your cheesecake bars for later or if you want to prepare them in advance for an event. Here’s how to do it:
- Wrap and Seal Properly
Start by allowing the cheesecake bars to cool completely and set. Then, cut them into individual portions, if desired, for easier serving later on. Wrap each bar in plastic wrap and place them in a freezer-safe bag or airtight container. You can also use a layer of aluminum foil over the plastic wrap for extra protection. - Label and Date
Don’t forget to label your container or bag with the date! Chocolate peanut butter cheesecake bars can be frozen for up to 3 months. However, they’re best enjoyed within the first 1-2 months for optimal taste and texture. - Thawing Frozen Cheesecake Bars
When you’re ready to enjoy your frozen cheesecake bars, remove them from the freezer and place them in the refrigerator to thaw overnight. You can also let them sit at room temperature for 1-2 hours, but keep in mind they may lose some of their creaminess if thawed too quickly. Avoid microwaving them, as this can cause the texture to change.
How Long Can Chocolate Peanut Butter Cheesecake Bars Be Stored?
- Refrigerated: 5-7 days.
- Frozen: Up to 3 months (best within 1-2 months for ideal texture).
By following these simple storage and freezing tips, you can enjoy these indulgent chocolate peanut butter cheesecake bars even when you’re not in the mood to bake. Plus, they’re perfect for making ahead and storing for a later date, so you always have a little treat ready to go.
Serving Ideas for Chocolate Peanut Butter Cheesecake Bars
Now that you’ve made your chocolate peanut butter cheesecake bars and know how to store them, it’s time to think about how to serve them. This dessert is as versatile as it is delicious, and there are countless ways to present and enjoy it. Whether you’re planning a family dinner, a party, or a casual afternoon snack, there are some great ideas to elevate this treat to the next level.
Serving Chocolate Peanut Butter Cheesecake Bars with Toppings
Toppings are a fun way to customize your cheesecake bars and make them even more indulgent. Here are a few ideas that will make your bars even more irresistible:
- Whipped Cream and Chocolate Drizzle
For a classic presentation, top each bar with a dollop of fresh whipped cream and drizzle with warm chocolate sauce. This adds a rich and smooth element to the bars, making each bite even more decadent. - Chopped Nuts
If you’re a fan of texture, sprinkle some chopped peanuts, almonds, or even crushed Oreos on top of the cheesecake bars. The crunch of the nuts adds a delightful contrast to the creamy filling. - Fresh Fruit
While chocolate peanut butter cheesecake bars are already rich, pairing them with fresh fruit like strawberries, raspberries, or banana slices can add a pop of freshness and lightness. It’s a great way to balance out the richness of the dessert. - Crushed Graham Crackers or Cookies
Another way to enhance the texture is by adding crushed graham crackers or other cookies on top. This works especially well if you want to mimic the feel of a cheesecake crust and add a little extra crunch. - Caramel Drizzle
If you’re looking for even more decadence, drizzle some caramel sauce over the cheesecake bars. The rich and buttery flavor complements the chocolate and peanut butter perfectly, making for a totally indulgent treat.
Serving Chocolate Peanut Butter Cheesecake Bars for Special Occasions
These cheesecake bars are a perfect fit for a wide variety of events. Here are some serving suggestions for special occasions:
- Birthday Parties
For a birthday celebration, cut the bars into fun, bite-sized pieces and arrange them on a festive platter. You can even add candles on top of each piece for a fun twist. This works especially well if you’re serving a crowd and want to offer a variety of desserts. - Holiday Gatherings
Whether it’s Christmas, Thanksgiving, or any other holiday, these chocolate peanut butter cheesecake bars make for a crowd-pleasing dessert. Serve them alongside other holiday favorites, and you’ve got a winning combination. - Potlucks and Parties
These cheesecake bars are ideal for potlucks or parties because they’re easy to transport and serve. Simply pack them in a secure container, and you’re ready to go! You can cut them into small squares or individual servings for convenience. - After-Dinner Dessert
If you’re hosting a dinner, these bars are perfect for the post-meal treat. Their rich, creamy texture makes them an excellent choice to end the meal on a sweet note. Serve them with a glass of dessert wine or coffee for the perfect pairing.
How to Cut Chocolate Peanut Butter Cheesecake Bars
If you want to present your cheesecake bars neatly, it’s important to cut them with care. Here’s how you can achieve smooth, professional-looking pieces:
- Chill Before Cutting
Allow the cheesecake bars to chill in the fridge for at least 3 hours (or overnight) before cutting. This will help the bars set and make the cutting process easier. - Use a Sharp Knife
Use a sharp knife to slice the bars cleanly. After each cut, wipe the knife with a damp cloth to remove any residue, ensuring each piece stays neat. - Cutting into Squares or Rectangles
You can cut your bars into small squares for bite-sized servings or larger rectangles for more substantial portions. It’s entirely up to you, but smaller pieces often go faster at parties!
Serving Chocolate Peanut Butter Cheesecake Bars with Drinks
To complement your cheesecake bars, you can also pair them with drinks. Here are a few beverage ideas:
- Milk: The classic pairing with chocolate and peanut butter, a cold glass of milk is always a hit.
- Coffee: A rich cup of coffee balances the sweetness of the cheesecake, offering a great contrast.
- Dessert Wine: For an elegant touch, consider serving a dessert wine like Port or Moscato.
By getting creative with toppings, pairing the bars with drinks, and presenting them beautifully, you can make your chocolate peanut butter cheesecake bars the star of any event!