
Introduction: A Sweet Twist on a Classic
Cherry Cheesecake Chimichangas are the ultimate dessert mashup—combining the creamy richness of cheesecake with the crispy, golden crunch of a chimichanga. Sounds pretty irresistible, right? Whether you’re looking for a fun way to surprise your guests at a party or simply craving a decadent treat, these sweet, fried pockets of joy are sure to satisfy. Imagine biting into a warm, crispy tortilla filled with a luscious cheesecake filling and topped with tangy cherry compote. Yes, it’s as delicious as it sounds! In this article, we’ll guide you through everything from the ingredients and recipe to fun variations, tips, and serving suggestions. So, buckle up for a sugary, crispy journey through the world of Cherry Cheesecake Chimichangas!
1. What Are Cherry Cheesecake Chimichangas?
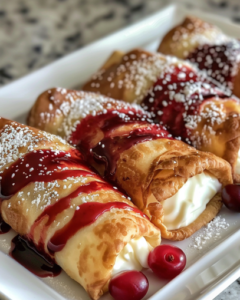
You might be wondering, what exactly is a Cherry Cheesecake Chimichanga? Let’s break it down. Imagine a traditional chimichanga—a deep-fried tortilla stuffed with savory fillings like beans, beef, or cheese. Now, take that concept and swap out the savory for something sweet. The Cherry Cheesecake Chimichanga is a dessert version of this crispy delight, filled with a rich and creamy cheesecake filling and topped with a juicy cherry compote.
1.1 A Delicious Fusion of Two Classics
While chimichangas are typically known as savory, the dessert version adds a fun twist by bringing together the rich, smooth flavors of cheesecake with the crispiness of a deep-fried tortilla. This fusion of textures—creamy on the inside and crispy on the outside—makes every bite a mouthwatering experience. The cherry topping not only adds a pop of color but also a fruity tang that perfectly balances the sweetness of the cheesecake filling.
1.2 A Crowd-Pleasing Dessert
What makes Cherry Cheesecake Chimichangas so special is their versatility. They’re perfect for parties, family gatherings, or any occasion where you want to impress your guests with a fun and unique dessert. Plus, you can easily modify the recipe for a variety of dietary preferences or flavor variations. Whether you’re making them for a birthday, a holiday party, or just because, these chimichangas are guaranteed to be a hit!
In the next section, we’ll dive deeper into the ingredients that make these Cherry Cheesecake Chimichangas so delicious. Stay tuned!
2. Key Ingredients for Cherry Cheesecake Chimichangas
To make Cherry Cheesecake Chimichangas, you need the perfect balance of sweet, creamy, and crispy elements. Let’s break down the key ingredients that make these little pockets of heaven so irresistible.
2.1 Cherry Filling
The star of the show here is the cherry compote—it adds a fresh, fruity punch that complements the rich cheesecake filling. You can use fresh cherries, which add a wonderful, natural sweetness and texture, or if you’re in a pinch, canned cherries can work just as well.
- Making Cherry Compote: To create the compote, cook down the cherries with a bit of sugar, lemon juice, and sometimes a touch of cornstarch to thicken it. This creates a luscious, syrupy topping that adds depth and a tangy contrast to the sweetness of the cheesecake. You can also try experimenting with other fruits like blueberries or strawberries if you’re in the mood for a twist.
2.2 Cheesecake Filling
The creamy, rich cheesecake filling is the heart of these chimichangas. It’s smooth, velvety, and not too sweet, which makes it the perfect balance for the cherry topping.
- Essential Ingredients: The key ingredients for the cheesecake filling are cream cheese, sour cream, vanilla extract, and sugar. The cream cheese brings that signature tangy flavor, while the sour cream adds richness and smoothness. A little vanilla extract boosts the overall flavor, and the sugar ensures just the right amount of sweetness.
- Tip: Be sure to blend everything until smooth to avoid lumps. If your filling is too runny, you can add a small amount of cornstarch to help thicken it, so it doesn’t ooze out when frying.
2.3 The Chimichanga Wrapper
The tortilla is the crispy vessel that holds everything together. You’ll want to use flour tortillas, as they fry up nicely and are flexible enough to hold the creamy filling. The tortillas should be a little bigger than your usual ones, allowing enough space for the filling.
- Frying the Tortillas: The trick to a perfect chimichanga is to get the right amount of crispiness without overcooking the filling. Fry the rolled tortillas in hot vegetable oil or coconut oil—the oil should be around 350°F to get that perfect golden-brown exterior.
2.4 Frying and Topping
Once your chimichangas are fried to golden perfection, you can top them with a dusting of powdered sugar or even cinnamon sugar for extra sweetness. A scoop of vanilla ice cream or a dollop of whipped cream will take them to the next level!
In the next section, we’ll walk you through how to prepare these delicious Cherry Cheesecake Chimichangas step by step. You won’t want to miss it!
-
3. Step-by-Step Recipe for Cherry Cheesecake Chimichangas
Now that you know the key ingredients, it’s time to dive into the fun part: making these mouthwatering Cherry Cheesecake Chimichangas! Follow these easy steps to create your own crispy, creamy, fruity dessert that will have everyone asking for the recipe.
3.1 Preparing the Cherry Filling
Start by making your cherry compote to give it time to cool. In a saucepan, combine fresh or frozen cherries (about 2 cups) with 1/2 cup of sugar, and 1 tablespoon of lemon juice. Cook over medium heat, stirring occasionally, until the cherries soften and release their juices. To thicken the compote, mix 1 tablespoon of cornstarch with 1 tablespoon of cold water, then add it to the mixture. Simmer for another 2-3 minutes until thickened. Set aside to cool.
3.2 Preparing the Cheesecake Filling
Next, make the cheesecake filling. In a large mixing bowl, beat 8 oz of cream cheese and 1/2 cup of sour cream until smooth and creamy. Add 1/2 cup of sugar and 1 teaspoon of vanilla extract, and continue to beat until well combined. You should have a smooth, thick mixture. If the filling seems too runny, you can add a small spoonful of cornstarch to thicken it, but make sure to blend well to avoid lumps. Taste the filling and adjust sweetness by adding more sugar if desired.
3.3 Assembling the Chimichangas
Now, it’s time to assemble your chimichangas. Start by heating your flour tortillas in the microwave for 10-15 seconds to soften them. This will make them easier to roll. Place a few tablespoons of the cheesecake filling in the center of each tortilla, then add a spoonful of the cherry compote on top. Be sure not to overfill, as it can cause the chimichangas to burst open while frying. Fold in the sides of the tortilla, then roll it up tightly, securing the ends with a dab of water or egg wash to keep everything sealed inside.
3.4 Frying and Draining
Heat about 2 cups of vegetable oil or coconut oil in a deep pan or fryer to 350°F. Carefully lower each chimichanga into the hot oil and fry for 2-3 minutes on each side until golden brown and crispy. Use tongs to turn them carefully so they cook evenly. Once golden, remove from the oil and place them on a paper towel-lined plate to drain excess oil.
You’re almost there! Now, in the next section, we’ll cover how to serve your Cherry Cheesecake Chimichangas in style, making them look as delicious as they taste.
4. Cherry Cheesecake Chimichangas: Serving Suggestions (200 words)
Now that your Cherry Cheesecake Chimichangas are golden brown and crispy, it’s time to think about how to present them! A beautiful presentation can take this simple dessert to the next level, making it even more appealing to the eye—and the taste buds. Here are a few serving suggestions that will impress your guests and elevate the overall experience.
4.1 Presentation Tips
To make your cherry cheesecake chimichangas truly shine, serve them on a decorative platter with a dusting of powdered sugar or cinnamon sugar. For a fancier touch, drizzle some chocolate syrup or caramel sauce over the top for an added layer of sweetness. Garnishing with a few fresh cherry halves or even some whipped cream on the side will make the dessert pop visually, while also adding an extra burst of flavor.
If you’re hosting a party, you can make the chimichangas mini-sized for easy sharing. Serve them in small, bite-sized portions to create a fun, interactive dessert experience!
4.2 Pairing with Drinks
These fried cheesecake chimichangas pair wonderfully with a variety of drinks. A rich cup of coffee complements the sweetness, while milk balances the richness of the filling. For a sophisticated twist, consider pairing your chimichangas with a light, bubbly Prosecco or a Peach Bellini. You could also offer a dessert wine like Moscato to match the sweetness of the cherries and the cheesecake filling.
4.3 Making a “Chimichanga Bar”
For parties or gatherings, set up a DIY topping station. Guests can customize their chimichangas with additional toppings like chocolate chips, mini marshmallows, crushed nuts, or syrups. This interactive dessert bar creates a fun experience for guests and allows them to get creative with their toppings!
In the next section, we’ll explore some fun variations of the Cherry Cheesecake Chimichangas that you can try to suit different tastes and preferences.
-
5. Variations and Customizations for Cherry Cheesecake Chimichangas

If you’re looking to put your own spin on Cherry Cheesecake Chimichangas, you’re in luck! This versatile dessert can be easily customized to suit different tastes, dietary needs, or even seasonal flavors. Here are some fun and creative variations you can try to make these chimichangas uniquely your own.
5.1 Flavor Variations
While cherry is the star of the show, you can easily switch up the flavor profile to create different versions of this dessert. Here are some ideas:
- Blueberry Cheesecake Chimichangas: Swap out the cherry compote for a homemade blueberry sauce or fresh blueberries. Blueberries pair beautifully with the creamy cheesecake filling, and the combination of the two will leave your taste buds dancing.
- Strawberry Cheesecake Chimichangas: Instead of cherries, use strawberry compote or fresh strawberries. This variation is perfect for those who love the classic strawberry cheesecake flavor but want to enjoy it in a fun new way.
- Peach Cheesecake Chimichangas: For a tropical twist, use peach preserves or fresh diced peaches for the filling. The sweet, juicy peaches will add a refreshing balance to the rich cheesecake.
- Chocolate Cheesecake Chimichangas: Love chocolate? Make a chocolate cheesecake filling by mixing in cocoa powder or melted chocolate with the traditional cream cheese mixture. You can even drizzle melted chocolate ganache over the top for extra indulgence.
5.2 Gluten-Free and Dairy-Free Options
For those with dietary restrictions, it’s easy to make Cherry Cheesecake Chimichangas that are gluten-free or dairy-free. Here’s how:
- Gluten-Free: Use gluten-free flour tortillas instead of regular flour tortillas. They will hold up well during frying and give you that perfect crispy bite.
- Dairy-Free: Swap out the cream cheese and sour cream for non-dairy cream cheese or coconut cream. You can also use almond milk or oat milk in place of any dairy products in the recipe.
5.3 Baked Version vs. Fried Version
If you’re looking for a lighter alternative to the traditional fried chimichangas, you can bake them instead! Here’s how:
- Baked Cherry Cheesecake Chimichangas: Preheat your oven to 375°F (190°C). Place the assembled chimichangas on a baking sheet lined with parchment paper, and lightly spray them with cooking spray. Bake for about 15-20 minutes, flipping halfway through, until they are golden brown and crispy. While baked chimichangas may not have quite the same level of crispiness as the fried version, they still make for a delicious and healthier dessert.
Now that we’ve explored some fun and unique ways to personalize your Cherry Cheesecake Chimichangas, the next section will cover essential tips to ensure that you make them just right every time. Stay tuned for more!
6. Tips and Tricks for Perfect Cherry Cheesecake Chimichangas (300 words)
Making Cherry Cheesecake Chimichangas might seem like a simple task, but there are a few tricks that can help you achieve the crispiest, creamiest, and most delicious result every time. Whether you’re a beginner or an experienced cook, these tips will help you elevate your chimichanga game to the next level!
6.1 Don’t Overfill the Tortillas
It’s tempting to stuff your chimichangas with a generous amount of filling, but if you overfill them, they’re more likely to burst open while frying. A few tablespoons of cheesecake filling and a spoonful of cherry compote are more than enough. When you roll them up, make sure to leave enough room to fold in the sides and seal them securely. A tightly wrapped chimichanga will fry better and hold its shape.
6.2 Use the Right Oil Temperature
Getting the oil temperature just right is crucial to achieving that golden, crispy exterior. If the oil is too hot, the chimichangas will burn on the outside before the filling heats up. If the oil is too cool, they’ll become greasy and soggy. Aim for around 350°F (175°C) for perfect frying. To test if the oil is ready, drop a small piece of tortilla in. If it sizzles and browns quickly, it’s the right temperature.
6.3 Seal the Edges Properly
To prevent the filling from leaking out while frying, make sure to seal the edges of the chimichangas tightly. You can use a little water or egg wash (whisked egg) to help seal the tortilla. Pinch the edges together securely, and press gently to ensure the filling is locked inside. This will also help them keep their shape during frying.
6.4 Try Using a Cast-Iron Skillet for Frying
If you have one, a cast-iron skillet is the perfect tool for frying Cherry Cheesecake Chimichangas. It heats evenly and holds heat well, giving you that consistent, golden-brown crust on all sides. However, any deep frying pan will work, as long as you monitor the oil temperature carefully.
6.5 Let the Chimichangas Cool Before Serving
As tempting as it may be, try to let your chimichangas cool for a few minutes before serving. This gives the filling a chance to firm up slightly and makes them easier to eat without the cheesecake spilling out.
6.6 Make-Ahead Tips
Want to prep these ahead of time? You can assemble the chimichangas up to 1-2 days in advance and refrigerate them. Just be sure to cover them tightly with plastic wrap or foil to keep them fresh. When ready to serve, simply fry or bake as usual.
Now that you’ve got all the tricks for perfecting your Cherry Cheesecake Chimichangas, let’s wrap things up with some frequently asked questions (FAQs) in the next section. These answers will help clear up any confusion and make your cooking experience even smoother!
-
7. Frequently Asked Questions (FAQs) About Cherry Cheesecake Chimichangas
As with any fun and creative recipe, there are always a few common questions that pop up along the way. In this section, we’ve compiled the most frequently asked questions about Cherry Cheesecake Chimichangas to help guide you through the process and make your baking experience as smooth as possible.
7.1 Can I make Cherry Cheesecake Chimichangas in advance?
Yes! You can assemble the Cherry Cheesecake Chimichangas up to 1-2 days ahead of time. Simply wrap them tightly in plastic wrap or aluminum foil and store them in the fridge. When you’re ready to fry or bake them, no need to thaw—just cook them as usual. If you’re baking them, add a few extra minutes to the cooking time to ensure they’re fully heated through.
7.2 Can I use a different type of fruit for the filling?
Absolutely! While cherries are the classic choice for these chimichangas, you can easily swap them out for other fruits. Strawberries, blueberries, or even peaches work wonderfully. Just make sure to adjust the sweetness of your compote based on the fruit you’re using. If using fresh fruit, you may want to cook it down a little longer to create a thick compote.
7.3 Are Cherry Cheesecake Chimichangas gluten-free?
Traditional Cherry Cheesecake Chimichangas are not gluten-free, as they are made with flour tortillas. However, you can easily make them gluten-free by using gluten-free flour tortillas. Be sure to check the label for any hidden gluten ingredients, and the rest of the recipe can remain the same!
7.4 Can I bake Cherry Cheesecake Chimichangas instead of frying them?
Yes, you can bake them for a lighter alternative. Preheat your oven to 375°F (190°C), place the assembled chimichangas on a baking sheet, and lightly spray them with cooking oil. Bake for 15-20 minutes, flipping halfway through until they are golden and crispy. While baked chimichangas may not have the same level of crispiness as fried ones, they’re still delicious!
7.5 How do I store leftover Cherry Cheesecake Chimichangas?
Leftover Cherry Cheesecake Chimichangas can be stored in an airtight container in the fridge for up to 3 days. To reheat, place them in a preheated oven at 350°F (175°C) for 10 minutes to get them crispy again. Alternatively, you can microwave them for a quicker option, though they may not be as crispy.
With these tips and answers in hand, you’re now ready to make the best Cherry Cheesecake Chimichangas ever! Whether you’re serving them for a family dessert, a special occasion, or a fun treat just for yourself, these chimichangas are sure to be a crowd-pleaser every time.
Conclusion: Why You’ll Love Cherry Cheesecake Chimichangas
Cherry Cheesecake Chimichangas are the perfect dessert for anyone who loves the combination of crispy, sweet, and creamy in one delicious bite. Whether you’re looking for a fun twist on a traditional cheesecake or just want to surprise your friends and family with something unique, these chimichangas will certainly make an impression. From the creamy cheesecake filling to the sweet, tart cherry compote and crispy, golden tortilla exterior, they offer an indulgent treat that’s hard to resist.
With the variations and customization options we’ve covered—like using different fruits, making them gluten-free, or even baking them instead of frying—you can make this recipe your own to suit any taste or dietary need. The best part? They’re just as easy to make as they are to eat. So grab your ingredients, get frying (or baking), and enjoy the irresistible combination of flavors that make Cherry Cheesecake Chimichangas the ultimate dessert.
This wraps up our Cherry Cheesecake Chimichangas guide. We hope you’re inspired to try them out in your own kitchen! Happy cooking and enjoy every bite!