
Black Velvet Cake: A Luxuriously Dark and Delicious Dessert
When it comes to cakes that leave a lasting impression, Black Velvet Cake is a showstopper. With its smooth texture, rich flavor, and striking appearance, it’s a must-try for anyone who enjoys indulging in unique desserts. In this article, we’ll take a deep dive into everything you need to know about Black Velvet Cake—from its origins to the key ingredients, baking tips, variations, and more. Whether you’re an experienced baker or just starting, this guide will help you master the art of making this decadent cake at home.
Part 1: Introduction
What is Black Velvet Cake?
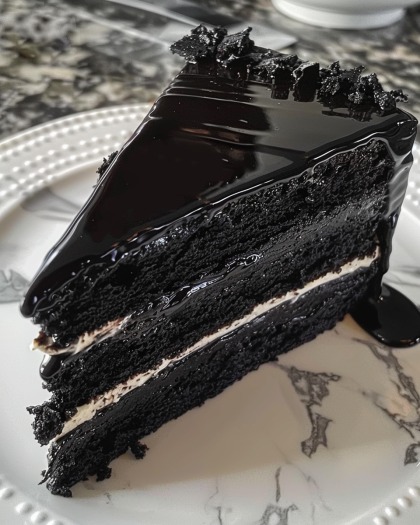
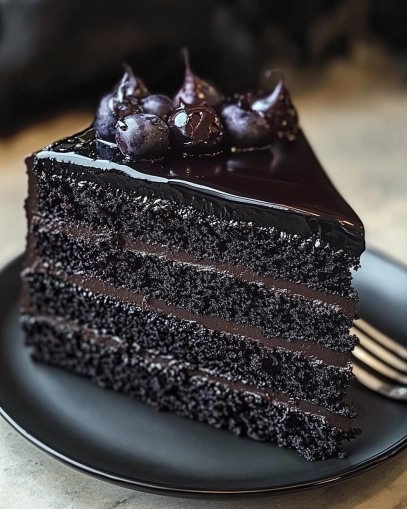
Black Velvet Cake is not your typical chocolate cake. While it does have chocolate flavors, it’s distinctly different from the classic chocolate cake we all know and love. The cake’s defining feature is its deep, dark color, achieved by using black cocoa powder, which gives it a unique flavor—less sweet and more intense. This cake’s smooth texture and rich, bittersweet taste are perfect for those who enjoy something a little different from the usual.
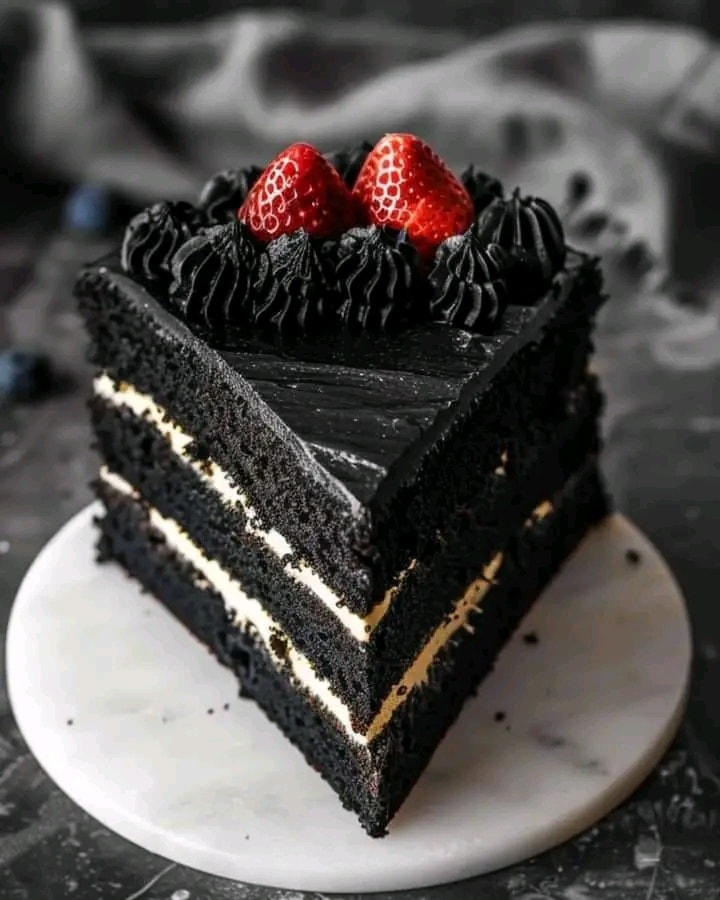
The cake often comes paired with creamy frosting, which complements its intense flavor and adds a sweet contrast to the cake’s richness. But it’s not just about flavor; Black Velvet Cake is also about making a statement. It’s a dessert that catches eyes with its bold, elegant color, often served at special occasions like Halloween, birthdays, and weddings.
Significance of Black Velvet Cake
Why has Black Velvet Cake captured the hearts (and taste buds) of cake lovers? Well, besides its bold appearance and rich flavor, this cake has become a symbol of decadence. It’s perfect for those who enjoy the finer things, offering a cake that’s not too sweet, yet indulgent enough to make any occasion feel special.
For those who have tasted Red Velvet Cake, Black Velvet Cake offers a different experience—less tangy and more subtly flavored. It’s the perfect way to explore a new variation of the velvet cake family without straying too far from the familiar texture and richness we all love.
With its dark, mysterious charm and unforgettable flavor, Black Velvet Cake is much more than just a dessert; it’s an experience. Now, let’s dive into the history and origins of this fabulous treat!
 Part 2: History and Origins
History of Velvet Cakes
Velvet cakes have a long-standing history in the world of desserts, dating back to the Victorian era. Known for their soft, airy texture, these cakes were prized for their delicate crumb and smooth consistency. In fact, the “velvet” name refers to the cake’s texture—so smooth that it almost melts in your mouth. Back in the day, velvet cakes were made using buttermilk and vinegar, ingredients that helped create their signature tender crumb. But what made them truly special was the meticulous attention to detail in the baking process.
Victorian Era Velvet Cakes
During the Victorian era, cake-making took a more refined turn. The use of buttermilk and baking soda was a revolutionary technique, resulting in lighter cakes that were easier to digest. These cakes, often frosted with rich buttercream or fondant, were reserved for special occasions and symbolized both elegance and skill. But these early velvet cakes were typically not the vibrant red or black cakes we see today—they were lighter in color, often yellow or pale.
Emergence of Red Velvet Cake
As we fast forward into the 20th century, another velvet cake emerged that would steal the spotlight—Red Velvet Cake. Red velvet, with its vibrant red color, became a sensation in the U.S., largely thanks to its popularity in high-society circles, particularly at the Waldorf-Astoria hotel. But what really set red velvet apart wasn’t just its appearance; it was the unique combination of cocoa powder, buttermilk, and vinegar, creating a slightly tangy, tender cake that was unlike any other.
However, not long after, Black Velvet Cake began making waves as a unique alternative to the well-known red version. Its deep, dark hue gives it a distinct edge, appealing to those who crave something more intense and rich in flavor. The use of black cocoa powder in place of traditional cocoa gives Black Velvet its signature dark color and smooth, less-sweet chocolate flavor.
Introduction of Black Velvet Cake
Black Velvet Cake entered the dessert scene with its striking dark appearance and subtle flavor profile. Unlike its red counterpart, which relies on food coloring for its color, Black Velvet Cake owes its inky hue entirely to the use of black cocoa powder. This special cocoa, known for its darker and richer flavor, imparts a deep, earthy taste that is less sweet than regular cocoa but still incredibly flavorful. While it’s not as widely known as red velvet, Black Velvet Cake has gained popularity in recent years, especially in the form of elegant, dramatic desserts perfect for special occasions like Halloween or even weddings.
So, next time you encounter Black Velvet Cake, you’ll know it’s not just a visually stunning dessert—it has a rich history that dates back centuries and has evolved over time to become the decadent treat it is today. Now that we understand where this cake came from, let’s move on to the key ingredients that make Black Velvet Cake a standout dessert!
Part 3: Key Ingredients for Black Velvet Cake
1. Black Cocoa Powder – The Secret Ingredient
One of the most crucial components in a Black Velvet Cake is the black cocoa powder. This ingredient is what sets it apart from traditional chocolate cakes. Unlike regular cocoa powder, black cocoa powder is processed using a special technique that creates a darker, almost black color. It has a more intense, less sweet, and slightly bitter flavor, which balances out the richness of the cake perfectly. The result? A deep, luxurious color and a smooth, slightly earthy flavor that’s a signature of Black Velvet Cake.
Why Black Cocoa Powder is Essential:
- Color: It’s the key to the cake’s bold, dramatic hue.
- Flavor: It gives the cake a refined, slightly bitter chocolate flavor that isn’t too sweet.
Black cocoa powder can sometimes be hard to find in local grocery stores, but it’s well worth seeking out for the authentic Black Velvet Cake flavor. For those in a pinch, a blend of regular cocoa powder and a small amount of activated charcoal can work as a substitute.
2. Buttermilk – The Secret to Tenderness
Just like in traditional velvet cakes, buttermilk plays a major role in giving the cake its soft, tender texture. The acidity in buttermilk helps break down the gluten in the flour, ensuring a cake that melts in your mouth. It also reacts with the baking soda to help the cake rise and maintain its light, fluffy texture.
Why Buttermilk is Important:
- Tender Texture: It helps create the light, airy crumb that is characteristic of velvet cakes.
- Flavor Balance: It adds a slight tanginess, which helps balance the rich, chocolate flavor.
If you don’t have buttermilk on hand, you can easily make a substitute by mixing milk with a tablespoon of vinegar or lemon juice. Let the mixture sit for a few minutes before using it in your cake batter.
3. Baking Soda – For Rise and Softness
Baking soda is a leavening agent that works hand-in-hand with buttermilk. The combination of buttermilk’s acidity and baking soda creates bubbles, causing the cake batter to rise and become fluffy. This reaction also helps tenderize the cake, giving it that perfect soft texture that is a hallmark of velvet cakes.
Why Baking Soda is Key:
- Rising Agent: It helps the cake rise and become fluffy.
- Tender Crumb: It softens the cake’s texture, contributing to the “velvet” feel.
4. Butter and Oil – For Moisture and Flavor
To keep Black Velvet Cake moist, a combination of butter and vegetable oil is often used. Butter provides richness and flavor, while oil adds moisture. The oil helps the cake stay moist for longer, even after it’s been baked and cooled. This results in a cake that is not only delicious but stays soft and moist for days.
Why Butter and Oil are Essential:
- Flavor: Butter enhances the cake’s flavor with its creamy, rich taste.
- Moisture: Oil ensures the cake stays moist and tender even after baking.
5. Eggs – Binding the Ingredients Together
Eggs are the binding agents that hold the cake’s structure together. They help create a smooth batter and contribute to the cake’s overall rise. Eggs also add moisture and richness, helping to create that smooth, velvety texture.
Why Eggs Are Needed:
- Structure: They hold the cake together and provide stability.
- Moisture and Richness: Eggs make the cake tender and rich in flavor.
6. Vanilla Extract – A Touch of Warmth
Vanilla extract adds a warm, aromatic note that balances the intense cocoa flavor in the cake. Though the Black Velvet Cake is known for its deep chocolate taste, vanilla extract provides a subtle sweetness that enhances the other ingredients without overpowering them.
Why Vanilla is Used:
- Enhances Flavor: It adds a delicate sweetness that complements the bitter cocoa.
- Aromatic: Vanilla creates a rich, inviting fragrance that makes the cake even more enticing.
7. Sugar – Sweetening the Deal
Finally, granulated sugar is used to sweeten the cake and help it rise. While the black cocoa powder adds an earthy, slightly bitter flavor, sugar provides the necessary sweetness to balance the cake.
Why Sugar is Crucial:
- Sweetness: It balances the bitterness of the cocoa.
- Texture: Sugar helps achieve a tender crumb and a golden, slightly crisp exterior.
 Part 4: How to Make Black Velvet Cake
Step-by-Step Instructions for Baking Black Velvet Cake
Making Black Velvet Cake might seem like a daunting task due to its unique ingredients, but it’s actually quite simple when you break it down. Follow these easy steps for a perfectly tender, rich, and flavorful cake.
1. Preheat Your Oven
Before you begin mixing your ingredients, start by preheating your oven to 350°F (175°C). This ensures that the oven reaches the optimal temperature for baking the cake.
2. Prepare Your Cake Pans
Grease and flour two 9-inch round cake pans. You can also line them with parchment paper to prevent the cakes from sticking to the pans. This is an essential step to ensure your cake comes out perfectly and is easy to remove once baked.
3. Mix Dry Ingredients
In a large mixing bowl, combine the following dry ingredients:
- 2 ½ cups all-purpose flour
- ¾ cup black cocoa powder
- 1 ½ tsp baking soda
- 1 tsp salt
Whisk them together until fully combined. The black cocoa powder is what gives your cake that signature dark color, so make sure it’s evenly distributed.
4. Mix Wet Ingredients
In a separate bowl, whisk together the wet ingredients:
- 1 cup buttermilk
- 1 cup vegetable oil
- 2 large eggs
- 1 tsp vanilla extract
The oil will keep your cake moist, while the buttermilk will provide the tangy flavor and soft texture.
5. Combine Wet and Dry Ingredients
Now, gradually add the wet ingredients to the dry ingredients. Use a spatula or mixer on low speed to combine them until the batter is smooth and free of lumps. Be careful not to overmix the batter, as this could affect the texture of your cake.
6. Bake the Cake
Divide the batter evenly between the two prepared cake pans. Tap the pans gently on the counter to remove any air bubbles. Bake for about 30-35 minutes or until a toothpick inserted into the center of the cakes comes out clean. The cakes should rise beautifully and have a soft, tender crumb.
7. Cool the Cakes
Once baked, remove the cakes from the oven and let them cool in the pans for about 10 minutes. After that, remove the cakes from the pans and allow them to cool completely on a wire rack. Cooling is essential before frosting the cake to ensure the frosting doesn’t melt.
8. Frost Your Cake
While the cake is cooling, you can prepare the frosting. A classic choice for Black Velvet Cake is a cream cheese frosting, which complements the slightly bitter cocoa flavor with its tangy richness.
How to Make Cream Cheese Frosting:
- 1 cup unsalted butter, softened
- 8 oz cream cheese, softened
- 4 cups powdered sugar
- 2 tsp vanilla extract
Whisk the butter and cream cheese together until smooth. Gradually add the powdered sugar, one cup at a time, until the frosting is thick and creamy. Add the vanilla extract and mix until fully combined.
Once the cake layers have cooled, spread a layer of frosting between the two cake layers, then frost the top and sides of the cake. You can garnish the cake with a sprinkle of cocoa powder or chocolate shavings for added visual appeal.
9. Serve and Enjoy
Cut a slice of your Black Velvet Cake and enjoy the tender, moist layers with the rich, creamy frosting. It’s perfect for any occasion, from birthdays to casual gatherings, or even just a special treat for yourself.
Part 5: Tips for Perfecting Black Velvet Cake
1. Don’t Overmix the Batter
While it’s tempting to keep stirring until everything is perfectly smooth, overmixing the batter can lead to a dense cake. The key to a light, fluffy Black Velvet Cake is mixing just until the ingredients are combined. Overmixing can develop the gluten in the flour too much, which will result in a cake that’s more chewy than tender. A gentle fold will do the trick!
2. Use Room Temperature Ingredients
For the best texture and flavor, make sure all your ingredients are at room temperature before starting. This includes your eggs, buttermilk, and butter. Room-temperature ingredients will blend together more smoothly, ensuring a better rise and consistency in your cake. Cold ingredients, especially butter, can cause the batter to separate and affect the cake’s texture.
3. Double Check Your Oven Temperature
Every oven is different, and your oven might run a little hotter or cooler than the dial suggests. It’s always a good idea to use an oven thermometer to make sure your oven is at the correct temperature. This helps avoid underbaking or overbaking, which can result in dry, uneven cakes.
4. Let the Cakes Cool Completely Before Frosting
It’s essential to let the cake cool completely before applying the frosting. If the cake is still warm, the frosting can melt, ruining the texture and appearance. Be patient, and allow your cakes to cool to room temperature before layering with frosting.
5. Use Fresh Baking Powder and Baking Soda
The leavening agents (baking soda and baking powder) in your cake batter need to be fresh to work effectively. Old or expired baking soda and baking powder lose their potency, resulting in a dense and flat cake. Always check the expiration date of these ingredients before use to ensure they perform their best.
6. Layering for the Perfect Finish
When frosting your cake, take your time and be generous with the frosting layers. This doesn’t just add flavor; it also helps create a smooth and professional finish. To achieve a beautifully frosted cake, use a bench scraper or offset spatula to smooth out the frosting as you go. For an elegant finish, consider adding chocolate shavings or even edible gold leaf to give your Black Velvet Cake a luxurious touch.
7. Refrigerate the Cake for Better Slicing
If you want perfectly clean slices of Black Velvet Cake, refrigerate the cake for about 30 minutes before slicing. Chilling the cake helps set the frosting, which makes it easier to cut and ensures each slice holds its shape. This is especially useful if you’re planning to serve the cake at a party or special occasion.
8. Make Ahead and Store Properly
Black Velvet Cake can be made ahead of time and stored for up to 3 days. Wrap the cake layers tightly in plastic wrap before storing them in the fridge. You can also freeze the cake for up to a month if you want to prepare it well in advance. To thaw, simply leave it in the fridge overnight and frost as usual.
9. Experiment with Flavor Variations
While cream cheese frosting is a classic choice for Black Velvet Cake, you can experiment with other types of frosting or fillings for different flavors. Try a chocolate ganache frosting for an extra indulgent treat, or a whipped cream frosting for a lighter option. Adding a layer of raspberry jam or cherry preserves between the layers can also bring a burst of flavor that complements the rich chocolate of the cake.
Part 6: Common Mistakes to Avoid When Making Black Velvet Cake
1. Using the Wrong Cocoa Powder
One of the key elements that give Black Velvet Cake its rich, dark color is the type of cocoa powder you use. If you opt for regular unsweetened cocoa powder instead of black cocoa powder, you’ll end up with a much lighter cake, both in color and flavor. Black cocoa powder is essential for achieving that deep, velvety color and the subtle, rich chocolate taste that defines this cake.
Solution: Always use high-quality black cocoa powder for the best results. It has a more intense flavor and gives your cake its signature dark hue.
2. Not Measuring Ingredients Properly
Accurate measurements are essential when baking any cake, but they’re particularly crucial for Black Velvet Cake. Too much flour can lead to a dry, dense cake, while too little can cause the cake to fall apart. Similarly, the amount of baking soda and cocoa powder needs to be just right for the perfect rise and flavor balance.
Solution: Invest in a good set of measuring cups and spoons, and make sure to level off the ingredients to ensure accuracy. For dry ingredients, a kitchen scale can also be helpful.
3. Not Sifting the Dry Ingredients
Sifting dry ingredients such as flour and cocoa powder before combining them helps break up any clumps and ensures an even distribution. Failing to sift can lead to uneven texture and flavor in the cake.
Solution: Take a moment to sift the flour, cocoa powder, and other dry ingredients together. This simple step helps prevent clumps and results in a smoother batter.
4. Not Letting the Cake Cool Before Frosting
One common mistake people make is frosting the cake before it has had a chance to cool completely. If the cake is too warm, the frosting will melt, creating a mess and ruining the beautiful layers you’ve worked so hard to achieve.
Solution: Always let the cakes cool completely on a wire rack before frosting. If you’re short on time, you can place the cakes in the fridge for 30 minutes to speed up the cooling process.
5. Using Too Much Frosting
While it’s tempting to use a lot of frosting, too much can overpower the cake and make it too sweet. A thick layer of frosting might also make it difficult to slice the cake cleanly, leading to messy pieces.
Solution: Apply a thin, even layer of frosting. You can always add a little more if needed, but it’s easier to add than take away.
6. Underbaking or Overbaking the Cake
Another common mistake when baking Black Velvet Cake is not properly monitoring the baking time. If the cake is underbaked, it will be too gooey and might not hold up when sliced. On the other hand, overbaking can result in a dry and crumbly cake.
Solution: Keep an eye on the baking time and perform the toothpick test. Insert a toothpick into the center of the cake—if it comes out clean or with a few crumbs sticking to it, the cake is done.
7. Not Using Buttermilk
Buttermilk is a crucial ingredient in Black Velvet Cake because it reacts with the baking soda to create a light and fluffy texture. If you substitute regular milk, the cake might lack the same tenderness and rise.
Solution: Stick with buttermilk to achieve the moist, soft texture that makes Black Velvet Cake so special. If you don’t have buttermilk, you can make a quick substitute by adding 1 tablespoon of lemon juice or vinegar to a cup of milk and letting it sit for 5 minutes.
 Part 7: Creative Variations and Serving Ideas for Black Velvet Cake
1. Black Velvet Cake Cupcakes
If you want to serve individual portions of this decadent dessert, turning your Black Velvet Cake into cupcakes is a fantastic option. They’re perfect for parties, gatherings, or when you just want a smaller treat.
How to Make:
- Simply follow the same recipe as for the cake but pour the batter into cupcake liners instead of cake pans.
- Bake at the same temperature, but start checking for doneness around 18-20 minutes. A toothpick should come out clean when inserted into the center.
- Top with your favorite frosting and maybe even a small decorative piece of chocolate or edible glitter for an extra touch.
2. Layered Black Velvet Cake with a Twist
Why not add some extra flavor and texture to your Black Velvet Cake by including additional layers or fillings? Try adding a layer of fresh fruit like raspberries, strawberries, or a decadent chocolate ganache between the cake layers. This adds a refreshing contrast to the rich chocolate flavor.
How to Make:
- After baking the cake layers, allow them to cool and slice them in half to create extra layers.
- Spread a layer of fruit jam, cream cheese filling, or chocolate ganache before reassembling the cake.
- Frost as usual, and garnish with fresh fruit or even whipped cream for an added touch of sweetness.
3. Black Velvet Cake with Chocolate Ganache Frosting
If you’re a true chocolate lover, using chocolate ganache instead of cream cheese frosting will elevate the richness of your Black Velvet Cake even further. The smooth, velvety ganache adds a glossy finish that pairs beautifully with the dark cake.
How to Make:
- To make chocolate ganache, heat heavy cream until just before boiling and pour it over chopped chocolate. Stir until smooth and glossy.
- Let the ganache cool to room temperature before spreading it over the cake. The consistency will thicken as it cools, allowing you to spread it easily over the cake.
4. Mini Black Velvet Cakes for Special Occasions
Mini cakes are a fun and trendy way to serve Black Velvet Cake at special events like weddings, birthdays, or anniversaries. These mini versions make for the perfect bite-sized treat that’s both personal and elegant.
How to Make:
- Use small cake pans or a muffin tin to create individual mini cakes. The baking time will be shorter, so keep a close eye on them as they bake.
- Layer the mini cakes with frosting and any filling you prefer, such as buttercream, cream cheese frosting, or even whipped cream.
- Decorate with edible flowers, chocolate shavings, or sprinkles to make them look as beautiful as they taste.
5. Black Velvet Cake Pops
Another fun and trendy way to serve Black Velvet Cake is to turn it into cake pops. These are a great choice for parties, baby showers, or any event where guests will be grabbing a quick bite.
How to Make:
- After baking the cake and allowing it to cool, crumble it into small pieces.
- Mix the crumbs with frosting to bind it together, then roll the mixture into small balls.
- Insert cake pop sticks and dip them into melted chocolate or white chocolate for a smooth coating. Decorate with sprinkles or other fun toppings.
- Let them set in the fridge for a few hours to ensure the coating hardens and the pops hold their shape.
6. Vegan Black Velvet Cake
For those following a plant-based diet, a vegan version of Black Velvet Cake can be made without compromising on flavor. Using alternatives for dairy and eggs is easy to do and will result in a rich, flavorful cake that’s still incredibly moist.
How to Make:
- Substitute the buttermilk with a plant-based milk (like almond milk or oat milk) and add 1 tablespoon of vinegar or lemon juice to create acidity.
- Use a flaxseed or chia egg substitute (1 tablespoon of ground flaxseed mixed with 3 tablespoons of water, left to sit for a few minutes until it thickens) in place of eggs.
- Replace the butter with vegan butter or coconut oil for the best results.
7. Serving Ideas:
Once your Black Velvet Cake is frosted and ready to go, it’s time to think about how to serve it. The beauty of this cake is that it can be dressed up in so many different ways, depending on the occasion.
-
For Special Occasions: A classic way to serve Black Velvet Cake is with a rich cream cheese frosting and simple decorations like chocolate curls, fresh berries, or edible flowers. It’s the perfect centerpiece for birthdays, anniversaries, or a holiday gathering.
-
For a Cozy Night In: If you’re enjoying the cake at home, pair it with a hot cup of coffee or tea for a comforting, indulgent treat.
-
For a Luxurious Touch: Top the cake with gold leaf, chocolate-covered strawberries, or a drizzle of caramel sauce for a more sophisticated presentation.
FAQs: Everything You Need to Know About Black Velvet Cake
1. What is the difference between Black Velvet Cake and Red Velvet Cake?
Black Velvet Cake and Red Velvet Cake are often compared due to their similar textures and vibrant colors. However, the primary difference lies in the color and the type of cocoa used.
- Black Velvet Cake uses black cocoa powder, which gives it a much darker, almost black hue, and a slightly more intense, rich chocolate flavor.
- Red Velvet Cake uses regular cocoa powder and typically has a red color achieved by adding red food coloring.
Both cakes are equally moist and tender, but the Black Velvet Cake tends to have a deeper, more robust chocolate flavor, while Red Velvet Cake has a subtle hint of cocoa with a tangy note from buttermilk.
2. Can I make Black Velvet Cake ahead of time?
Yes, Black Velvet Cake can be made ahead of time! In fact, it often tastes even better the next day after the flavors have had a chance to settle. Here’s how you can do it:
- Baking ahead: Bake the cake layers and allow them to cool completely. Wrap them tightly in plastic wrap and store them in an airtight container at room temperature for up to 2 days. Alternatively, you can freeze the layers for up to 3 months.
- Frosting ahead: You can also make the frosting in advance. Store the frosting in an airtight container in the fridge for up to 3 days. Before frosting, let it come to room temperature and re-whip if needed.
3. How do I store Black Velvet Cake?
To keep your Black Velvet Cake fresh and delicious, store it in an airtight container.
- If you have leftover cake, it’s best to keep it in the fridge, especially if you’ve used cream cheese frosting. It will stay fresh for up to 4-5 days.
- If you’re planning to keep the cake for longer, you can freeze it. Wrap individual slices or whole layers tightly in plastic wrap and foil, and store them in the freezer for up to 3 months. To thaw, simply place them in the fridge overnight.
4. Why is my Black Velvet Cake not as dark as expected?
If your Black Velvet Cake isn’t as dark as you expected, it could be due to the type of cocoa powder used. Black cocoa powder is essential for achieving the signature deep, dark color. Regular cocoa powder won’t give the same result.
- Solution: Make sure to use high-quality black cocoa powder for the best color and flavor. If you’re having trouble finding it, look for Dutch-processed cocoa, which has a similar dark color.
5. Can I use a different frosting for Black Velvet Cake?
While cream cheese frosting is the most popular choice for Black Velvet Cake, you can definitely switch things up depending on your taste preference. Here are a few ideas:
- Buttercream frosting: A classic and smooth option that pairs well with the rich, chocolate flavor of the cake.
- Whipped cream frosting: Lighter and fluffier, this is a great option for those who prefer a less sweet and heavy frosting.
- Chocolate ganache: For an extra indulgent treat, a rich chocolate ganache will elevate your cake’s chocolate flavor even more.
Feel free to experiment with different frostings to create your perfect version of Black Velvet Cake.
6. Can I make Black Velvet Cake gluten-free?
Yes! You can easily make Black Velvet Cake gluten-free by swapping out the all-purpose flour for a gluten-free flour blend. Make sure to choose a blend that’s designed to be used as a 1:1 replacement for regular flour.
- Additionally, make sure to check your other ingredients, such as the cocoa powder and baking soda, to ensure they are gluten-free.
The texture and flavor of the cake should remain just as moist and delicious as the traditional version!
7. How do I prevent my Black Velvet Cake from being dry?
The key to a moist Black Velvet Cake lies in the balance of ingredients and baking time. If your cake turns out dry, it could be due to overmixing the batter, using too much flour, or overbaking the cake.
Tips to prevent dryness:
- Be careful not to overmix the batter once you’ve added the dry ingredients. Mix just until combined to avoid incorporating too much air.
- Use buttermilk in the recipe, as it helps tenderize the cake and keeps it moist.
- Don’t overbake the cake! Keep an eye on it in the oven and use the toothpick test to check for doneness.
8. Can I freeze Black Velvet Cake?
Yes, Black Velvet Cake freezes beautifully, making it a great option for preparing ahead of time.
- To freeze, wrap the cake layers tightly in plastic wrap and then foil to prevent freezer burn. You can freeze the whole cake or individual slices.
- When you’re ready to serve, thaw the cake in the fridge overnight or leave it at room temperature for a few hours before serving.
Conclusion: Your Perfect Black Velvet Cake Awaits!
There you have it—everything you need to know to bake the perfect Black Velvet Cake. From the rich, dark cocoa powder to the smooth, creamy frosting, this cake is bound to become a crowd favorite at any occasion. Whether you’re a seasoned baker or a newbie in the kitchen, this recipe is simple to follow and delivers a show-stopping dessert that tastes just as good as it looks.
Remember, the key to a successful Black Velvet Cake is the right ingredients, careful baking, and, of course, a little patience. So, don’t hesitate to get creative with your frosting, make the cake ahead of time, or experiment with different ways to decorate it.
With all the tips, tricks, and FAQs provided in this article, you’re now equipped to create a moist, flavorful cake that will impress everyone who tries it. So go ahead, grab your ingredients, and bake up something truly special that will leave everyone coming back for seconds.
Happy baking, and enjoy every velvety bite of your homemade Black Velvet Cake!
Print Black Velvet Cake Recipe – Rich, Moist, and Irresistible Chocolate Delight
Ingredients
Instructions
Notes
- Author: laura