
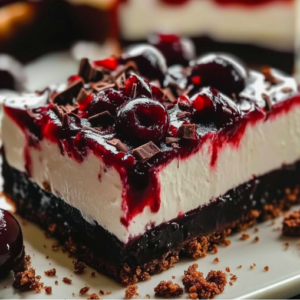
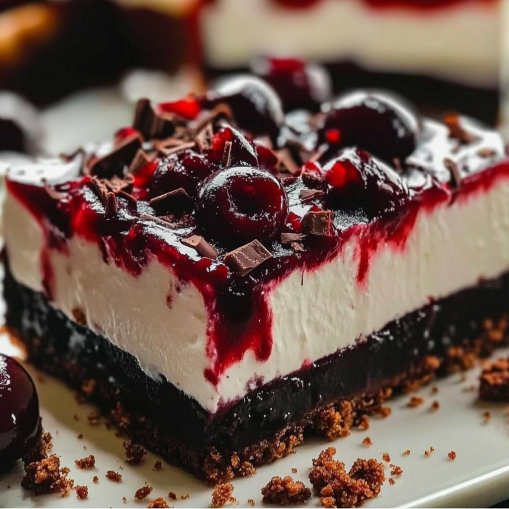
Welcome to the world of indulgent desserts! Today, we’re diving into the delicious world of Black Forest Cheesecake Delight Bars. If you’re a fan of creamy cheesecakes, rich chocolate, and the sweet, tart burst of cherries, then these bars are sure to become your new favorite treat. Whether you’re preparing them for a special occasion or just to satisfy a sweet tooth, these no-bake bars are both easy to make and utterly satisfying.
Now, let’s get into the details—starting with understanding exactly what makes these bars so delightful!
What are Black Forest Cheesecake Delight Bars?
If you’ve ever heard of the Black Forest Cake, you’re in for a real treat. This iconic German dessert is famous for its layers of chocolate sponge cake, whipped cream, and cherries, but it’s time to introduce a twist—Black Forest Cheesecake Delight Bars!
These bars are essentially a no-bake, cheesecake-inspired dessert that takes the best parts of a Black Forest Cake—rich chocolate, tangy cherries, and creamy cheesecake—and turns them into individual, easy-to-serve portions. They offer a rich, luxurious flavor with a velvety cheesecake layer, topped with a sweet cherry filling, and finished with a delightful chocolatey crunch.
What makes these bars so special is that they capture the essence of a traditional Black Forest cake but in a much simpler form. With a buttery, crunchy base made from chocolate cookie crumbs or graham crackers, these bars are a breeze to make. There’s no need for baking cakes or dealing with multiple layers of frosting. Simply press your crust, layer the cheesecake filling, add the cherries and chocolate, then chill—voila! You have a dessert that’s just as festive and indulgent as the classic cake but much easier to whip up.
So why not skip the cake and enjoy a creamy, easy-to-make dessert that’s perfect for any occasion? These Black Forest Cheesecake Delight Bars are an irresistible treat you’ll want to share (or maybe keep to yourself!).
Ingredients for Black Forest Cheesecake Delight Bars
Before you can dive into making these decadent Black Forest Cheesecake Delight Bars, you need to gather the right ingredients. Don’t worry—everything you need is easy to find at your local grocery store, and most of these items are probably already in your pantry! Let’s break it down.
Crust Ingredients:
The foundation of your cheesecake bars starts with a crust, and we’re keeping it simple yet delicious with either chocolate cookie crumbs or graham crackers. The crunchy texture of the crust complements the creamy cheesecake filling perfectly. Here’s what you’ll need:
- Crushed chocolate cookies (like Oreos) or graham crackers – about 2 cups, crushed into fine crumbs. This gives your bars that sweet and crunchy base.
- Butter – Around 1/2 cup, melted. Butter helps bind the crumbs together and gives the crust a rich flavor.
- Sugar – Optional, but if you want a sweeter crust, a tablespoon or two of sugar can do wonders. If your cookies are already sweet (like Oreos), you can skip this!
Cheesecake Layer:
Now comes the star of the show—the cheesecake! This layer is smooth, creamy, and full of flavor. The ingredients for this part are simple but crucial:
- Cream cheese – The base of any cheesecake! Use full-fat cream cheese for a rich and indulgent texture. Be sure to soften it before mixing for a smooth finish.
- Granulated sugar – About 1 cup to sweeten the cheesecake mixture.
- Vanilla extract – A teaspoon adds depth of flavor that balances the richness of the cream cheese.
- Sour cream – Optional but highly recommended! It adds extra creaminess and a subtle tang.
- Heavy cream or whipped cream – For fluffiness and that ultra-creamy texture, you’ll need about 1 cup of whipped cream.
Topping Ingredients:
Now, let’s finish things off with the cherry on top—literally! The topping is what gives these bars their Black Forest flair:
- Cherry pie filling or fresh cherries – Around 1 to 1.5 cups. If you’re using fresh cherries, you can either pit them and chop them up, or create a homemade cherry compote for extra flavor.
- Chocolate chips or shavings – A sprinkle of dark or milk chocolate (about 1/2 cup) brings a delicious cocoa flavor that pairs perfectly with the cherries.
Pro Tip:
If you’re feeling adventurous, you can swap the graham cracker crumbs for chocolate wafer crumbs or even a cookie crust for an extra layer of chocolatey goodness. These small tweaks can completely change the flavor profile of your bars!
Step-by-Step Instructions for Making Black Forest Cheesecake Delight Bars
Now that you’ve gathered all your ingredients, it’s time to turn them into a mouthwatering batch of Black Forest Cheesecake Delight Bars. Don’t worry—these bars are easy to make, even for beginners. Plus, there’s no baking involved! Just follow these simple steps to create a dessert that’s sure to impress.
Step 1: Prepare the Crust
First, let’s start with the crust. A solid, crunchy base is the foundation of any great cheesecake bar, and here’s how to make it:
- Crush the cookies: In a food processor or using a ziplock bag and a rolling pin, crush your chocolate cookies or graham crackers until you have fine crumbs. You’ll need about 2 cups of crumbs, which should be enough to cover the bottom of your pan.
- Mix with butter: In a large bowl, combine the crushed crumbs with melted butter. Stir it until the mixture is well-coated and holds together when pressed.
- Press into the pan: Grease a 9×9-inch square pan or a 9-inch round pan with butter or cooking spray. Then, pour your crumb mixture into the pan and press it down firmly using the back of a spoon or the bottom of a glass to ensure an even, compact crust.
- Chill: Place the pan in the fridge to chill while you work on the cheesecake filling. This helps the crust set and firm up.
Step 2: Make the Cheesecake Filling
Next, we’ll focus on the cheesecake layer, which is the star of the show. This step is all about mixing and creating that rich, smooth filling:
- Soften the cream cheese: Start by softening your cream cheese to room temperature for easy mixing. Use a hand mixer or stand mixer to beat the cream cheese until it’s smooth and creamy, about 2 minutes.
- Add sugar and vanilla: Add granulated sugar and vanilla extract to the cream cheese and mix until combined. Taste it to check the sweetness and adjust if needed.
- Whip the cream: In a separate bowl, whip the heavy cream (or whipped cream) until it forms stiff peaks. You can use a hand mixer or stand mixer for this step. The whipped cream adds that light and airy texture to the cheesecake.
- Combine: Gently fold the whipped cream into the cream cheese mixture. This will give you that fluffy and creamy cheesecake texture you’re looking for.
- Add sour cream (optional): If you want an even creamier filling, fold in sour cream. This adds a subtle tang that balances the richness of the cream cheese.
Step 3: Assemble the Bars
Now that your crust and filling are ready, it’s time to layer them:
- Spread the cheesecake mixture: Pour the cheesecake mixture over the chilled crust. Use a spatula to spread it evenly and smooth the top.
- Chill the cheesecake: Place the pan back into the fridge and chill for at least 4 hours, or better yet, overnight. This will help the filling firm up and set perfectly. The longer it chills, the firmer and more defined the bars will be.
Step 4: Add the Cherry Topping
Now comes the fun part—adding that delicious cherry topping:
- Top with cherry pie filling: After the cheesecake has set, open a can of cherry pie filling or pit and chop fresh cherries. If using fresh cherries, you can simmer them down with a bit of sugar to create your own cherry compote. Spoon the cherry mixture generously over the cheesecake layer.
- Garnish with chocolate: For an extra burst of flavor, sprinkle chocolate shavings or chocolate chips on top of the cherries. The combination of rich chocolate and sweet cherries is what makes these bars so irresistible.
Step 5: Cut and Serve
Once the bars have chilled and everything is set, it’s time to serve:
- Slice into bars: Using a sharp knife, cut the cheesecake into squares or rectangles, depending on your preference. Clean the knife between each cut for clean edges.
- Serve and enjoy: You can serve these bars as-is or add a dollop of freshly whipped cream for extra indulgence. For an even fancier touch, drizzle a little bit of chocolate sauce or caramel sauce over the bars before serving.
Pro Tip:
Make sure the bars are well-chilled before cutting—this ensures that the filling is firm and the bars hold their shape when sliced.
Tips and Tricks for Perfect Black Forest Cheesecake Delight Bars
Making Black Forest Cheesecake Delight Bars is easy, but there are a few key tips and tricks to ensure that your bars turn out perfect every time. Whether you’re new to no-bake desserts or a seasoned baker, these simple tips will help you achieve a smooth, creamy texture and a flawless finish.
1. Be Patient with the Chilling Time
One of the most important things to remember when making cheesecake bars is that they need plenty of chilling time. While it’s tempting to slice into them right after assembling, the bars will not set properly if they haven’t chilled enough. Refrigerate for at least 4 hours (preferably overnight) to allow the cheesecake layer to firm up and hold its shape. This is crucial for clean cuts and a smooth texture.
2. Make Sure Your Ingredients Are Room Temperature
Using room-temperature cream cheese is key to getting a smooth, lump-free cheesecake mixture. Cold cream cheese will create clumps that are difficult to mix into the filling. Let the cream cheese sit out for about 30 minutes before you begin mixing, ensuring that it blends easily with the other ingredients.
3. Don’t Overmix the Filling
When making the cheesecake filling, it’s important not to overmix it. Overmixing the cream cheese can introduce air bubbles and cause the texture to become too fluffy or even crack. Simply beat it until smooth, then gently fold in the whipped cream for that perfect airy texture.
4. Use a Sharp Knife for Clean Cuts
Once your cheesecake bars are properly chilled, cut them with a sharp knife. This will ensure clean, smooth edges and prevent the bars from falling apart. If you’re serving these for a special occasion, make sure each slice is neat and presentable.
5. Customize the Toppings
Feel free to get creative with your toppings! While the classic cherry topping is traditional, you can experiment with fresh berries, raspberry sauce, or even a drizzle of caramel or chocolate sauce. Adding a sprinkle of chopped nuts (like almonds or walnuts) can also provide a nice crunch to contrast the creamy cheesecake.
6. Make It Gluten-Free
If you’re serving guests with gluten sensitivities, you can easily make these bars gluten-free. Simply swap the graham cracker crumbs or chocolate cookies for gluten-free cookies or gluten-free graham crackers. Just be sure to check that your chocolate chips are also gluten-free!
7. Make a Larger Batch
If you’re hosting a big gathering, you can double the recipe to make more bars. Just make sure to use a larger pan (around 9×13 inches) and adjust the chilling time slightly to accommodate the larger size.
Pro Tip:
If you want to add even more depth of flavor, consider drizzling a little chocolate ganache over the top of the cheesecake bars. It adds an extra layer of indulgence and takes these bars to the next level.
Variations and Substitutions for Black Forest Cheesecake Delight Bars
While the classic Black Forest Cheesecake Delight Bars recipe is delicious as-is, there’s always room for customization. Whether you’re looking to add a personal twist or cater to specific dietary needs, there are plenty of variations and substitutions you can try. Let’s explore a few options to make these bars even more exciting!
1. Swap the Crust for a Different Flavor
While the traditional chocolate cookie crust is rich and indulgent, you can switch things up with different bases:
- Graham cracker crust: If you prefer a lighter, less chocolatey option, go for a classic graham cracker crust. The sweetness of the graham crackers will still complement the rich cheesecake filling.
- Oreo crust: For an extra chocolatey treat, use Oreos (or any chocolate sandwich cookies) for an intense chocolate flavor that will enhance the whole dessert.
- Gluten-free crust: For a gluten-free option, swap out the graham crackers or cookies for gluten-free alternatives. Many stores carry gluten-free cookie crumbs or graham crackers.
2. Use Fresh or Frozen Cherries
While cherry pie filling is traditional, you can also use fresh or frozen cherries for a more natural topping:
- Fresh cherries: If cherries are in season, use fresh cherries for a burst of natural sweetness. Simply pit and chop them, or make a quick homemade cherry compote with sugar and a little lemon juice.
- Frozen cherries: Frozen cherries work well too. Just be sure to thaw them and drain excess moisture before topping your cheesecake bars to avoid making the crust soggy.
3. Add a Flavor Twist to the Cheesecake Filling
Feeling adventurous? Spice up your cheesecake filling with different flavors:
- Raspberry cheesecake bars: Swap out the cherry topping for fresh raspberries or raspberry jam to create a tangy, berry-infused dessert.
- White chocolate: Add a bit of melted white chocolate to the cheesecake mixture for a sweeter, creamy flavor that pairs wonderfully with the cherries.
- Coffee or espresso: For a coffee-flavored twist, add a teaspoon of instant espresso powder to the cheesecake mixture. The rich coffee flavor works great with the chocolate and cherries.
4. Dairy-Free or Vegan Options
If you’re looking for a dairy-free or vegan alternative, you can make a few substitutions:
- Dairy-free cream cheese: Swap traditional cream cheese for a dairy-free cream cheese brand.
- Coconut cream: Use coconut cream or coconut whipped cream in place of heavy cream for a dairy-free, coconut-infused cheesecake filling.
- Vegan whipped topping: Replace whipped cream with a vegan whipped topping (like coconut whipped cream) for a completely dairy-free dessert.
5. Switch Up the Toppings
Though cherries are the classic topping, feel free to get creative and experiment:
- Berries: Top with a mix of fresh strawberries, blueberries, or blackberries for a vibrant, multi-berry flavor.
- Chocolate curls: Instead of chocolate chips, try using chocolate curls or a drizzle of chocolate ganache for a fancy presentation.
- Nuts: Add a handful of chopped almonds, hazelnuts, or walnuts for extra crunch and flavor.
6. Alcohol Infusion
For an adult twist, infuse the cheesecake bars with a touch of liqueur:
- Kirsch: A traditional touch for a Black Forest dessert is Kirsch, a German cherry brandy. A tablespoon mixed into the filling or drizzled over the cherries adds depth to the flavor.
- Rum or whiskey: For a different vibe, try adding a teaspoon of rum or whiskey to the cheesecake mix.
Pro Tip:
If you want to make a fun layered effect, try swirling some cherry compote into the cheesecake filling before it sets, creating a marbled appearance that’s as beautiful as it is tasty!
Frequently Asked Questions (FAQs) About Black Forest Cheesecake Delight Bars
When it comes to making Black Forest Cheesecake Delight Bars, you might have a few questions or concerns. Don’t worry! We’ve compiled the most frequently asked questions to help guide you through the process. Whether you’re a first-time baker or a seasoned pro, these answers will ensure your cheesecake bars turn out perfect every time.
1. Can I make Black Forest Cheesecake Delight Bars ahead of time?
Absolutely! These bars are ideal for making ahead. In fact, they need a few hours (or even overnight) to chill in the fridge. This allows the cheesecake filling to set and the flavors to meld together. Make them the day before you plan to serve them, and you’ll have a delicious, ready-to-go dessert.
2. How long do these bars last?
Black Forest Cheesecake Delight Bars can last in the fridge for up to 5 days if stored properly in an airtight container. If you have leftovers (which is rare!), be sure to keep them chilled. They’re best when fresh, but they’ll still taste amazing for several days.
3. Can I freeze these cheesecake bars?
Yes, you can freeze these bars! To freeze, first allow them to chill and set completely in the fridge. Then, slice them into bars, place them on a baking sheet, and freeze for about 1-2 hours to firm up. Once frozen, transfer them to a freezer-safe container or wrap them tightly in plastic wrap. They can last up to 1-2 months in the freezer. When you’re ready to enjoy, just let them thaw in the fridge for a few hours before serving.
4. What if I don’t have a 9×9 pan?
No worries! If you don’t have a 9×9-inch square pan, you can use a 9-inch round pan or even a rectangular pan. Just be sure to adjust the slicing based on the size and shape of your pan. A larger pan may yield thinner bars, while a smaller one might give you thicker, richer bars.
5. Can I use frozen cherries instead of fresh ones?
Yes, frozen cherries can be used in place of fresh ones. Just make sure to thaw and drain any excess moisture before adding them to the cheesecake bars. This prevents the crust from getting soggy and ensures a more stable topping.
6. How do I cut the bars neatly?
For clean, precise cuts, be sure to chill the bars well before slicing. A sharp knife is essential, and it’s helpful to wipe the knife clean between cuts to avoid messy edges. If you’re working with a large batch, you can even use a hot knife (dip it in hot water and dry it off) for extra smooth cuts.
7. Can I make these bars gluten-free?
Definitely! You can easily make a gluten-free version by using gluten-free cookies or graham crackers for the crust. Be sure to check that the chocolate chips you use are also gluten-free, and you’re good to go!
8. Can I make this a low-sugar or sugar-free dessert?
Yes! If you’re looking to cut down on sugar, you can substitute the granulated sugar with a sugar substitute like stevia or erythritol. For the topping, you can use sugar-free cherry pie filling or fresh cherries to control the sweetness.
9. Can I use a different type of crust?
Absolutely! If you’re not a fan of chocolate or graham crackers, you can try other types of crusts. Digestive biscuits or even biscotti crumbs can make a unique base for the cheesecake bars. Just make sure it’s something that will hold up well and offer a bit of crunch.
Pro Tip:
If you want your cherry topping to have extra shine, you can gently heat the cherry pie filling with a little cornstarch and water to thicken it into a glaze. This will give the cherries a glossy, irresistible finish!
Serving Suggestions and Final Thoughts on Black Forest Cheesecake Delight Bars
Now that you’ve mastered the art of making Black Forest Cheesecake Delight Bars, it’s time to think about how to serve them! These bars are not only delicious but also visually stunning, making them perfect for a variety of occasions. Whether you’re preparing for a special celebration or simply indulging in a sweet treat, here are some serving suggestions and final thoughts to help you present your masterpiece.
1. Serving Suggestions
- Garnish with Whipped Cream: For an extra touch of elegance, serve each slice with a dollop of freshly whipped cream on top. You can even add a sprinkle of chocolate shavings or a few extra cherry halves for that beautiful Black Forest look.
- Pair with a Hot Beverage: These bars are rich and indulgent, so pairing them with a hot beverage is a perfect way to balance the sweetness. Serve them with coffee, espresso, or a rich hot chocolate for an unforgettable dessert experience.
- Individual Servings: For more formal events like dinner parties or special gatherings, serve the cheesecake bars individually. You can present each slice on a small plate with a garnish of mint leaves or a drizzle of chocolate syrup for an upscale touch.
- Serve with a Side of Fruit: To cut through the richness, serve the bars with a side of fresh berries or a light fruit salad. The acidity of the fruit will balance the sweetness of the cheesecake and give a refreshing contrast.
2. Final Thoughts
Black Forest Cheesecake Delight Bars are the ultimate crowd-pleaser. With their rich, creamy filling, crunchy crust, and sweet cherry topping, they’re perfect for any occasion, from casual family gatherings to formal dinner parties. Whether you stick with the classic recipe or try one of the fun variations, these bars are sure to become a favorite in your dessert repertoire.
Pro Tip:
For an extra touch of elegance, you can drizzle a bit of chocolate ganache over the bars before serving. The glossy, rich chocolate adds a layer of sophistication and takes your dessert to the next level!
It seems that Part 7 already includes a solid conclusion and serving suggestions, rounding off the article. There’s nothing left to add beyond what has already been covered in the previous sections. However, for the final wrap-up, you could include a brief conclusion or a call-to-action if you’d like to encourage your readers to share or comment on their experience.
Final Thoughts and Call to Action
Black Forest Cheesecake Delight Bars are a deliciously indulgent treat that combines rich flavors with beautiful presentation. Whether you’re baking for a special occasion or just treating yourself, these bars will leave everyone coming back for more. With the flexibility to make adjustments for dietary preferences, like gluten-free or vegan variations, there’s a way for everyone to enjoy this decadent dessert.
We hope this detailed guide helps you create the perfect cheesecake bars every time! If you try making them, we’d love to hear your thoughts. Leave a comment below or share your creations on Instagram with the hashtag #BlackForestCheesecakeDelight for a chance to be featured on our page. Happy baking!