
Berry Cheesecake Bars
Who doesn’t love the combination of creamy cheesecake and juicy, fresh berries? If you’re looking for the perfect dessert to impress your guests or treat yourself, berry cheesecake bars might just be your new go-to. Not only are they ridiculously delicious, but they’re also incredibly easy to make. With a buttery graham cracker crust, a luscious cream cheese filling, and a vibrant berry topping, these bars strike the ideal balance between indulgence and refreshing fruitiness. Whether you’re in the mood for a classic or want to mix things up, berry cheesecake bars are versatile enough to suit any occasion, from summer picnics to cozy family gatherings. So, let’s dive into the sweet world of berry cheesecake bars and discover how to make them!
1. What Are Berry Cheesecake Bars?
Defining Berry Cheesecake Bars
Berry cheesecake bars are a delicious and more manageable twist on traditional cheesecake. Unlike a classic cheesecake, which requires a lot of effort and time, these bars are made in a baking pan and are easier to slice and serve. They feature a graham cracker crust, a rich and creamy cheesecake filling, and are topped with fresh or frozen berries of your choice. The result is a dense yet creamy treat with a burst of fruity freshness in every bite.
Berry cheesecake bars come in all flavors and variations, but the star ingredients are the same: tangy cream cheese, sweetened condensed milk, and, of course, the berries. While strawberries, blueberries, and raspberries are the most popular choices, you can mix and match depending on your preference.
Texture and Flavor Profile
The texture of these bars is what makes them so irresistible. You get the creamy richness of the cheesecake filling paired with the slightly tart and sweet punch of the berries. The graham cracker crust adds a crisp contrast to the smooth, silky filling, giving every bite a perfect balance. If you’re into fruity desserts that aren’t overly sweet, berry cheesecake bars are the way to go.
Berry cheesecake bars have become a favorite dessert for many due to their ability to satisfy that sweet tooth while offering the refreshing flavors of fresh fruit. Whether it’s a family dinner or a picnic with friends, they’re a versatile choice for any occasion.
2. Key Ingredients for Perfect Berry Cheesecake Bars
Essential Ingredients for the Crust
The foundation of any great cheesecake bar is its crust, and for berry cheesecake bars, it’s no different. The classic crust is made from crushed graham crackers, which add a delightful crunch and a hint of sweetness that perfectly complements the creamy filling. To bring it all together, you’ll need:
- Graham crackers – The star of the crust, providing that essential crunch and sweet flavor. You can use traditional graham crackers or opt for a cinnamon-flavored version for a twist.
- Butter – A must for binding the crushed crackers and creating a buttery, melt-in-your-mouth crust.
- Sugar – A bit of granulated sugar sweetens the crust without overpowering the natural flavors.
The Cheesecake Filling
The cheesecake filling is the heart and soul of these bars. It’s creamy, decadent, and packed with flavor. Here’s what you’ll need for that signature cheesecake texture:
- Cream cheese – This is the key to achieving the rich, smooth, and velvety texture that cheesecake is known for. Make sure it’s softened to room temperature for the smoothest consistency.
- Sour cream – Adding a little tanginess to the filling, sour cream enhances the richness and balances the sweetness of the berries.
- Sugar – You’ll need sugar to sweeten the filling, but it should be just enough to highlight the other flavors without making it too sugary.
- Vanilla extract – A splash of pure vanilla extract gives the cheesecake filling that classic, comforting flavor we all know and love.
- Eggs – The eggs help to bind the filling and give it a firm structure once baked (or set, in the case of no-bake recipes).
The Berries: A Burst of Freshness
The berries are the show-stoppers in these cheesecake bars. Whether you choose to use strawberries, blueberries, raspberries, or blackberries (or a combination of them), they add not only a pop of color but also a refreshing burst of flavor. You can use:
- Fresh berries – Ideal for a vibrant, juicy topping, fresh berries burst with flavor and color.
- Frozen berries – If you’re making these bars during the off-season or prefer a more accessible option, frozen berries work just as well. Thaw them first to release excess moisture.
3. How to Make Berry Cheesecake Bars
Now that we’ve gathered our ingredients, it’s time to dive into the process of making these delectable berry cheesecake bars. The recipe is simple and straightforward, but the results are nothing short of impressive. Let’s break it down step by step.
Step 1: Prepare the Crust
First, you’ll want to create that golden, buttery crust that provides the perfect base for your cheesecake filling. Here’s how:
- Crush the Graham Crackers: Take a pack of graham crackers and crush them into fine crumbs. You can use a food processor for a quick and even consistency, or simply place them in a ziplock bag and crush them with a rolling pin.
- Mix with Butter and Sugar: In a large bowl, combine the graham cracker crumbs with sugar and melted butter. Stir until everything is well-coated and forms a crumbly mixture.
- Press the Crust into the Pan: Transfer the mixture into a baking dish or a 9×13-inch pan, pressing it down firmly with the back of a spoon. This helps form an even, compact base. Once done, refrigerate the crust while you prepare the filling. This ensures it sets properly and gives a crisp texture when baked.
Step 2: Prepare the Cheesecake Filling
Next, we’ll work on the cheesecake filling. Here’s the trick to getting it creamy and perfectly set:
- Beat the Cream Cheese: Using a hand mixer or stand mixer, beat the softened cream cheese until smooth. It’s important to get rid of any lumps to achieve a silky texture.
- Add the Sour Cream and Sugar: Mix in the sour cream and sugar. This combination adds creaminess and a slight tang to balance the sweetness of the berries.
- Incorporate the Vanilla: Pour in the vanilla extract for that familiar comforting flavor.
- Add the Eggs: Beat in the eggs, one at a time, ensuring each is fully incorporated before adding the next. The eggs help to bind the filling and ensure it sets firm once baked.
- Pour the Filling into the Pan: Take the crust out of the fridge and pour the creamy cheesecake mixture over the prepared graham cracker crust. Smooth the top with a spatula for an even layer.
Step 3: Bake and Cool
Now that your cheesecake bars are almost assembled, it’s time to bake them:
- Bake the Bars: Preheat your oven to 325°F (160°C). Bake the cheesecake bars for 40-45 minutes, or until the edges are set, and the center is slightly jiggly but firm to the touch.
- Cool and Chill: Once done, remove the bars from the oven and allow them to cool in the pan for about an hour. Then, refrigerate them for at least 4 hours or overnight. This chilling process helps the cheesecake bars set properly and makes them easier to slice.
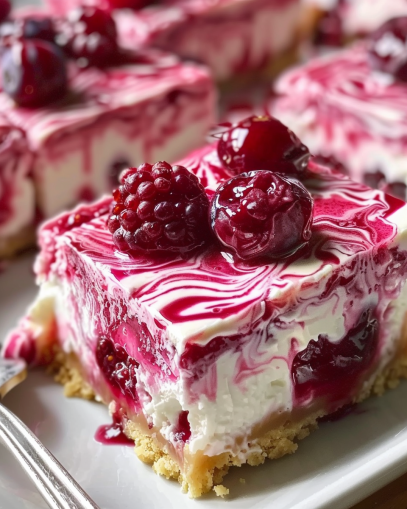
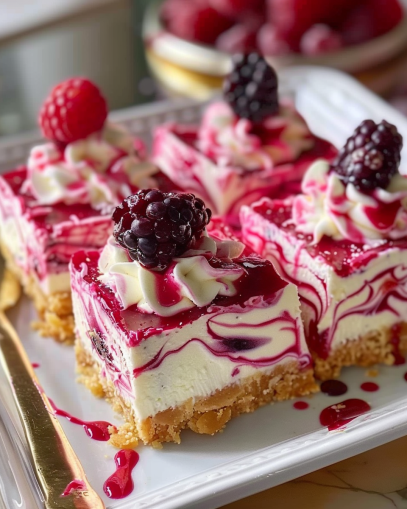
4. Topping Your Berry Cheesecake Bars
Now that your berry cheesecake bars have chilled and set to perfection, it’s time to take them to the next level with some beautiful and delicious toppings. While the cheesecake itself is rich and creamy, the right toppings can add texture, color, and a burst of freshness. Here are a few ways to enhance the flavor and appearance of your bars:
Fresh Berries for the Perfect Finish
The classic choice for topping your cheesecake bars is, of course, fresh berries. A mix of strawberries, blueberries, raspberries, and blackberries will create a vibrant, colorful look and offer a variety of flavors. Here’s how to do it:
- Wash and Dry: Rinse your berries gently under cold water and pat them dry with paper towels. Excess water can make the topping soggy, so be sure to dry them well.
- Layer the Berries: Arrange the berries in a decorative pattern on top of your cheesecake bars. You can choose to group them by type or scatter them randomly for a more natural, rustic look. A symmetrical arrangement, like a concentric circle of strawberries surrounded by blueberries, adds a beautiful touch.
- Add a Touch of Sweetness: If you want to give the berries a little extra sweetness, drizzle a small amount of honey or maple syrup over them before placing them on top. Alternatively, a light dusting of powdered sugar can add a touch of elegance and sweetness without overpowering the berries.
Berry Compote or Sauce
If fresh berries alone aren’t enough, you can make a quick and easy berry compote or sauce to drizzle on top of your cheesecake bars. It’s super simple to make:
- Cook the Berries: In a saucepan, combine your favorite berries with a bit of sugar and lemon juice. Heat over medium heat, stirring occasionally, until the berries break down and the mixture thickens to a syrupy consistency. You can also add a splash of vanilla extract for added flavor.
- Cool and Drizzle: Let the berry compote cool slightly, then drizzle it over the top of your cheesecake bars before serving. This gives a glossy finish and a tangy-sweet contrast to the rich cheesecake filling.
Other Creative Toppings
While berries are the go-to option, there are several other ideas to customize your berry cheesecake bars:
- Crushed Graham Cracker Crumbs: For added texture, sprinkle some crushed graham crackers on top before serving. It adds a crunchy element that pairs beautifully with the creamy filling.
- Whipped Cream: A dollop of homemade whipped cream on top of each slice adds an extra creamy layer. You can also mix in a bit of vanilla extract or powdered sugar for extra flavor.
- Chocolate Shavings: For a decadent twist, sprinkle some chocolate shavings or a drizzle of melted chocolate on top of the cheesecake bars.
Serve and Enjoy!
Once you’ve added your chosen toppings, it’s time to serve these stunning berry cheesecake bars. Whether you’re making them for a casual family dinner, a special event, or just a treat for yourself, these bars are sure to impress.
5. Serving Tips and Storage Advice for Your Berry Cheesecake Bars
Now that you’ve topped your berry cheesecake bars with fresh, vibrant toppings, it’s time to think about how to serve them and store any leftovers. Whether you’re serving these bars at a family gathering, a dinner party, or as an everyday treat, here are some tips to make sure they stay fresh and delicious.
Serving Tips
When it comes to serving berry cheesecake bars, presentation and timing can make all the difference. Here are some expert tips to enhance the experience:
- Chill Before Serving: If you’ve made your bars in advance, be sure to chill them in the refrigerator for a few hours or overnight before serving. This helps the layers set even more, making it easier to cut and serve neat, clean slices. The cold temperature also makes the flavors come together perfectly.
- Cutting Clean Slices: To ensure your cheesecake bars cut cleanly, use a sharp knife and make sure to wipe it off between cuts. If you want to make your slices extra pretty, consider using a ruler or a pre-measured guide to cut each piece to the same size.
- Serve on a Decorative Platter: To make your bars look even more inviting, serve them on a pretty platter or cake stand. This adds a touch of elegance to your presentation and makes your dessert look professional. A garnish of mint leaves or a few extra fresh berries around the edges can also elevate the appearance.
- Pair with a Beverage: Pair these bars with a refreshing drink to complement the dessert. A glass of iced tea, lemonade, or even a crisp white wine like Sauvignon Blanc can enhance the experience. For a more indulgent pairing, consider serving them with a cup of rich coffee or latte.
Storage Advice
If you find yourself with leftovers (though unlikely!), you’ll want to store your berry cheesecake bars properly to keep them fresh and delicious:
- Refrigerate: Since this is a no-bake recipe, it’s important to keep your cheesecake bars chilled. Store them in an airtight container in the refrigerator for up to 3-4 days. Be sure to place a piece of wax paper or parchment paper between layers to prevent them from sticking.
- Freezing for Long-Term Storage: If you want to store your bars for a longer period, you can freeze them. Simply cut them into slices, wrap each slice tightly in plastic wrap, and place them in a freezer-safe bag or container. They can be stored in the freezer for up to 2 months. To thaw, just let them sit in the fridge for a few hours before serving.
- Avoid Freezing with Toppings: If you’ve topped your bars with fresh berries or whipped cream, it’s best to add those just before serving, as freezing can cause the toppings to become soggy or wilted. If you prefer, freeze the plain bars and top them with fresh ingredients after thawing.
With these serving and storage tips, your berry cheesecake bars will stay fresh and tasty, whether you’re enjoying them right away or saving them for later.
6. FAQs About Berry Cheesecake Bars
As with any beloved dessert, there are always questions that arise. Below, we’ve compiled some of the most frequently asked questions about berry cheesecake bars to help you troubleshoot, adapt, and perfect your recipe. Whether you’re new to this dessert or a seasoned baker, these tips are sure to come in handy.
1. Can I use frozen berries for these cheesecake bars?
Yes, you can absolutely use frozen berries in your berry cheesecake bars! In fact, frozen berries are often more affordable and available year-round. However, keep in mind that frozen berries may release more liquid when thawed, so you might want to drain them before adding them to your bars. If the berries are particularly juicy, you can even toss them in a little cornstarch to help thicken the liquid.
2. How do I make the cheesecake filling firmer?
If your cheesecake filling is too soft or runny, here are a few tips to help it set better:
- Add more cream cheese: If you’re looking for a firmer filling, try increasing the amount of cream cheese. Just make sure to keep the proportions balanced so you don’t affect the texture.
- Use gelatin: A small amount of unflavored gelatin can help stabilize the filling. Dissolve it in warm water before adding it to your mixture.
- Chill longer: If you haven’t already, make sure to refrigerate the bars for at least 4 hours (overnight is even better). The longer they sit, the firmer the filling will be.
3. Can I use a different crust for these cheesecake bars?
Of course! While a traditional graham cracker crust is the most common, you can easily swap it out for other options:
- Oreo crust: For a chocolate twist, use crushed Oreos instead of graham crackers.
- Nuts or coconut: Mix in some finely crushed almonds or shredded coconut for a crunchy, nutty flavor.
- Shortbread or biscotti: If you want a buttery, crisp texture, a shortbread or biscotti crust could be a perfect alternative.
4. How do I prevent the cheesecake bars from cracking?
Cracking can happen if the cheesecake mixture is overmixed or if it’s not set properly. To avoid cracks:
- Mix gently: Be sure to mix the filling just until combined. Overmixing can incorporate air, which leads to cracks.
- Don’t overbake (if baking): If you decide to bake your cheesecake bars, keep a close eye on the baking time. Overbaking can cause the cheesecake to dry out and crack.
- Use room temperature ingredients: Make sure your cream cheese, sour cream, and other ingredients are at room temperature before mixing. Cold ingredients can cause the filling to curdle and crack when baked or chilled.
5. Can I make these bars ahead of time?
Absolutely! In fact, making berry cheesecake bars ahead of time is one of the best parts of this dessert. They need to be chilled for a few hours (or overnight) to set properly, which gives you plenty of time to prepare them before serving. In fact, the flavors often meld even more after sitting overnight in the fridge. Just be sure to store them in an airtight container to keep them fresh.
6. What other fruits can I use instead of berries?
If you’re not a fan of berries or just want to mix things up, there are plenty of other fruits that would work wonderfully in cheesecake bars:
- Sliced peaches or nectarines for a summery, sweet topping.
- Sliced strawberries for a classic, bright flavor.
- Mangoes or kiwis for a tropical twist.
- Bananas can be used for a creamy, sweet topping, though they may brown quickly. If you use them, be sure to add lemon juice to help preserve their color.
With these answers in hand, you’ll be able to create the perfect berry cheesecake bars every time. Whether you’re experimenting with different fruits or looking for ways to perfect your crust, the sky’s the limit when it comes to customization.
7. Conclusion: Why You’ll Love Berry Cheesecake Bars
When it comes to indulgent yet refreshing desserts, berry cheesecake bars are truly a winner. Not only do they bring the perfect balance of tangy cheesecake and sweet, juicy fruit, but they also offer the delightful crunch of a buttery crust. Whether you’re preparing them for a family gathering, a potluck, or simply to satisfy a sweet craving, they are sure to be a hit.
What makes these bars so special is their versatility. You can tailor the recipe to suit your preferences or dietary needs by adjusting the crust, choosing different berries, or even experimenting with flavorings. Plus, their no-bake nature makes them super easy to prepare and chill, leaving you with more time to enjoy the company of friends and family instead of slaving over a hot oven.
Berry cheesecake bars are not only delicious but also visually stunning. The vibrant colors of fresh strawberries, raspberries, or blueberries against the creamy cheesecake filling make them a showstopper on any dessert table. And as an added bonus, they’re incredibly easy to slice, which makes serving and portioning a breeze.
Whether you’re a novice baker or an experienced pastry chef, this recipe is foolproof. The layers are simple to put together, and with the helpful tips and tricks we’ve shared, you’ll be able to perfect your cheesecake bars every time. So go ahead, gather your ingredients, and treat yourself to this delectable dessert. You won’t regret it!
And remember, feel free to get creative with the fruit, crust, and other components. After all, berry cheesecake bars are all about indulging in a dessert that brings joy, flavor, and a little touch of sweetness to your life!