
Part 1: Introduction to Pavlova
Pavlova is a delicious, light, and crispy dessert that’s perfect for any occasion. Made with a meringue base and topped with fresh fruit and whipped cream, this perfect pavlova recipe will impress your guests and satisfy your sweet tooth. Whether you’re a seasoned baker or trying this dessert for the first time, this guide will show you how to make the ideal pavlova with ease.
But what exactly is it? How do you make the perfect pavlova? And what are the best variations of this classic dessert? Well, you’re in for a treat! Let’s dive deep into everything you need to know about pavlova, from its origins to step-by-step instructions on creating this show-stopping dessert.

Perfect Pavlova Recipe: A Light & Crispy Delight with Fruit Toppings
Ingredients
Instructions
Notes
- Author: laura
1.1 What is Pavlova?
At its heart, pavlova is a meringue-based dessert with a crisp crust on the outside and a soft, marshmallowy center. The beauty of this dessert lies in the combination of textures: the crackling exterior, the gooey inside, and the rich, whipped cream and fresh fruits that crown it.
The basic ingredients? Egg whites, sugar, vanilla extract, and a touch of cornstarch to give it that perfect crunch. Typically, pavlova is topped with fresh fruit like berries, kiwis, or passion fruit, making it as much of a visual delight as a culinary one.
1.2 Brief History of Pavlova
Origin of the Name
Named after the renowned ballerina Anna Pavlova, the dessert is believed to have been created during one of her tours to Australasia in the 1920s. The dessert was said to reflect her graceful dancing style: light, airy, and beautiful. But of course, like many food origins, the exact birthplace of the pavlova is a topic of debate.
Creation Stories
Australia’s Claim: The most popular story comes from Australia, where chef Bert Sachse is said to have invented the pavlova in 1935 at Perth’s Esplanade Hotel. He was inspired by Anna Pavlova’s visit to the region in 1929. The combination of crisp and soft elements is said to mirror her delicate yet powerful performance.
New Zealand’s Claim: However, New Zealand also lays claim to this iconic dessert, with the first published recipe for pavlova appearing in a 1927 New Zealand cookbook titled Dainty Davis Dishes. This debate still rages on today, with both countries fiercely defending their culinary creation.
While the exact origin may still be up for debate, there’s no denying that pavlova has become a beloved dessert in both Australia and New Zealand—and it’s no wonder why. Its light, airy texture and tangy, fruity toppings are an irresistible combination.
 Part 2: Ingredients and Preparation
Making a perfect pavlova involves just a few simple ingredients, but it’s all about getting the details right. The beauty of pavlova lies in the meringue base, and that’s where you’ll find the magic. A mix of egg whites, sugar, and a few special additions ensures that every bite is a balance of crispness and softness. Ready to learn the secret to making this show-stopper? Let’s break it down.
2.1 Essential Ingredients
Meringue Base
-
Egg Whites: The key to the light, airy texture of pavlova. The egg whites need to be whipped to stiff peaks, which helps create that meringue base that’s both crispy and marshmallowy inside.
-
Granulated Sugar: Sugar is essential for stabilizing the egg whites and creating the glossy meringue. The right amount of sugar is crucial, so don’t rush this part! Gradually add sugar while beating to ensure the perfect texture.
-
Vanilla Extract: A touch of vanilla extract enhances the overall flavor, giving the pavlova a sweet, aromatic undertone.
-
Cream of Tartar: This ingredient helps stabilize the meringue. A tiny bit goes a long way, ensuring your pavlova holds its shape as it bakes.
-
Cornstarch: Cornstarch is added to the meringue to give it that perfect crisp texture, without becoming too brittle. It helps the pavlova retain its structure.
Toppings
-
Whipped Cream: Once your pavlova is baked and cooled, it’s time to add the finishing touches. A generous dollop of whipped cream creates the perfect creamy contrast to the crisp meringue base.
-
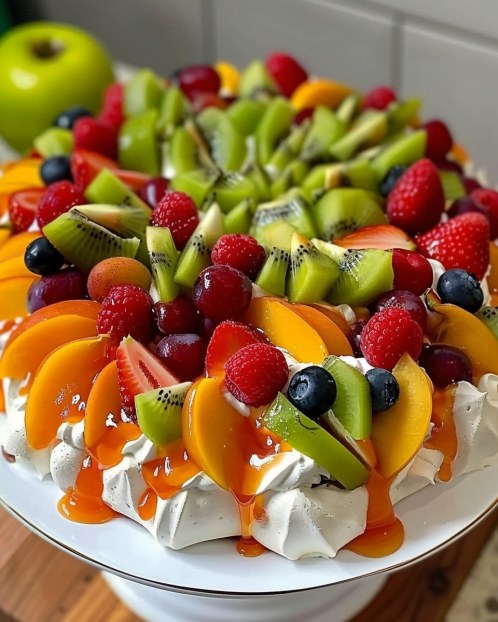
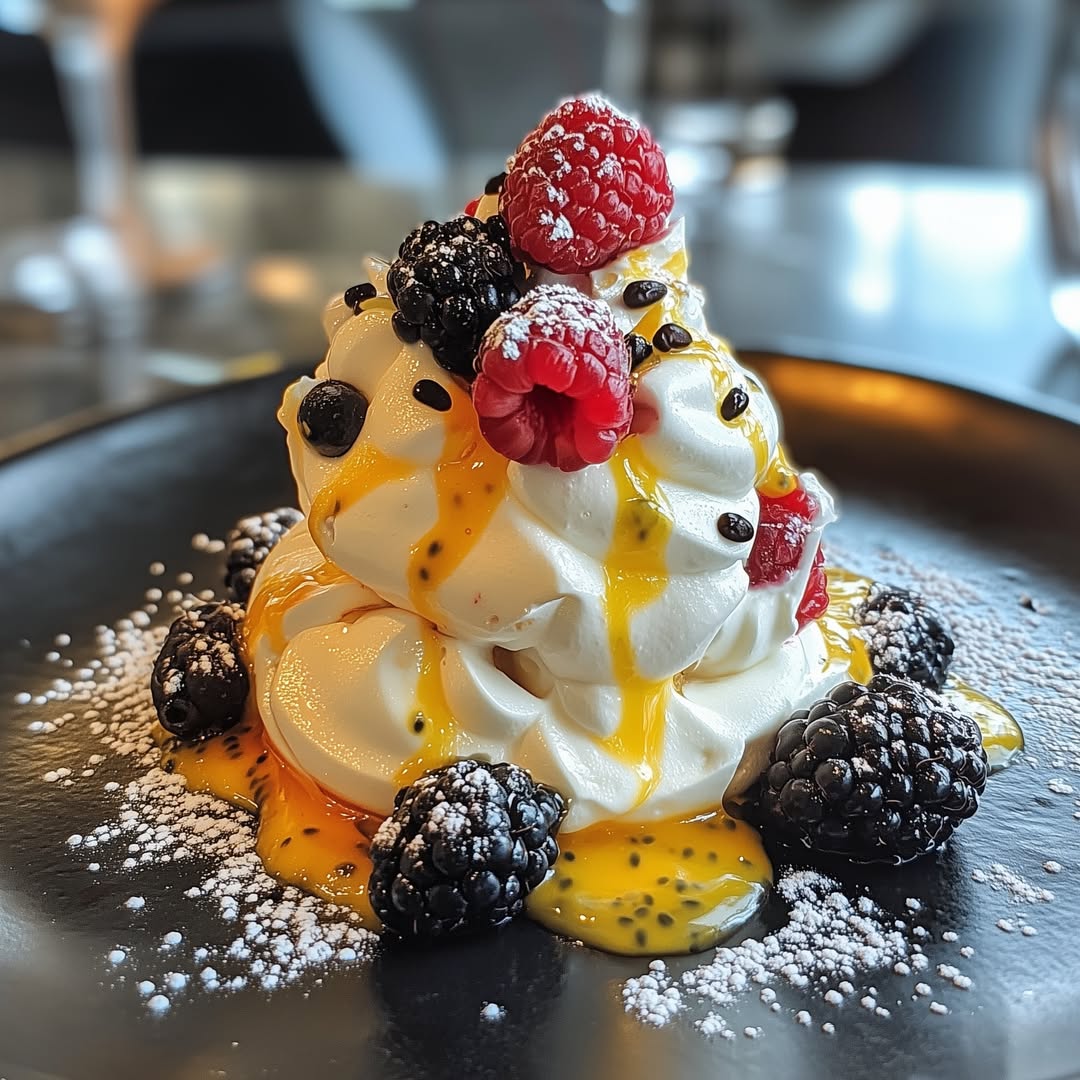
Fresh Fruits: The traditional toppings for pavlova are fresh fruits like berries, kiwi, and passionfruit. These fruits provide a tangy sweetness that balances the richness of the meringue and cream.
2.2 Step-by-Step Preparation
Now, let’s get down to making this dreamy dessert. The process might seem a bit tricky, but once you get the hang of it, pavlova is easier than you might think.
1. Preparing the Meringue
-
Whip the Egg Whites: Start by separating the egg whites from the yolks. Ensure your mixing bowl is clean and dry—any trace of oil or water can prevent the egg whites from whipping properly. Beat the egg whites on medium speed until they form soft peaks.
-
Gradually Add Sugar: Once the egg whites are foamy, start adding the sugar, one tablespoon at a time. Continue to beat the mixture until you have stiff, glossy peaks. This is where the magic happens—the sugar helps the egg whites form a stable meringue.
-
Add Vanilla, Cream of Tartar, and Cornstarch: Mix in a teaspoon of vanilla extract, a pinch of cream of tartar, and a tablespoon of cornstarch. These ingredients help stabilize the meringue, giving it the perfect texture.
2. Baking the Meringue
-
Shape the Meringue: Preheat your oven to a low temperature (around 250°F or 120°C). Line a baking sheet with parchment paper and spoon the meringue onto the sheet, forming a round or oval shape. Smooth the edges and make a slight dip in the center to create a “nest” for the whipped cream and fruits.
-
Bake Slowly: Place the meringue in the oven and bake for about 1.5 to 2 hours, depending on the size. The low temperature ensures the meringue dries out slowly, achieving the crunchy exterior and soft center. Turn off the oven and let the pavlova cool in the oven with the door slightly ajar to avoid cracking from sudden temperature changes.
3. Assembling the Pavlova
-
Cool the Meringue: Once baked, let the meringue cool completely before handling it. If you’re in a rush, place it in a cool spot (not the fridge). The cooling process helps the meringue firm up while retaining its marshmallow-like interior.
-
Spread the Whipped Cream: Once the meringue is cool, spread a layer of freshly whipped cream on top. This creamy layer adds a rich contrast to the lightness of the meringue.
-
Top with Fresh Fruits: Now comes the fun part! Arrange fresh fruits like berries, kiwi, and passionfruit on top of the whipped cream. The tartness of the fruits balances the sweetness of the meringue and cream, creating the perfect harmony of flavors.
Part 3: Variations of Pavlova
Pavlova is a versatile dessert, and while the classic version is always a hit, there are plenty of exciting variations to explore. Whether you want to make individual servings or add a twist with different flavors, pavlova can easily be customized to suit your preferences. In this section, we’ll look at some of the most popular variations of pavlova that will add new flair to your dessert game.
3.1 Mini Pavlovas
Why Go Mini?
Mini pavlovas are perfect for individual servings, making them an ideal choice for gatherings or when you want to serve dessert in a fun and personal way. These bite-sized meringues can be topped with the same creamy and fruity toppings as the classic pavlova, but they offer a unique twist in terms of presentation and serving.
How to Make Mini Pavlovas
Making mini pavlovas is almost the same as making a full-size one, but with a few simple changes. Instead of one large meringue, you’ll divide the meringue mixture into small, individual portions. Shape them into little nests on a parchment-lined baking sheet and bake them at the same temperature, but for a shorter period of time, about 1 hour. Let them cool, then fill with whipped cream and fresh fruit.
3.2 Pavlova Rolls
What is a Pavlova Roll?
The pavlova roll is a delightful twist on the classic pavlova. Imagine the crunchy, light meringue rolled up with whipped cream and fruit inside, much like a Swiss roll. It’s a stunning and delicious dessert that’s easy to serve in slices.
How to Make a Pavlova Roll
Making a pavlova roll requires a little more precision to ensure the meringue doesn’t crack when you roll it. After whipping up your meringue, spread it evenly over a baking sheet. Bake at a low temperature, just like in the traditional pavlova, but once it’s done, you’ll let the meringue cool for a few minutes before carefully rolling it up with whipped cream and your choice of fruits. Once rolled, let it cool fully before slicing.
3.3 Pavlova with Different Flavors
While the classic pavlova is delicious as is, it’s easy to mix up the flavors. You can tweak the meringue by adding different extracts or zest to create new flavor profiles that will surprise and delight your guests.
Citrus Pavlova
For a zesty twist, add lemon or lime zest to the meringue. The citrus flavors pair wonderfully with the sweet and airy texture of the pavlova, and you can top it with a mix of citrus fruits like orange slices, lemon, and grapefruit.
Chocolate Pavlova
Chocolate lovers can rejoice with a chocolate pavlova. Simply add cocoa powder to the meringue mixture for a deep chocolate flavor. Top it with whipped cream and fresh berries, or for a more decadent option, drizzle it with melted chocolate.
3.4 Pavlova with Exotic Fruits
Why not take your pavlova to the next level by adding exotic fruits? While berries, kiwis, and passionfruit are traditional choices, there’s a whole world of tropical fruits that can elevate your dessert game.
Tropical Pavlova
Think mango, papaya, pineapple, and dragon fruit. These fruits add vibrant colors and tropical sweetness to the pavlova. Pair them with whipped cream and a light drizzle of honey or coconut milk for a tropical escape.
3.5 Pavlova with Nutty Additions
For some extra crunch and flavor, try adding nuts to your pavlova. You can either incorporate them into the meringue or sprinkle them on top for added texture.
Nutty Pavlova
To make a nutty pavlova, fold chopped almonds, pistachios, or hazelnuts into the meringue before baking. You can also use roasted or candied nuts to garnish your pavlova after assembly for a delightful crunch.
3.6 Vegan Pavlova
Vegan pavlova is a fantastic option for those with dietary restrictions. The traditional egg whites are replaced with aquafaba—the liquid from a can of chickpeas—which whips up just like egg whites, giving you that same light, crispy texture.
How to Make Vegan Pavlova
To make vegan pavlova, start by whipping the aquafaba with sugar, cream of tartar, and vanilla. Once it forms stiff peaks, bake it as you would a regular pavlova. Top it with dairy-free whipped cream and fresh fruit, and you’ve got a pavlova that everyone can enjoy.
3.7 Pavlova Parfaits
For a more casual and fun take, try making pavlova parfaits. These are a great option for layered desserts that can be served in individual glasses.
How to Make Pavlova Parfaits
Start by crumbling the baked meringue into small pieces. Layer it with whipped cream and fresh fruit in clear glasses for a stunning dessert. Not only does this look beautiful, but it’s also super easy to assemble!
The beauty of pavlova is in its versatility—there’s a variation to suit every taste and occasion. Whether you’re in the mood for something tropical, nutty, or even vegan, pavlova can be tailored to fit your style.
In the next section, we’ll dive into the common mistakes to avoid when making pavlova, so you can achieve the perfect balance of crispy, airy goodness every time!
 Part 4: Common Mistakes to Avoid
While pavlova is a relatively simple dessert to make, there are some common pitfalls that can affect your final result. Even a small mistake can lead to a cracked or soggy pavlova, but don’t worry—knowing what to watch out for will help you perfect your technique. In this section, we’ll go over some of the most common mistakes and how to avoid them, so you can serve up a flawless pavlova every time.
4.1 Overbeating or Underbeating the Egg Whites
Why it’s a Problem
The egg whites are the foundation of your pavlova, and getting them just right is essential for the texture. If you overbeat the egg whites, they can become dry and grainy, making it difficult for the sugar to dissolve properly. On the other hand, underbeating them means they won’t hold their shape, and you’ll end up with a runny meringue that can collapse in the oven.
How to Avoid It
To achieve the perfect egg whites, start on a medium speed and increase to high once the mixture begins to foam. You’ll know they’re ready when the egg whites form stiff, glossy peaks that stand up on their own. If you’re unsure, you can test by lifting the whisk out of the mixture—if the peaks hold their shape without drooping, you’re good to go!
4.2 Adding Sugar Too Quickly
Why it’s a Problem
One common mistake when making pavlova is adding sugar too quickly to the egg whites. When sugar is added too fast, it doesn’t have enough time to dissolve fully into the egg whites. This can result in a grainy texture that affects the final meringue.
How to Avoid It
To ensure the sugar dissolves properly, add it gradually, about a tablespoon at a time, while continuing to beat the egg whites. This process helps to incorporate the sugar evenly into the mixture, creating a smooth and glossy meringue.
4.3 Incorrect Oven Temperature
Why it’s a Problem
Pavlova requires a slow bake at a low temperature. If the oven is too hot, the meringue will cook too quickly on the outside, causing it to crack and lose its delicate texture. A temperature that’s too low, on the other hand, can prevent the meringue from achieving that perfect crispy exterior.
How to Avoid It
Make sure your oven is preheated to a low temperature, around 250°F (120°C). Use an oven thermometer to check the actual temperature, as oven settings can sometimes be inaccurate. Baking at a consistent, low temperature ensures the meringue dries slowly and evenly, giving it the right texture.
4.4 Not Letting the Meringue Cool Properly
Why it’s a Problem
Cooling is a crucial step in making pavlova. If you don’t let the meringue cool slowly and evenly, it can crack or collapse. Sudden temperature changes can cause the delicate meringue structure to break down.
How to Avoid It
After baking, turn off the oven and allow the pavlova to cool with the door slightly ajar. This gradual cooling process helps prevent cracking. If you’re in a rush, don’t put the pavlova directly into the fridge—let it cool at room temperature first.
4.5 Using Wet or Oily Equipment
Why it’s a Problem
Meringue is incredibly sensitive to moisture and oil, which can prevent the egg whites from whipping properly. Even a tiny bit of water or grease in your mixing bowl or whisk can cause the egg whites to collapse and ruin your meringue.
How to Avoid It
Before you start, make sure your mixing bowl and whisk are completely clean and dry. Wipe down your equipment with a paper towel and a little vinegar to ensure it’s free of any oils or moisture. This will help your egg whites whip up perfectly.
4.6 Overloading with Toppings
Why it’s a Problem
It’s easy to get carried away with toppings, especially when you’re working with something as visually stunning as pavlova. However, too many toppings can overwhelm the delicate meringue, causing it to collapse or become soggy.
How to Avoid It
Keep your toppings simple and balanced. A light layer of whipped cream and a few pieces of fresh fruit is usually enough. You want the toppings to enhance the flavor, not take over the pavlova itself. Remember, the meringue is the star of the show!
4.7 Using the Wrong Fruits
Why it’s a Problem
Some fruits can release too much juice, making the pavlova soggy. For instance, watermelon or highly watery fruits might not be the best choice for topping your pavlova. Overly ripe or soft fruits can also break down and affect the texture.
How to Avoid It
Stick to fruits that are less juicy and firm, like kiwi, berries, passionfruit, and stone fruits (peaches, nectarines, plums). These fruits complement the pavlova without making it soggy. If you want to use juicy fruits, make sure to drain them before adding them as a topping.
Part 5: Tips and Tricks for the Perfect Pavlova
Making the perfect pavlova might take a little practice, but with the right techniques, you can master this beautiful dessert and wow your guests every time. In this section, we’ll share some useful tips and tricks that will ensure your pavlova turns out perfectly crispy on the outside and wonderfully soft on the inside, every single time.
5.1 Use Room Temperature Eggs
Why It’s Important
Eggs at room temperature will whip up better than cold eggs. The egg whites will form stiffer peaks, resulting in a more stable meringue. This is especially important for pavlova, where the texture of the meringue is key to its success.
How to Do It
Take your eggs out of the fridge about 30 minutes before you start making your pavlova. If you’re in a hurry, place the eggs in a bowl of warm water for a few minutes to bring them to room temperature more quickly.
5.2 Don’t Overmix the Meringue
Why It’s Important
When making pavlova, it’s tempting to keep beating the egg whites just to be sure they’re fully whipped, but this can actually work against you. Overmixing can cause the meringue to become too dry, leading to cracks when baked.
How to Do It
Once you see stiff peaks forming, stop beating the meringue. You don’t need to beat it any further. A smooth, glossy meringue is all you need for the perfect pavlova base.
5.3 Add Cornstarch for Extra Crispness
Why It’s Important
Cornstarch helps the meringue set up crisply on the outside while keeping it marshmallow-soft on the inside. This is one of the tricks used by professional bakers to ensure a pavlova with the perfect texture.
How to Do It
Add a teaspoon of cornstarch to your sugar mixture before you fold it into the egg whites. This will help stabilize the meringue and give your pavlova that signature crisp, light texture.
5.4 Bake at a Low Temperature
Why It’s Important
Pavlova needs to bake slowly at a low temperature to dry out properly without turning brown. This slow baking process helps prevent cracks and ensures a fluffy center.
How to Do It
Set your oven to around 250°F (120°C). If you don’t have an oven thermometer, it’s a good idea to get one, as many ovens don’t display the temperature accurately. Low and slow is the key to a successful pavlova!
5.5 Keep the Oven Door Closed
Why It’s Important
One of the most important things to remember when baking pavlova is to avoid opening the oven door during the baking process. Sudden temperature changes can cause the pavlova to crack or collapse.
How to Do It
Once the pavlova is in the oven, resist the urge to peek! The meringue needs to bake undisturbed to maintain its structure. If you’re worried, set a timer and walk away until it’s done. If you’re using a gas oven, be mindful of any drafts that may affect the temperature inside.
5.6 Let It Cool in the Oven
Why It’s Important
The cooling process is just as important as the baking process. If you remove the pavlova too quickly from the oven, it can collapse from the sudden change in temperature. Gradual cooling helps maintain that perfect texture.
How to Do It
Turn off the oven and crack the oven door slightly. Let the pavlova cool in the oven for at least 1 hour. This gradual cooling prevents cracking and helps the meringue set without becoming too soggy or losing its shape.
5.7 Use a Piping Bag for Neat Edges
Why It’s Important
If you’re making individual pavlovas or shaping the base of your pavlova, using a piping bag can help create clean, neat edges. This ensures a professional-looking finish and adds to the visual appeal of the dessert.
How to Do It
Simply place the meringue into a piping bag fitted with a large round tip. Pipe the meringue in a spiral shape on your baking sheet, or create little nests for individual pavlovas. This technique allows for uniformity and will give your pavlova a beautiful structure.
5.8 Make It Ahead of Time
Why It’s Important
One of the great things about pavlova is that you can make it ahead of time. Since it’s essentially a dried meringue shell, it stores well for a few days before being topped with fruit and cream.
How to Do It
Bake your pavlova a day or two in advance and store it in an airtight container at room temperature. Don’t add any toppings until you’re ready to serve, as fresh fruit can cause the meringue to soften. When you’re ready, simply top it with whipped cream and your favorite fruits for a fresh, show-stopping dessert.
5.9 Experiment with Flavors
Why It’s Important
Adding flavor to your meringue is an easy way to elevate your pavlova and make it uniquely your own. Whether you’re infusing it with vanilla, citrus zest, or cocoa powder, these small touches can make a big difference in the final taste.
How to Do It
Add your desired flavoring to the egg whites once they’ve reached soft peaks. For vanilla, add a teaspoon of extract, or try adding lemon zest for a citrusy twist. A tablespoon of cocoa powder can turn your pavlova into a chocolate lover’s dream.
5.10 Don’t Overload with Toppings
Why It’s Important
While toppings are the fun part of making pavlova, it’s important not to overwhelm the meringue with too many. The crispness of the meringue should shine through, and too many toppings can cause the pavlova to become soggy or lose its delicate texture.
How to Do It
Top your pavlova with a light hand. Whipped cream, fresh fruit, and a drizzle of syrup or honey are often all you need to create the perfect balance of flavors and textures. Keep it simple, and let the meringue take center stage.
By following these expert tips, you’ll be well on your way to making pavlova like a pro. Whether you’re making a traditional version or experimenting with new flavors and variations, these tips will help ensure your pavlova turns out perfect every time.
 Part 6: FAQs About Pavlova
When it comes to making pavlova, there are always some common questions that pop up. Whether you’re a first-time baker or someone who’s made this dessert before, it’s helpful to know the answers to some frequently asked questions. In this section, we’ll cover everything you need to know to troubleshoot any potential issues and make sure your pavlova is absolutely perfect.
6.1 Can You Make Pavlova Ahead of Time?
Yes, you can! In fact, pavlova can be made in advance and stored until you’re ready to serve. The meringue base can be baked the day before, as it stores well in an airtight container at room temperature for 1-2 days. Just remember not to add any toppings until right before serving to maintain its crisp texture.
6.2 Why Did My Pavlova Collapse?
A collapsed pavlova can be a disappointment, but there are a few reasons this can happen. One of the most common causes is removing the pavlova from the oven too early or opening the oven door too often during baking, which causes the temperature to fluctuate. Another possibility is that the egg whites weren’t whipped to stiff peaks, or the sugar wasn’t added gradually enough.
To avoid this, make sure you bake the pavlova at a low temperature, let it cool gradually in the oven, and ensure your egg whites are stiff before baking.
6.3 Can I Make Pavlova Without Cornstarch?
Yes, you can make pavlova without cornstarch, but it won’t be quite as stable. The cornstarch helps give the meringue structure and creates the perfect balance of crispy outer shell and soft center. If you don’t have cornstarch, you can omit it, but your pavlova may be more fragile.
6.4 How Do I Fix a Runny Meringue?
If your meringue is too runny, it’s likely that the egg whites were overbeaten or underbeaten, or that the sugar wasn’t added properly. To fix a runny meringue, start by re-whipping the egg whites until stiff peaks form. Be sure to add the sugar in small batches and continue beating until you see a glossy, stiff meringue.
6.5 Can I Freeze Pavlova?
While you can freeze pavlova, it’s not ideal. Freezing can affect the crisp texture of the meringue, which is one of the most important qualities of this dessert. If you must freeze it, make sure it’s stored in an airtight container, and be prepared for the texture to change once it’s thawed.
6.6 Why Did My Pavlova Crack?
Pavlova cracking is another common issue. It often occurs if the meringue was baked at too high a temperature or if the oven door was opened during baking. Cracks can also form if the pavlova cools too quickly after being removed from the oven. To prevent cracking, bake the pavlova at a low temperature, let it cool in the oven with the door ajar, and avoid any drafts.
6.7 Can I Use Other Fruits for the Topping?
Absolutely! While pavlova is traditionally topped with fresh berries, you can get creative with your toppings. Try tropical fruits like mango, kiwi, or passion fruit, or experiment with citrus fruits like oranges or lemons. Just make sure the fruit is fresh and juicy to complement the crispy, airy meringue.
6.8 Can I Make Pavlova Gluten-Free?
Yes, pavlova is naturally gluten-free! Since it’s made with egg whites, sugar, and cornstarch, there are no flour-based ingredients involved. It’s a great dessert for anyone following a gluten-free diet. Just be mindful of the toppings you use, as some store-bought whipped cream or fruit syrups may contain gluten.
6.9 Can I Make Mini Pavlovas Instead of One Large One?
Yes, you can! Mini pavlovas are a great alternative to the traditional large pavlova, especially if you’re serving them at a party or gathering. Simply pipe the meringue onto a baking sheet in individual nests or circles, and bake them in the same way. Mini pavlovas can be topped with whipped cream and fresh fruit for an elegant, bite-sized treat.
6.10 Why Is My Pavlova Soft on the Inside?
If your pavlova is soft on the inside, it may not have baked long enough or at a low enough temperature. To fix this, try baking it at a lower temperature for a longer period of time. If the outer crust is crisp, but the inside is still soft or marshmallow-like, it’s often a sign that the meringue needs more drying time in the oven.
By now, you should have a good understanding of how to troubleshoot any common issues with pavlova and ensure that your dessert turns out perfectly. The key to a perfect pavlova is patience, the right techniques, and a little practice. Whether you’re making it for a special occasion or just as a sweet treat for yourself, pavlova is sure to impress.
Part 7: Serving Suggestions and Creative Variations of Pavlova
Now that you know everything about making the perfect pavlova, it’s time to explore some fun ways to serve and tweak this classic dessert. Whether you’re looking for ways to spice up the presentation or experiment with new flavors, this section will give you all the inspiration you need to take your pavlova to the next level.
7.1 Serving Pavlova: Classic or Creative?
The traditional way to serve pavlova is simple: a large meringue base topped with whipped cream and a selection of fresh fruit. However, you can get creative with how you present your pavlova to suit different occasions.
-
Individual Servings: For a more personal touch, make mini pavlovas. These individual portions are perfect for parties or dinner gatherings where guests can enjoy their own pavlova topped with fresh fruit, cream, or even a drizzle of chocolate sauce.
-
Pavlova Cups: You can also serve pavlova in a bowl-like form. Use a spoon to shape the meringue into small, cup-like portions before baking, and fill them with whipped cream and fruit afterward. It’s a fun and unique presentation that adds a new twist to this dessert.
-
Elegant Platter: If you’re serving a large pavlova for a special event, place it on a beautiful platter and top it generously with fresh berries, citrus slices, or edible flowers for a stunning display.
7.2 Toppings: Go Beyond the Basics
While traditional pavlova toppings like strawberries and kiwi are delicious, don’t be afraid to experiment with other fruits and flavors to make your pavlova stand out. Here are some exciting alternatives:
-
Tropical Fruits: Mango, passion fruit, or pineapple will add a zesty twist to your pavlova. These fruits pair beautifully with the sweetness of the meringue and create a refreshing contrast.
-
Citrus: Adding slices of orange, lemon, or grapefruit can provide a tangy punch that complements the sweetness of the dessert. You can also use citrus zest for an extra burst of flavor.
-
Berry Compote: If fresh berries aren’t in season, try making a berry compote with raspberries, blueberries, or blackberries. Simmer the berries with a bit of sugar until they form a syrup, and drizzle it over the pavlova for added depth of flavor.
-
Chocolate Drizzle: For chocolate lovers, a drizzle of dark or white chocolate over the top of your pavlova is a simple yet indulgent option. You could even sprinkle some cocoa nibs or grated chocolate for a crunchy texture.
-
Caramelized Nuts: Add a bit of crunch with caramelized almonds, hazelnuts, or pistachios. These nuts add both texture and flavor to the dish, making it even more satisfying.
7.3 Pavlova Flavor Variations: Creative Spins
While traditional pavlova is made with a vanilla base, there are plenty of ways to get creative with the flavor of the meringue. Here are a few ideas to make your pavlova even more special:
-
Chocolate Pavlova: Add cocoa powder to your meringue to create a chocolate-flavored pavlova. This variation pairs wonderfully with whipped cream and berries, adding an extra layer of richness to the dessert.
-
Matcha Pavlova: For a trendy twist, add matcha powder to your meringue mix. This gives the pavlova a subtle green tea flavor and pairs well with fruits like strawberries and citrus.
-
Coconut Pavlova: Incorporate shredded coconut into the meringue for a tropical, coconut-flavored pavlova. The chewy coconut texture complements the crispy meringue perfectly and enhances the sweetness of your toppings.
-
Coffee Pavlova: Add instant coffee powder to the meringue for a deep, coffee-flavored twist. This pairs beautifully with whipped cream and a sprinkle of chocolate shavings for an irresistible dessert.
7.4 Pavlova as Part of a Dessert Table
Pavlova is an excellent addition to a dessert spread, especially at gatherings or special occasions. Here’s how you can incorporate it:
-
Dessert Buffet: Serve mini pavlovas alongside other small desserts, like chocolate mousse, fruit tarts, or éclairs, for a delightful dessert buffet. It allows your guests to sample different treats and makes for an impressive spread.
-
Seasonal Occasions: Pavlova is a great dessert for Christmas, Easter, or New Year’s Eve. You can decorate your pavlova according to the season – for example, red and green fruits for Christmas, or pastel-colored toppings for Easter.
-
Picnics: Mini pavlovas are perfect for picnics, as they’re easy to transport and serve. Make them in advance and pack them in a container, ready to be topped with fresh fruit when you arrive at your destination.
7.5 Pavlova-Inspired Desserts
If you love pavlova but want to try something a little different, here are some pavlova-inspired desserts you can make:
-
Pavlova Cake: This is a twist on the traditional pavlova, where layers of meringue are stacked with cream and fruit, similar to a layered cake. The meringue layers give it a crispy crunch while the whipped cream and fruit keep it light and fresh.
-
Pavlova Parfaits: Layer crumbled meringue, whipped cream, and fruit in individual serving glasses for a fun and easy-to-serve pavlova parfait. This dessert is just as delicious as the original but in a more casual, ready-to-eat format.
-
Pavlova Tart: Instead of the typical circular meringue, try making a pavlova tart. Use a tart shell for the base, fill it with whipped cream, and top with your favorite fruits for a beautiful twist on the classic.
7.6 Serving Pavlova with Drinks
Though pavlova is a sweet dessert, it pairs well with a variety of beverages. Since it’s light and fruity, you want to complement it with something that won’t overpower its delicate flavors. Here are a few drink pairing ideas:
-
Iced Tea: A refreshing iced tea, like chamomile or green tea, balances the sweetness of pavlova without being too heavy. Opt for a lightly sweetened version for the best results.
-
Sparkling Water: If you prefer something more neutral, sparkling water with a slice of lemon or lime can provide a crisp contrast to the pavlova’s richness.
-
Fruit Juices: Serve the pavlova with freshly squeezed juices, like orange, pomegranate, or cranberry juice, which add a refreshing, tangy contrast to the sweetness of the meringue.
7.7 Storing Leftover Pavlova
While pavlova is best enjoyed fresh, you can store any leftovers for a short time. Simply place the meringue in an airtight container and keep it in a cool, dry place. Avoid refrigerating the meringue, as it can cause it to become soft. If you have leftover whipped cream or toppings, store those separately in the fridge, and top the pavlova just before serving.
By now, you’re ready to get creative with your pavlova. Whether you stick to the classic or try one of the fun variations above, there’s no wrong way to enjoy this dessert. Pavlova is as versatile as it is delicious, so let your imagination run wild!
FAQs: Everything You Need to Know About Pavlova
You’ve learned about making, serving, and variations of pavlova, but we know you might still have some lingering questions. In this section, we’ll answer some of the most frequently asked questions about this delightful dessert. Whether you’re a beginner or an experienced baker, these answers will help ensure your pavlova turns out perfect every time.
8.1 What is the best type of fruit to top pavlova with?
The beauty of pavlova lies in its versatility when it comes to toppings. The best fruits to top your pavlova are those that provide a fresh contrast to the sweetness of the meringue. Some of the most popular choices include:
-
Berries: Strawberries, blueberries, raspberries, and blackberries are all classic toppings. Their tartness balances out the meringue’s sweetness beautifully.
-
Tropical Fruits: Mango, kiwi, pineapple, and passion fruit give pavlova a refreshing, exotic touch.
-
Citrus Fruits: Oranges, lemons, and grapefruits can add a zesty contrast to the dessert.
-
Stone Fruits: Peaches, nectarines, and cherries add a juicy sweetness that pairs wonderfully with the lightness of the meringue.
Mixing and matching fruits based on the season will keep your pavlova exciting and flavorful all year long!
8.2 How do I prevent my pavlova from cracking?
Cracking can happen when the meringue dries out too quickly or if the oven temperature is too high. To prevent this:
-
Bake at a low temperature: Keep the oven temperature around 250°F (120°C) for a slow, steady cook.
-
Don’t open the oven door: Opening the door during baking lets in air, which can cause cracks. Let the pavlova cool in the oven with the door slightly ajar.
-
Cool it slowly: Allow your pavlova to cool gradually, either in the oven or at room temperature. Sudden changes in temperature can lead to cracks.
A smooth and crack-free pavlova requires patience, but the effort is worth it for a perfect dessert.
8.3 Can pavlova be made in advance?
Yes, you can make pavlova in advance, and it actually benefits from being made a few hours or even a day before serving. To do so:
-
Store the meringue separately: Bake the meringue base a day ahead and store it in an airtight container at room temperature. It will stay crisp for up to 24 hours.
-
Top before serving: Add the whipped cream and fruits just before serving, as they can cause the meringue to soften if left on too long.
Making the meringue ahead of time lets you enjoy the pavlova without the stress of preparing everything last minute.
8.4 How do I know when my pavlova is done baking?
Pavlova should be golden and crisp on the outside but soft and marshmallow-like on the inside. Here are a few tips to check if it’s done:
-
Look for a firm exterior: The meringue should feel dry and firm to the touch. You should be able to easily lift it from the baking paper without it sticking.
-
Check for cracks: A slight crack or a slightly browned top indicates that your pavlova is fully cooked.
-
Test with a toothpick: Gently insert a toothpick into the base of the meringue. It should come out clean if it’s cooked through.
Remember, pavlova will continue to cook a little after it’s removed from the oven, so don’t overbake it.
8.5 Can I make pavlova without cornstarch?
Yes, it’s possible to make pavlova without cornstarch, though it may not be as stable. Cornstarch helps to give the meringue its marshmallow-like consistency and prevents it from collapsing. If you don’t have cornstarch, you can substitute with a small amount of arrowroot powder or cream of tartar to stabilize the meringue. Keep in mind that these alternatives might slightly alter the texture, but your pavlova will still turn out delicious!
8.6 Why is my pavlova chewy instead of crispy?
A chewy pavlova usually indicates that the meringue wasn’t baked long enough, or the oven temperature was too high. Here’s how to avoid it:
-
Bake at a low temperature: Always bake pavlova at a low temperature, around 250°F (120°C), to allow the meringue to dry out slowly.
-
Let it cool gradually: Let the pavlova cool slowly in the oven with the door slightly cracked, so it doesn’t collapse or become chewy.
If your pavlova is too chewy, try making it again with a longer baking time and lower heat to get that crisp, crunchy texture.
8.7 Can I use a stand mixer to make the meringue?
Absolutely! A stand mixer is the best tool for making the meringue for pavlova. The key to a successful meringue is beating the egg whites until stiff peaks form, and a stand mixer can do this much more efficiently than a handheld whisk.
-
Use the whisk attachment: The whisk attachment is perfect for creating fluffy, stiff peaks in the meringue.
-
Beat on medium speed: Start beating at medium speed until the egg whites form soft peaks, then gradually increase the speed to high to form stiff peaks.
A stand mixer makes the process faster and easier, especially if you’re making a large batch.
8.8 What’s the best cream for topping pavlova?
For a creamy topping, whipped cream is the classic choice, but you can elevate it with a few variations:
-
Sweetened whipped cream: Add a little powdered sugar and vanilla extract to your whipped cream for extra sweetness.
-
Mascarpone cream: For a richer, slightly tangy flavor, whip mascarpone cheese with cream, sugar, and vanilla.
-
Greek yogurt: For a healthier twist, use Greek yogurt mixed with a touch of honey. It adds a tangy flavor that pairs wonderfully with the sweetness of the meringue.
Choose the topping that best suits your taste and the f
ruit you’re using for a perfect pavlova experience.
Conclusion
By now, you’re ready to make a show-stopping pavlova that will impress friends and family. Whether you stick to the classic version or get creative with toppings and flavors, the possibilities are endless. Don’t forget to experiment and make the dessert your own!