
🖤 Part 1: Introduction & Ingredients
### # Black Velvet Cake – Overview
Imagine a cake so dark it looks almost black — not because of food coloring, but thanks to black cocoa powder. This isn’t your average chocolate cake, and it certainly isn’t red velvet either. Black velvet cake has carved its place in the baking world with its deep, rich flavor and striking appearance. It’s soft, not too sweet, and has a smooth crumb that simply melts in your mouth.
Unlike red velvet, there’s no flashy color added. Instead, it draws attention with its sophisticated look and intense chocolatey taste. And guess what? It’s surprisingly easy to make at home.

Black Velvet Cake Recipe – Rich, Dark & Moist Cake Without Food Coloring
Ingredients
Instructions
Notes
- Author: laura
Nutrition
- Calories: 320
### ## What is Black Velvet Cake?
Black velvet cake is the darker sibling of red velvet. It’s made with black cocoa powder, which gives it that dramatic look and a slightly Oreo-like flavor. The cocoa is Dutch-processed, meaning it’s less acidic and much smoother on the palate. You’ll get the moist, tender crumb you’d expect from any velvet cake — but with more depth.
Unlike many cakes that depend on butter, this one uses oil, giving it an ultra-moist texture that stays fresh longer. Add a splash of buttermilk and vinegar, and you’ve got a cake that’s beautifully balanced with just the right tang.
### ## Why Choose Black Velvet Cake?
Well, first of all — it’s a total showstopper. Whether you’re baking for Halloween, a goth-themed party, or just want something edgy and delicious, this cake fits the bill. Plus, you don’t need artificial food coloring to get that jet-black color if you’re using true black cocoa.
The taste is another level entirely. It’s not as sweet as typical chocolate cake, but it’s packed with a bold cocoa flavor that feels indulgent without being heavy. The velvety texture and dark look make it perfect for layering with contrasting fillings like vanilla buttercream or tart raspberry preserves.
Want a cake that feels a little mysterious, but is still simple to bake and stunning to look at? Black velvet’s your best bet.
### ## Key Ingredients (& Substitutions)
Here’s what you’ll need to whip up your own black velvet cake:
-
Black cocoa powder – the star of the show. Brands like King Arthur black cocoa powder are perfect. If you can’t find it, use Dutch-processed cocoa, but expect a lighter shade.
-
All-purpose flour – provides the structure
-
Sugar – for sweetness, of course
-
Buttermilk – adds tang and tenderness
-
Vinegar – helps with leavening and velvet texture
-
Eggs – bind everything together
-
Oil – keeps the cake moist
-
Hot coffee or water – intensifies the cocoa flavor
You can also sub gluten-free flour if needed or even try a dairy-free version using oat milk and apple cider vinegar.
🖤 Part 2: How to Make Black Velvet Cake – Step-by-Step Guide
### # Tools and Equipment You’ll Need
Before diving into the baking, let’s gather the essentials. You don’t need fancy gear — just solid basics to ensure your black velvet cake turns out perfect.
-
Mixing bowls – at least two, preferably one large and one medium
-
Measuring cups and spoons – accuracy is key
-
Electric mixer (hand or stand) – for smooth batter
-
Rubber spatula – for scraping every last bit of batter
-
9-inch cake pans – two or three, depending on how many layers you want
-
Cooling rack – to let your cake rest and breathe after baking
-
Offset spatula – optional but helpful for frosting
Now, let’s get baking.
### ## Step-by-Step Instructions
Step 1: Prep your pans and preheat
Grease your cake pans with butter or nonstick spray, then line them with parchment paper rounds. Preheat your oven to 350°F (175°C).
Step 2: Mix the dry ingredients
In a bowl, whisk together:
-
2 cups of all-purpose flour
-
¾ cup of black cocoa powder
-
1½ teaspoons baking soda
-
½ teaspoon salt
This blend sets the base for that deep, dark crumb.
Step 3: Whisk wet ingredients
In another bowl, combine:
-
1½ cups sugar
-
1 cup vegetable oil
-
2 large eggs
-
1 cup buttermilk
-
1 tablespoon white vinegar
-
1 teaspoon vanilla extract
Mix until smooth and glossy.
Step 4: Combine wet and dry
Add the dry ingredients to the wet in batches, mixing gently to avoid overworking the batter. Then stir in ¾ cup of hot water or coffee. This step unlocks the bold cocoa flavor and gives the batter a silky texture.
Step 5: Pour and bake
Divide the batter evenly between your prepared pans. Tap each one lightly on the counter to pop any air bubbles. Bake for 28–32 minutes, or until a toothpick inserted into the center comes out clean.
Step 6: Cool completely
Let the cakes rest in the pans for 10 minutes, then flip onto a cooling rack. Be patient — frosting a warm cake is a big no-no.
🖤 Part 3: Frosting, Fillings & Flavor Pairings
### # Best Frostings for Black Velvet Cake
Let’s talk toppings. While the black velvet cake base is bold and rich, the frosting can bring contrast, sweetness, or tang — and totally elevate the entire dessert.
Here are the top picks:
1. Cream Cheese Frosting (The Classic)
It’s tangy, smooth, and pairs beautifully with the deep cocoa flavor. The slight saltiness balances the sweetness — and the pale white hue pops against the black layers.
Ingredients:
-
8 oz cream cheese (room temp)
-
½ cup unsalted butter (room temp)
-
3½ cups powdered sugar
-
1 tsp vanilla extract
Cream the butter and cream cheese until fluffy. Add the sugar slowly, then mix in vanilla. Beat until silky.
🧁 Tip: Chill the frosting for 10 minutes if it feels too soft.
2. Vanilla Bean Buttercream (For a lighter flavor)
Want something milder and fluffier? Go with a vanilla bean buttercream. It softens the cake’s intensity and adds that nostalgic, buttery finish.
3. Mascarpone Whipped Cream (Light & Airy)
Perfect for warm weather or those who prefer less sugar. It’s mild, slightly tangy, and gives a creamy contrast to the bold cake.
🧊 For a dreamy texture, chill your mixing bowl before whipping the cream.
### # Filling Ideas to Elevate Flavor
Beyond just frosting, you can layer in some creative fillings for surprise flavor and texture:
-
Raspberry preserves – tartness + richness = win
-
Salted caramel sauce – adds warmth and contrast
-
Chocolate ganache – for an ultra-decadent touch
-
Fresh berries – adds brightness to every bite
Even a thin layer of crushed Oreos between layers adds crunch and echoes the Oreo-like taste from the black cocoa.
🎂 For inspiration, see how King Arthur Baking uses layered textures and frostings for visual and flavor contrast.
### # Flavor Pairings that Work Like Magic
-
Coffee – enhances the cake’s cocoa flavor
-
Berries – raspberries, strawberries, or even cherries
-
Vanilla or almond – to add a floral or nutty note
-
Orange zest – for a citrusy twist
Experiment with different combinations to match the mood — bold, cozy, elegant, or fun.
🖤 Part 4: Decorating and Presentation Tips
### # How to Decorate a Black Velvet Cake Like a Pro
Now that your cake is cooled, layered, and frosted — it’s time to dress it up! A black velvet cake already has an edgy, dramatic look, so a little styling goes a long way. Whether you’re keeping it minimal or going full-on glam, these ideas will make your cake unforgettable.
1. Smooth, Clean Finish
Use an offset spatula to smooth the sides and top. This classic bakery-style finish gives it a polished, professional look. Want it super sleek? Warm your spatula in hot water, wipe it dry, then glide it over the frosting.
🪞 A black cake with stark white or cream cheese frosting is naturally eye-catching — no extra frills needed.
2. Chocolate Drip Topper
For some wow-factor, add a glossy chocolate drip using dark ganache:
Quick Ganache Recipe:
-
½ cup heavy cream
-
½ cup dark chocolate chips
Heat cream just to a simmer, pour over chocolate, let sit for 2 minutes, then stir until smooth. Let it cool slightly before dripping.
Use a spoon or squeeze bottle to drip ganache down the sides for a dramatic look.
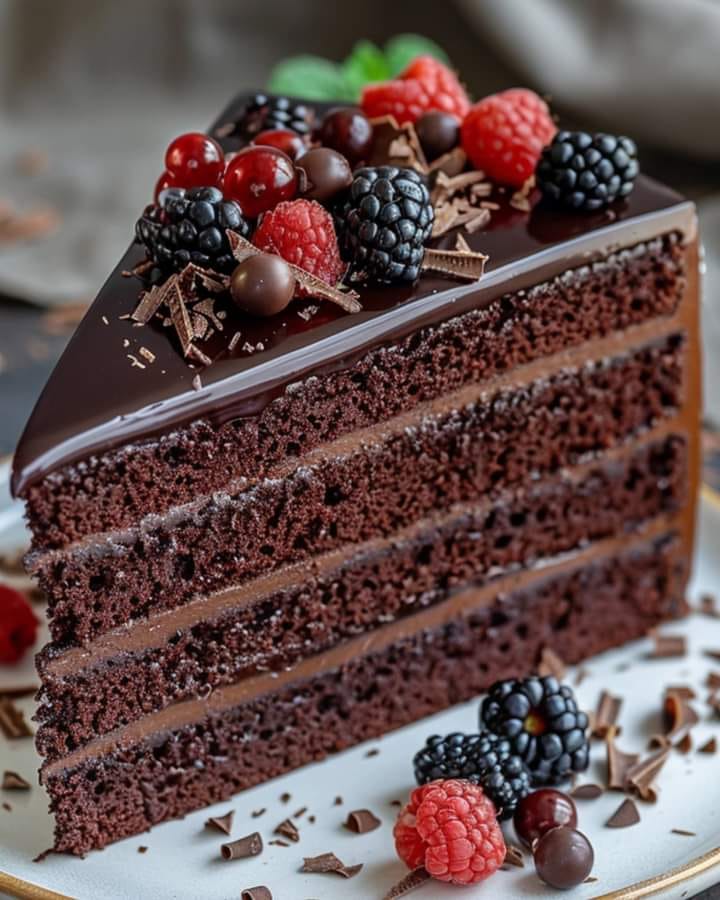
3. Fresh Berries or Edible Flowers
Want elegance? Try placing fresh raspberries or blueberries on top. Their color pops against the black and white. Edible flowers like violets or pansies add a botanical flair that’s stunning for events.
4. Crushed Oreo Dust or Chocolate Shavings
Sprinkle a ring of crushed Oreo cookies or black cocoa cake crumbs around the base or top. Or grate dark chocolate over the frosting for texture and that luxe bakery finish.
5. Themed Toppings for Special Occasions
-
Halloween? Add a spiderweb design or candy eyeballs
-
Birthday? Use bold candles and silver sprinkles
-
Wedding? Keep it minimal with white florals and gold leaf
🎨 For more pro-level visual tricks, check out Wilton’s cake decorating blog — they’ve got awesome ideas for clean lines and fancy flourishes (recommended anchor text: cake decorating ideas).
With your cake now picture-perfect, let’s turn to how to store, freeze, and enjoy leftovers in Part 5 — because trust me, there won’t be much left!
🖤 Part 5: Storage, Shelf Life & Freezing Tips
### # How to Store Black Velvet Cake Properly
Baked something amazing? Let’s make sure it stays amazing. Storing your black velvet cake the right way helps keep it moist, flavorful, and safe to enjoy for days.
Room Temperature (1–2 Days Max)
If your cake is unfrosted or just lightly frosted with a non-dairy topping, you can keep it at room temperature:
-
Wrap it tightly with plastic wrap
-
Keep it in an airtight container or cake dome
-
Store in a cool, dry spot (away from sunlight or heat)
🧁 Pro tip: Add a slice of bread inside the container — it helps prevent your cake from drying out.
Refrigerator (3–5 Days)
Have cream cheese frosting or fresh fillings like berries? Pop that beauty in the fridge:
-
Chill it uncovered for 15–20 minutes to firm up the frosting
-
Then wrap loosely with plastic wrap or place in a cake carrier
-
Let it sit at room temp for 20–30 mins before serving (cold cake dulls flavors!)
### # Can You Freeze Black Velvet Cake? Heck Yes.
Freezing black velvet cake is a game-changer. Whether you’re planning ahead or saving leftovers, here’s how:
Freezing Cake Layers (Unfrosted)
-
Cool completely
-
Wrap each layer tightly in plastic wrap, then foil
-
Freeze flat on a baking sheet, then stack
-
Good for up to 3 months
Freezing the Frosted Cake
-
Freeze uncovered for 1–2 hours until the frosting is firm
-
Then wrap with plastic wrap + foil
-
Thaw in the fridge overnight, then bring to room temp
🧊 According to Sally’s Baking Addiction (recommended anchor text: how to freeze cakes), double wrapping and slow thawing are the keys to preserving texture and flavor.
🖤 Part 6: Variations and Custom Twists
### # Flavorful Twists on Classic Black Velvet Cake
While the original black velvet cake recipe is bold and irresistible, there’s tons of room for creative spins. Whether you’re looking for something seasonal, dietary-friendly, or simply want to shake things up — we’ve got ideas to suit every sweet tooth.
1. Black Velvet Cupcakes
Perfect for parties, bake sales, or portion control. These minis bake faster, frost easily, and are super transportable.
Use the same batter, divide into a lined muffin tin, bake at 350°F for 18–20 minutes.
Top with a swirl of cream cheese frosting and maybe a drizzle of ganache? Chef’s kiss.
2. Vegan Black Velvet Cake
Yes, you can go egg-free and dairy-free without sacrificing texture. Here’s how:
-
Replace eggs with flax eggs or unsweetened applesauce
-
Use plant-based milk (like oat or almond)
-
Opt for vegan butter and vegan cream cheese
You’ll still get that rich, dark chocolate flavor — just with a cruelty-free twist!
3. Gluten-Free Version
Swap the all-purpose flour with a 1-to-1 gluten-free baking flour blend. Add ½ tsp of xanthan gum if your blend doesn’t include it.
🍰 Note: Some black cocoa brands may contain gluten traces, so always check the label.
4. Flavored Frostings
Shake up the frosting game:
-
Espresso buttercream – pairs beautifully with black cocoa
-
Peanut butter frosting – adds sweet-and-salty richness
-
Mint cream cheese – for a refreshing twist
5. Holiday-Inspired Variants
-
Halloween – Add orange frosting swirls or spooky toppers
-
Valentine’s Day – Red raspberry compote between layers
-
Christmas – Infuse the frosting with peppermint and sprinkle crushed candy canes
 🖤 Part 7: FAQs + Final Thoughts
### # Frequently Asked Questions About Black Velvet Cake
You’ve baked it, frosted it, and maybe even devoured a slice or two—but curious minds still want to know more about black velvet cake. Here are the answers to some of the most common questions people ask online.
1. Is Black Velvet Cake the Same as Red Velvet Cake?
Nope! Although they’re related, black velvet cake uses black cocoa powder instead of regular cocoa and red coloring. The result? A deeper chocolate flavor and a striking black hue that red velvet just can’t touch.
2. Why Is My Cake Dry or Dense?
Usually, it’s overmixing or overbaking. Mix just until combined and check doneness 5 minutes early. Adding a tablespoon of sour cream or oil to the batter can help lock in moisture, too.
3. Can I Make It Without Food Coloring?
Absolutely. The black cocoa itself gives a rich dark color. Food coloring just intensifies the effect. If you’re not into dyes, skip it — your cake will still look amazing and taste heavenly.
4. Can I Use Dutch-Processed Cocoa Instead of Black Cocoa?
You can, but you won’t get the same bold color or deep chocolate taste. Black cocoa is what gives this cake its signature dark look. Dutch cocoa is milder and redder in color.
5. Is Black Velvet Cake Good for Weddings or Events?
Heck yes! Its dramatic color, soft crumb, and elegant flavor profile make it perfect for any celebration. Dress it up with white florals, gold accents, or themed toppers to match the occasion.
### # Final Thoughts: Why You’ll Fall in Love with Black Velvet Cake
So, what’s the big deal about black velvet cake? Honestly—everything.
It’s visually striking, decadently rich, and surprisingly easy to bake at home. Plus, it’s customizable, freeze-friendly, and absolutely crowd-pleasing. Whether you’re serving it for Halloween, a birthday bash, or just a chill weekend treat — it’s guaranteed to be a showstopper.
🖤 Summary: A Cake Worth Baking Again and Again
If you’re looking for a cake that’s as elegant as it is indulgent, black velvet cake hits the mark. It’s rich, dark, tender, and perfect for any occasion — from moody Halloween parties to chic weddings.
With the help of black cocoa powder, buttermilk, and cream cheese frosting, every bite becomes a moment to remember. Whether you’re baking it as cupcakes, gluten-free, or layered for a show-stopper event, it’s a versatile masterpiece you’ll want on repeat.
Bookmark this recipe, try out the variations, and don’t forget to share it. After all, once you’ve had black velvet, you might just forget red velvet ever existed. 😉